Use OCI iSCSI Utility on Oracle Cloud Infrastructure
Introduction
In this tutorial, you learn how to enable and configure the OCI Utilities, and then run oci-iscsi-config to manage iSCSI block volumes on an Oracle Cloud Infrastructure instance.
Background
Before the OCI Utilities package was available, you had to use the iSCSI administration commands, through the cloud web console, to manually attach and detach the block devices to an instance.
With the oci-iscsi-config command and the oci-utils daemon, you can easily create and manage volume attachments from the instance command line and in the cloud.
When the oci-utils daemon runs, it automatically looks for iSCSI block volumes available in the cloud compartment and attached through the web console.
It also supports the creation and removal of devices in the cloud resources, as well as the attachment of those devices to and from the Linux instance.
Objectives
- Setup Oracle Cloud Infrastructure config file
- Explore
oci-iscsi-configcommand usage - Create block volumes
- Attach block volumes
- Detach block volumes on an instance
- Destroy block volumes on an instance
What Do You Need?
- A fully patched Oracle Linux system
Required Software
The required software packages have already been installed, and services enabled, in your lab environment to support and configure the OCI Utilities.
- The
oci-utilspackage provides scripts for querying, validating, and configuring instances running Oracle Linux. - The
python36-oci-sdkpackage is for use in Oracle Cloud Infrastructure. - The
python36-oci-clipackage provides the Python SDK for Oracle Cloud Infrastructure command line client utilities.
The OCI Utilities service (ocid.service) is already enabled on the provisioned instance.
Setup Oracle Cloud Infrastructure SDK config File
This lab provides a pre-generated SDK configuration which you copy to the lab server. Due to the configuration and constraints of the lab environment you must follow these instructions.
Outside of the lab environment, follow the instructions in the Additional Lab Instructions section at the end of the tutorial.
Connect to ol-server by following the instructions in Oracle Linux Lab Basics . The guide provides connection and usage instructions.
Create SDK default configuration directory.
mkdir -p ~/.ociComplete the following to create the SDK configuration file.
Open a new terminal from the desktop environment.
Note: Do not connect to the ol-server.
Copy all of the SDK configuration files to ol-server.
scp ~/.oci/* oracle@<ip_address_of_ol-server>:~/.oci/.Type
exitto close the terminal window.exitThe following example shows key values in a configuration file:
[DEFAULT]
user=ocid1.user.oc1..<unique_ID>
fingerprint=<your_fingerprint>
key_file=~/.oci/oci_api_key.pem
tenancy=ocid1.tenancy.oc1..<unique_ID>
tenancy=ocid1.tenancy.oc1..aaaaaaaa2o6nkgs3vkfp4qrs7fu5gdkkip427n3ar2ahnitoyupedeqt7yha
region=eu-frankfurt-1
compartment-id=ocid1.compartment.oc1..aaaaaaaap2aw5n4nagsontetw3xkpeg6fmiwblzibsyuriwo3d6n5m7jfeea
Switch to the terminal window connected to ol-server.
Update the location of the key_file in the SDK configuration file. When copying the SDK configuration file from the desktop environment, you must modify the user's home directory portion of the key_file.
sed -i 's/luna.user/oracle/g' ~/.oci/configIf you modify the file manually with your editor of choice, you can replace
/home/luna.userwith the shorthand syntax of~.
Explore oci-iscsi-config Command Usage
In this task, you explore the features of the oci-iscsi-config utility.
Run the command
oci-iscsi-configwithout any arguments.sudo oci-iscsi-configThe output reports no known information on any attached devices.
Run the
man oci-iscsi-configcommand to display a description of syntax and usage.man oci-iscsi-config- Familiarize yourself with the information provided
- Press
qto exit help
Run the command
oci-iscsi-config usageto display available arguments.sudo oci-iscsi-config usageAs noted in the command output, the utility provides both
positionalandoptionalarguments.- The positional arguments include:
create,attach,detach, anddestroy. - The optional arguments include
-h or --help, and the arguments associated with a specific positional argument
- The positional arguments include:
Run the command
oci-iscsi-config show.sudo oci-iscsi-config showWhen ISCSI devices are present, tabular output would show
Volume name,Attached devices, andSize.Run the
oci-iscsi-config showcommand again, adding the-hoption to display available argurments.sudo oci-iscsi-config show -hThe output displays the arguments available when using
show. You use these arguments during this tutorial.Run the command
oci-iscsi-config create -hto display its usage and a description of available arguments.
sudo oci-iscsi-config create -hExplore the available options.
- Run the
oci-iscsi-config createwithout any options and note the error message.
sudo oci-iscsi-config createThe message tells you that the Size option is required.
Create Block Volumes
In the exercise, you create block volumes using the oci-iscsi-config create command.
Open the web console and go to the details page of your instance. Keep the console open. Follow the instructions in Oracle Linux Lab Basics to access the web console.
Run
oci-iscsi-config createto create and attach a block volume to your instance.sudo oci-iscsi-config create -S 50 --volume-name=blkvm01 --attach-volumeThis takes a couple of minutes to complete. As it runs, the command displays notifications on its progress. When the command completes, a new block volume appears in the Oracle Cloud Infrastructure compartment and attched to your lab instance.
Create another block volume, but do not attach it to your instance.
sudo oci-iscsi-config create -S 50 --volume-name=blkvm02Run the command
oci-iscsi-config show --detailsto display information on the attached block volume.sudo oci-iscsi-config show --detailsThe table displays with truncated details about the attached volume (blkvm01).
Run the command
oci-iscsi-config show --detailsagain, adding the--no-truncateoption.sudo oci-iscsi-config show --details --no-truncateThe
--no-truncateoption prints the full IQN identifier and volume OCID of the attached volume.Run the
oci-iscsi-config show --detailscommand again adding the--output-mode=textargument.sudo oci-iscsi-config show --details --output-mode=textThe output displays detailed information on attached volumes in an easy to read format.
Run the
oci-iscsi-configcommand again with the-soption.sudo oci-iscsi-config -sThe
-soption displays details on both attached and available volumes.Go to the Resources section on instance details page and click Attached block volumes.
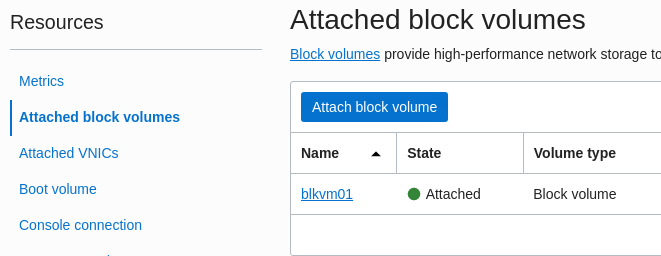
blkvm01 is the only block volume attached to your instance. You might need to refresh the screen.
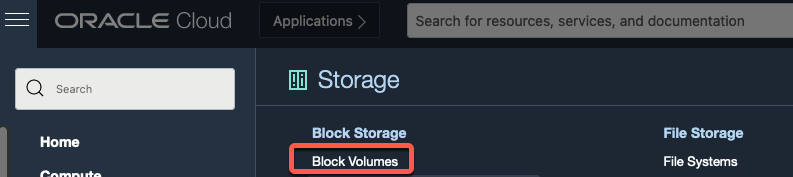
Go the Storage > Block Volumes in the web console to view the available block volumes in the compartment.
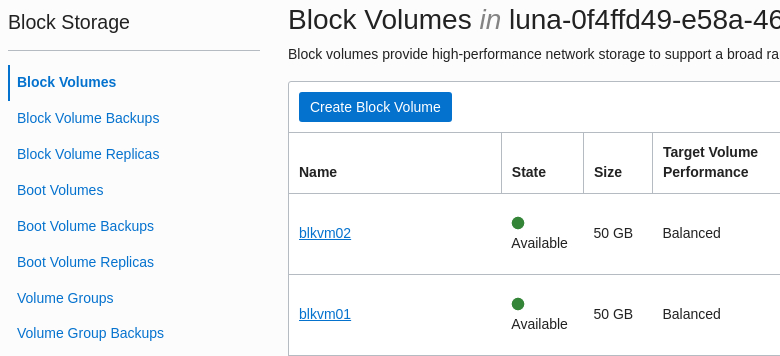
Both block volumes are available in the compartment.
Attach a Block Volume
In this task, attach the blkvm02 to your instance using the oci-iscsi-config command.
Run the command
oci-iscsi-config attach -hto view its usage.sudo oci-iscsi-config attach -hNote: You can attach a block volume using the device's IQN or OCID.
Run the command
oci-iscsi-config -sto view the IQN and OCID of blkvm02.sudo oci-iscsi-config -sNotice that blkvm02 does not show an IQN, but blkvm01 does.
Run
oci-iscsi-config attachcommand using the-Oargument with the volume's OCID.sudo oci-iscsi-config attach -O <OCID_of_BLKVM02>The volume successfully connects and becomes available for use. It is during the attachment that the instance performs iSCSI target discovery and login.
Run the following
oci-iscsi-configcommands and note the information each displays.sudo oci-iscsi-config -sThe
-soption displays information relevant to the OCID of the instance to which it is attached, the IQN of the target device, the compartment name, and the availability domain.sudo oci-iscsi-config showThe
showargument provides details on the block volume name, the attached device name, and size of attached volumes.sudo oci-iscsi-config show --details --output-mode=textThe
--details --output-mode=textarguments format and display the most commonly searched information about attached volumes at your fingertips.
Detach a Block Volume
In this task, you detach a block volume.
Run the command
oci-iscis-config detach -hto display available arguments.sudo oci-iscsi-config detach -hUse the
oci-iscsi-config show --details --output-mode=textcommand to show the full IQN of the block volumes.sudo oci-iscsi-config show --details --output-mode=textNote: in this scenario, the attached block volumes do not have any mounted file systems. You must unmount all file systems before you can detach block volumes.
Use the
oci-iscsi-config detachcommand to detach a volume from your instance.sudo oci-iscsi-config detach -I <IQN_of_Attached_Block_Volume>Rerun the
oci-iscsi-config show --details --output-mode=textand verify the volume is no longer attached.sudo oci-iscsi-config show --details --output-mode=textFrom the hamburger menu in the web console, go to Storage > Block Volumes and select it.
The block volume is still available in the compartment.
Destroy a Block Volume
To destroy a block volume, you must first detach it, and then run the oci-iscsi-config destroy command to remove it from the compartment.
Run the command
oci-iscsi-config -sto display details on volumes in your compartment.sudo oci-iscsi-config -sNote the volume's IQN and OCID.
Run the
oci-iscsi-config destroywithout any arguments.sudo oci-iscsi-config destroyNote: that the
-Oargument is the only valid option to use.Use the
oci-iscsi-config destroy -Ocommand adding its OCID to the argument. Enterywhen prompted.sudo oci-iscsi-config destroy -O <OCID_of_Block_Volume>Verify that the block volume has been removed from the compartment.
sudo oci-iscsi-config -sThere is only one remaining volume. The web console reports the same.
Additional Lab Instructions
Use the following instructions when following this tutorial outside of this lab environment.
They provide information on enabling oci-utils, including creating SSH keys and a SDK configuration file.
Alternatively, use the instructions provided within the SDK and CLI Configuration File and Required Keys and OCIDs sections of the OCI Documentation.
Use the
oci setup configcommand to create a CLIconfigfile. The command can also create the API key pair (public and private keys) if one does not exist. The keys allow for automatic authentication of SDK CLI calls to the API.The information you are prompted for can be found in the web console. The script prompts you for the User OCID, Tenancy OCID, and Region. To locate this information:
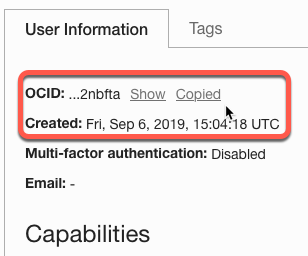
User OCID - Click Profile icon > User Settings, and then click the OCID Copy link in the User Informaton tab.
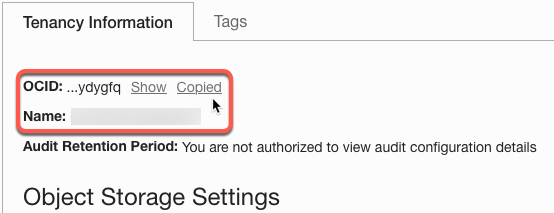
Tenancy OCID - Click Profile icon > Tenancy, and then click the OCID Copy link in the Tenancy Informaton tab.
Region - You can locate your region from the Browser URL.

Run the
oci setup configcommand to create theconfigfile.oci setup configThe following is a sample walkthrough of running the command to create a valid CLI config file:
Enter a location for your config [/home/oracle/.oci/config]:
Enter a user OCID: ocid1.user.oc1..aaaaaaaaiwoyjmqabtl7qln7jrniy5al2v5sliadg5grwvrfzk6mrditsqra
Enter a tenancy OCID: ocid1.tenancy.oc1..aaaaaaaakhyblglzku4lktefccllqsb37dshizfprljvw5imzq55zppsg2lq
Enter a region by index or name(e.g.
1: af-johannesburg-1, 2: ap-chiyoda-1, 3: ap-chuncheon-1, 4: ap-dcc-canberra-1, 5: ap-hyderabad-1,
6: ap-ibaraki-1, 7: ap-melbourne-1, 8: ap-mumbai-1, 9: ap-osaka-1, 10: ap-seoul-1,
11: ap-singapore-1, 12: ap-sydney-1, 13: ap-tokyo-1, 14: ca-montreal-1, 15: ca-toronto-1,
16: eu-amsterdam-1, 17: eu-frankfurt-1, 18: eu-marseille-1, 19: eu-milan-1, 20: eu-stockholm-1,
21: eu-zurich-1, 22: il-jerusalem-1, 23: me-abudhabi-1, 24: me-dcc-muscat-1, 25: me-dubai-1,
26: me-jeddah-1, 27: sa-santiago-1, 28: sa-saopaulo-1, 29: sa-vinhedo-1, 30: uk-cardiff-1,
31: uk-gov-cardiff-1, 32: uk-gov-london-1, 33: uk-london-1, 34: us-ashburn-1, 35: us-gov-ashburn-1,
36: us-gov-chicago-1, 37: us-gov-phoenix-1, 38: us-langley-1, 39: us-luke-1, 40: us-phoenix-1,
41: us-sanjose-1): eu-frankfurt-1
Do you want to generate a new API Signing RSA key pair? (If you decline you will be asked to supply the path to an existing key.) [Y/n]: Y
Enter a directory for your keys to be created [/home/oracle/.oci]:
Enter a name for your key [oci_api_key]:
Public key written to: /home/oracle/.oci/oci_api_key_public.pem
Enter a passphrase for your private key (empty for no passphrase):
Private key written to: /home/oracle/.oci/oci_api_key.pem
Fingerprint: 9f:00:c6:8b:43:fb:87:58:4b:82:9b:0f:98:31:4c:31
Config written to /home/oracle/.oci/config

    If you haven't already uploaded your API Signing public key through the console, follow the instructions on the page linked below in the section
    'How to upload the public key':

    https://docs.cloud.oracle.com/Content/API/Concepts/apisigningkey.htm#How2
Import the API public key to your Oracle Cloud Infrastructure account. From the web console:
Click Profile Icon > User Settings, and then click the API Keys resources link.
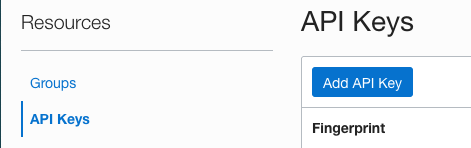
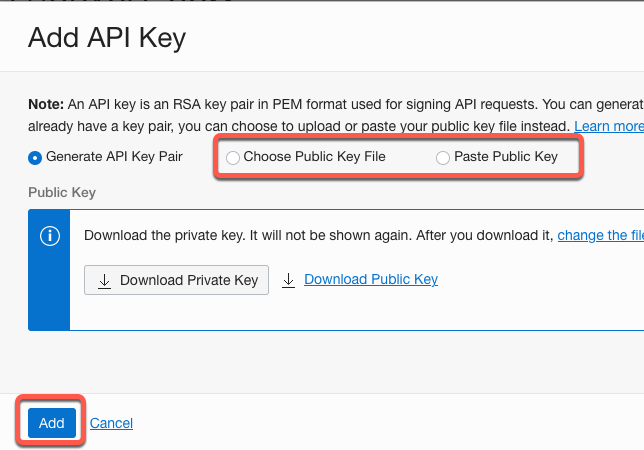
Click Add API Key.
Select either Choose Public Key File or Paste Public Key, and then click Add to upload the key.