Create Virtual Cloud Networks in Oracle Cloud Infrastructure
Introduction
A Virtual Cloud Network, or VCN, is a software defined virtualized network in the Oracle Cloud Infrastructure that allows instances to communicate as if operating on a traditional network.
This lab takes you step by step through the manual process of building a new VCN without using the wizard.
The VCN includes components such as public and private subnets, route tables, internet gateways, DNS support, security lists, and more.
When creating a compute instance it must be associated with a subnet, so a VCN is created to provide network services to instances. It must be configured with at least one subnet so instances have a networking resource to use when being launched.
Objectives
Upon completion of this Lab you will be able to:
- List the current VCNs associated with your compartment
- Launch the Virtual Cloud Network creation dialog in the web console
- Create a new VCN (without using wizard)
- Navigate and view the VCN details and its associated resources
- Create a subnet
- Add a CIDR block range of IP addresses
- Terminate a VCN
Prerequisites
- Oracle Cloud Infrastructure web console
The next section describes hands-on exercises you can perform in a lab environment to create a new Virtual Cloud Network.
Note: When using the free lab environment, see Oracle Linux Lab Basics for connection and other usage instructions.
To access the lab, click Launch lab next to the tutorial title.
Create a Virtual Cloud Network
To create a new Virtual Cloud Network, or VCN, it can be done manually or using a wizard. In this lab you will manually configure a new VCN.
Some components of your new Virtual Cloud Network will be created automatically, and will be listed as associated resources for your VCN when it is provisioned and available.
If a VCN is terminated, the associated resources will need to be removed or de-associated before it can be removed.
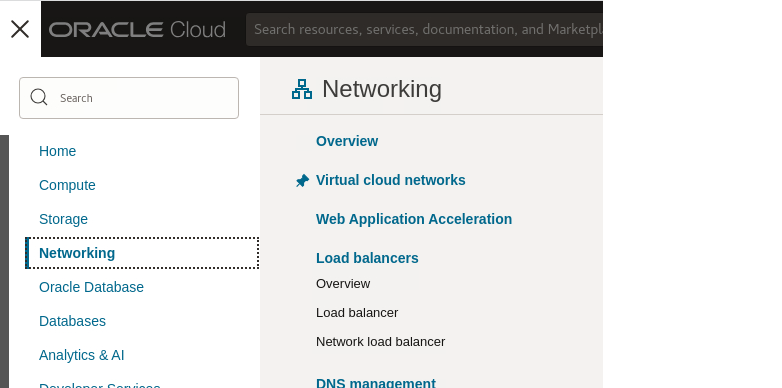
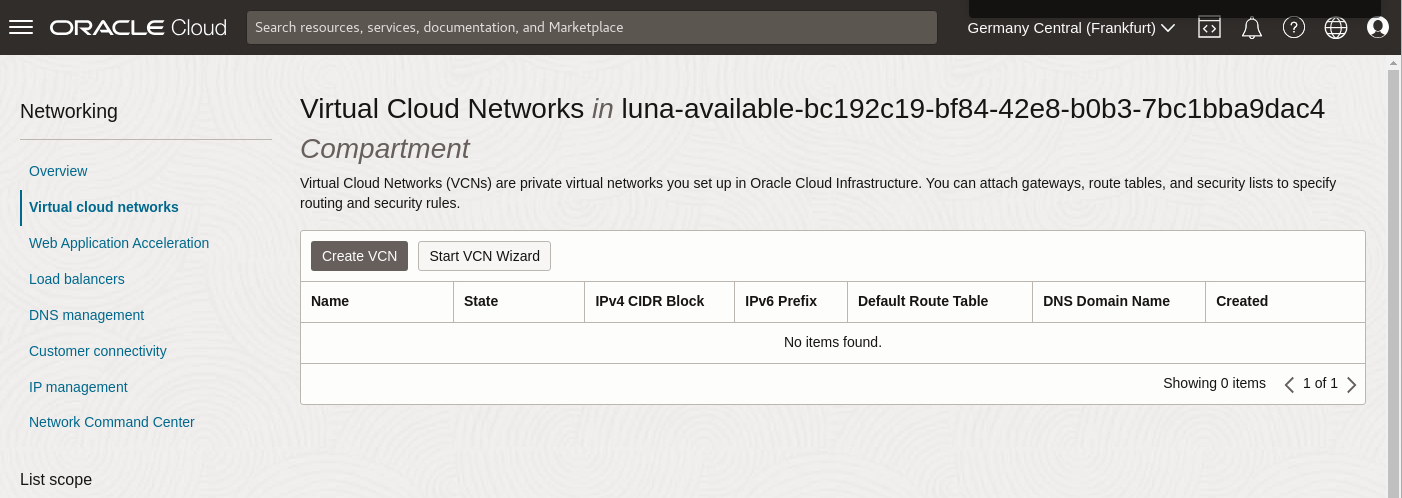
Click on the web console main menu, then Networking, and Virtual Cloud Networks to list the current Virtual Cloud Network information for your compartment
Note: You may see existing VCNs associated with the compartment for your lab. Do not modify any existing VCNs.
Click Create VCN.
You must provide certain information to create a VCN. Some parts of the dialog, if left blank, will be automatically populated by the system with default or preconfigured information.
Note: There is the option to create a VCN by clicking on the Start VCN Wizard button. In this lab we step through the non wizard method of manually building the VCN.
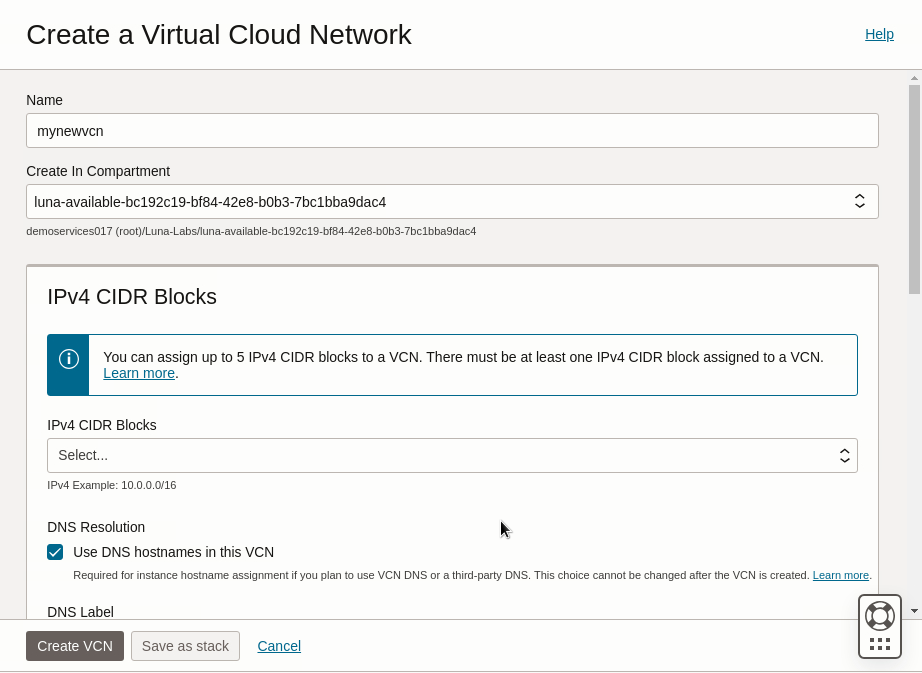
Give a VCN Name. You can use your own VCN name if you prefer.
Create in Compartment - Use the default compartment provided for this lab. It is filled in automatically.
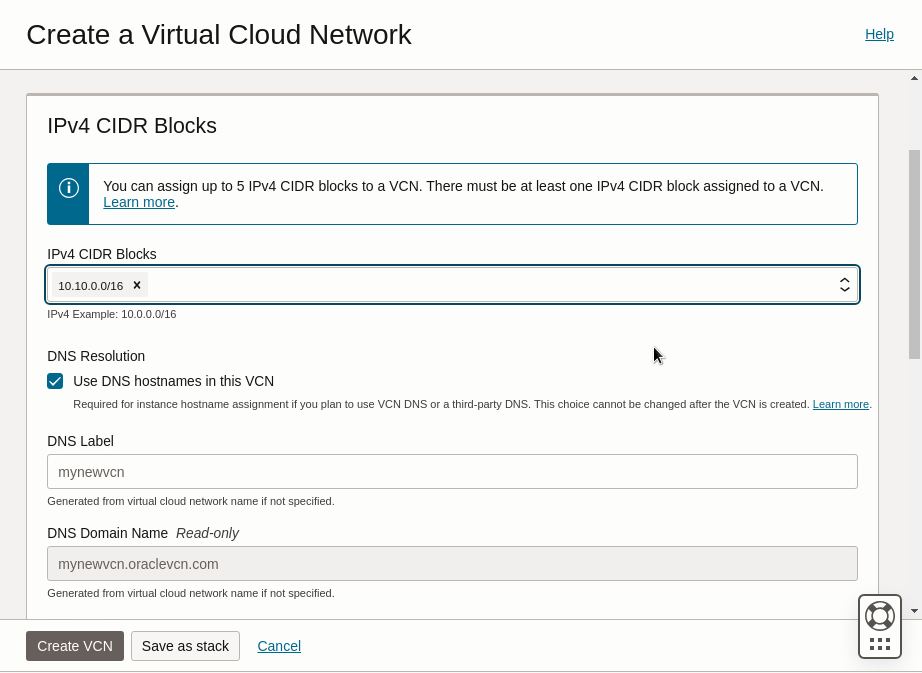
IPv4 CIDR Blocks - Choose an IPv4 CIDR block range. Use the 10.10.0.0/16 range for your VCN and press return to set the range in the field.
Note: You can set up to five ranges. Ranges are defined from /16 to /30, and the same ranges can be used in separate VCNs. The block ranges cannot overlap and there is a total maximum of 64000 private IPs that can be created and managed within the VCN. Later you select a range to be used for a private subnet you create. Subnet ranges will come from within the VCN range, so its important to plan the block ranges. More CIDR blocks can be added after the VCN is created.
Enabling Ipv6 Prefixes is not needed for this lab.
DNS Resolution - Keep the selected default to use DNS hostnames in this VCN. This will automatically use DNS to resolve host names on the VCN. Leave the DNS Label empty, it will be generated using the VCN name.
Note: You cannot change this setting after the VCN is created.
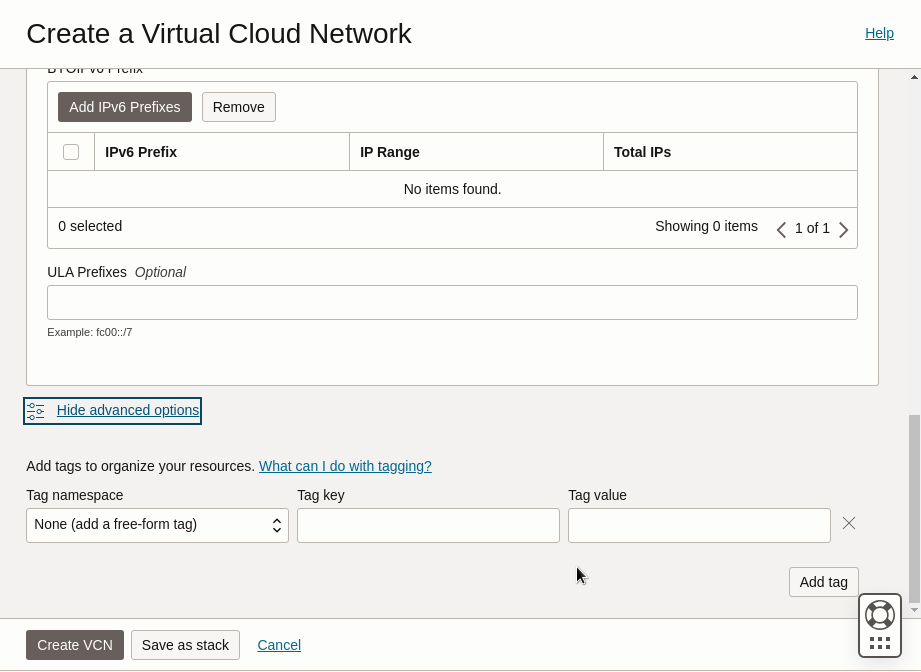
Show Advanced Options - Enables setting tags for the VCN. It is not needed in this lab.
Click Create VCN
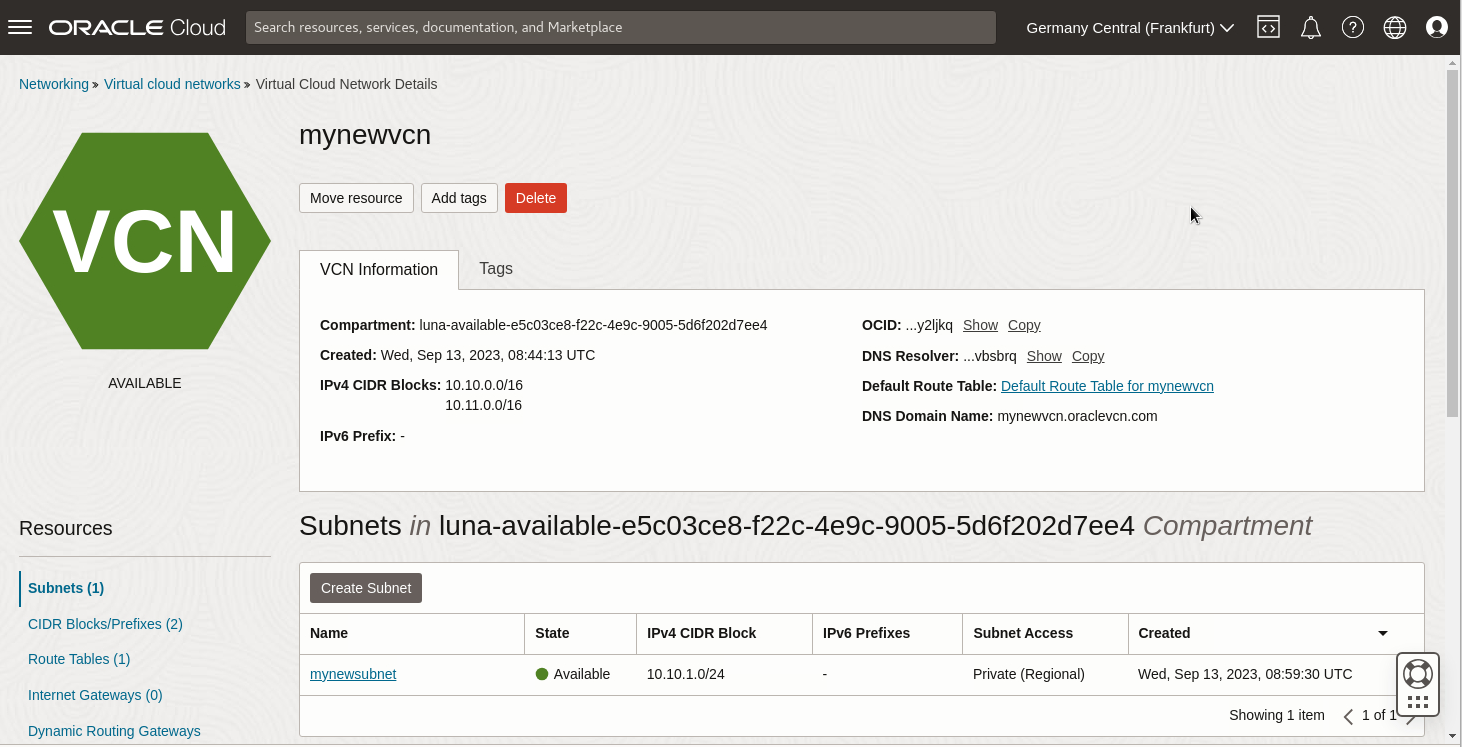
Examine the VCN Information
When the create VCN dialog closes you are directed to the Details page for the new VCN. Here we can see the compartment it belongs to, the CIDR block ranges assigned, its unique Oracle Cloud Identifier and the generated DNS domain name.
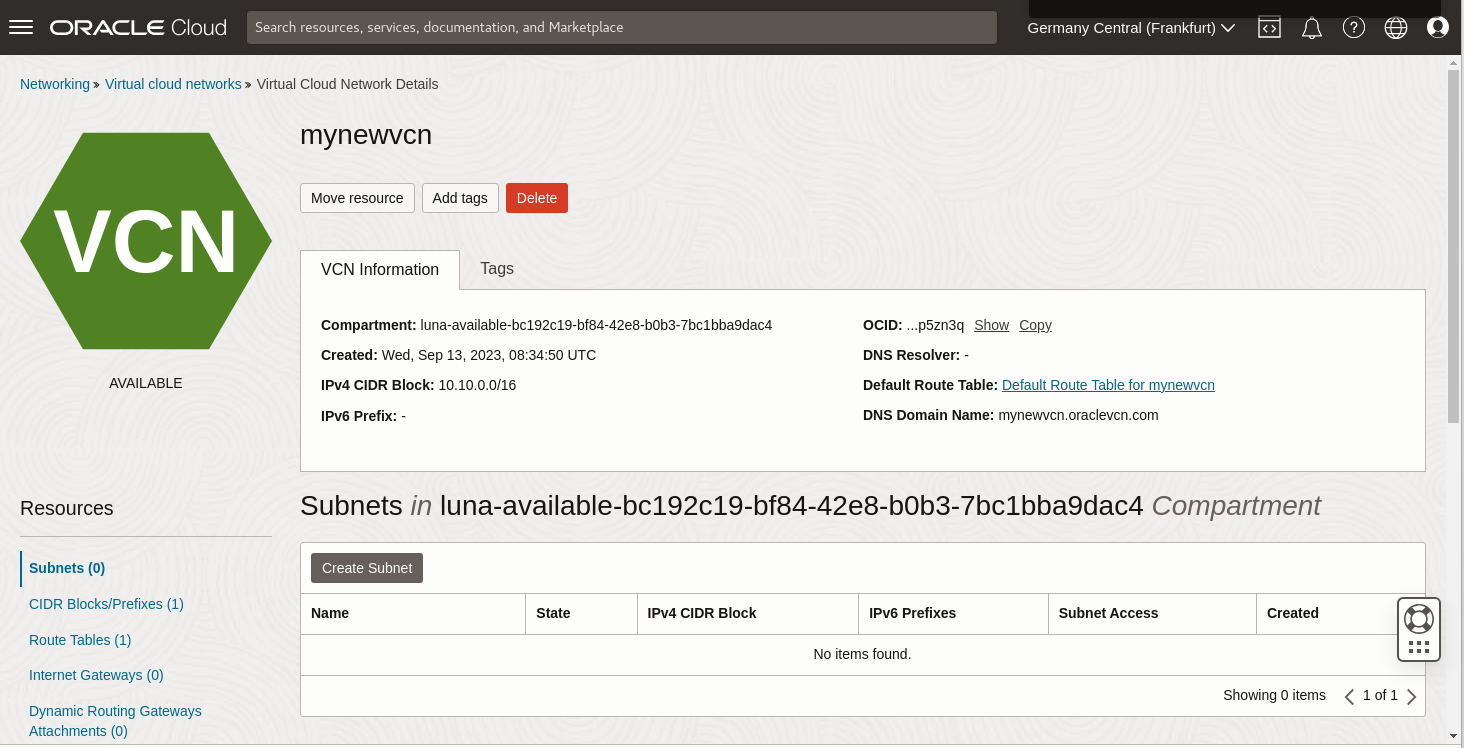
The details page defaults to listing any subnets created, none are created yet.
On the left are links to Resources available for the VCN. Resources with the number 1 beside the name indicate there is a resource associated. With a new VCN these were created when the VCN was built.
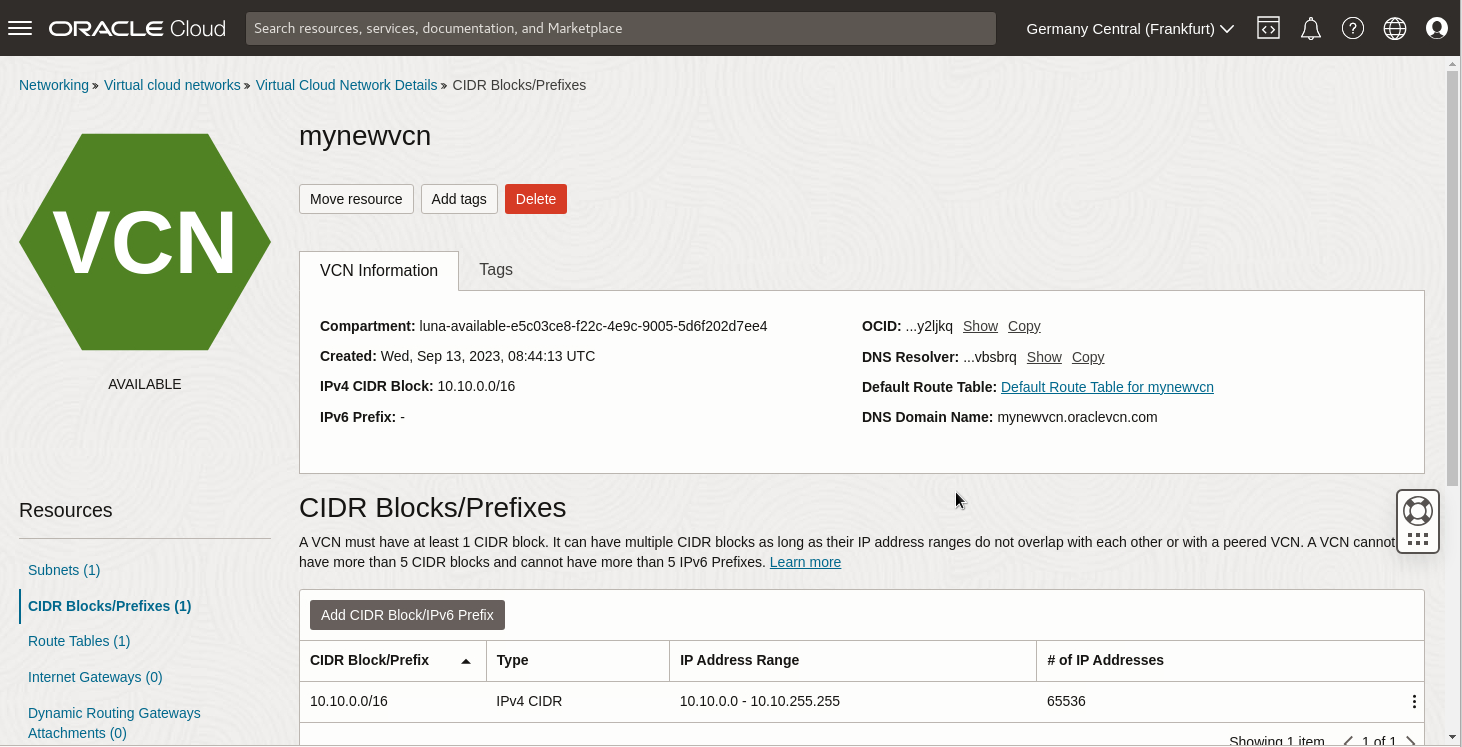
We see a CIDR Blocks/Prefixes, Route Tables, Security Lists, and DHCP Options have already been created or assigned.
Note: The VCN automatically gets a default route table, security list, and DHCP options setting, but not any Subnets.
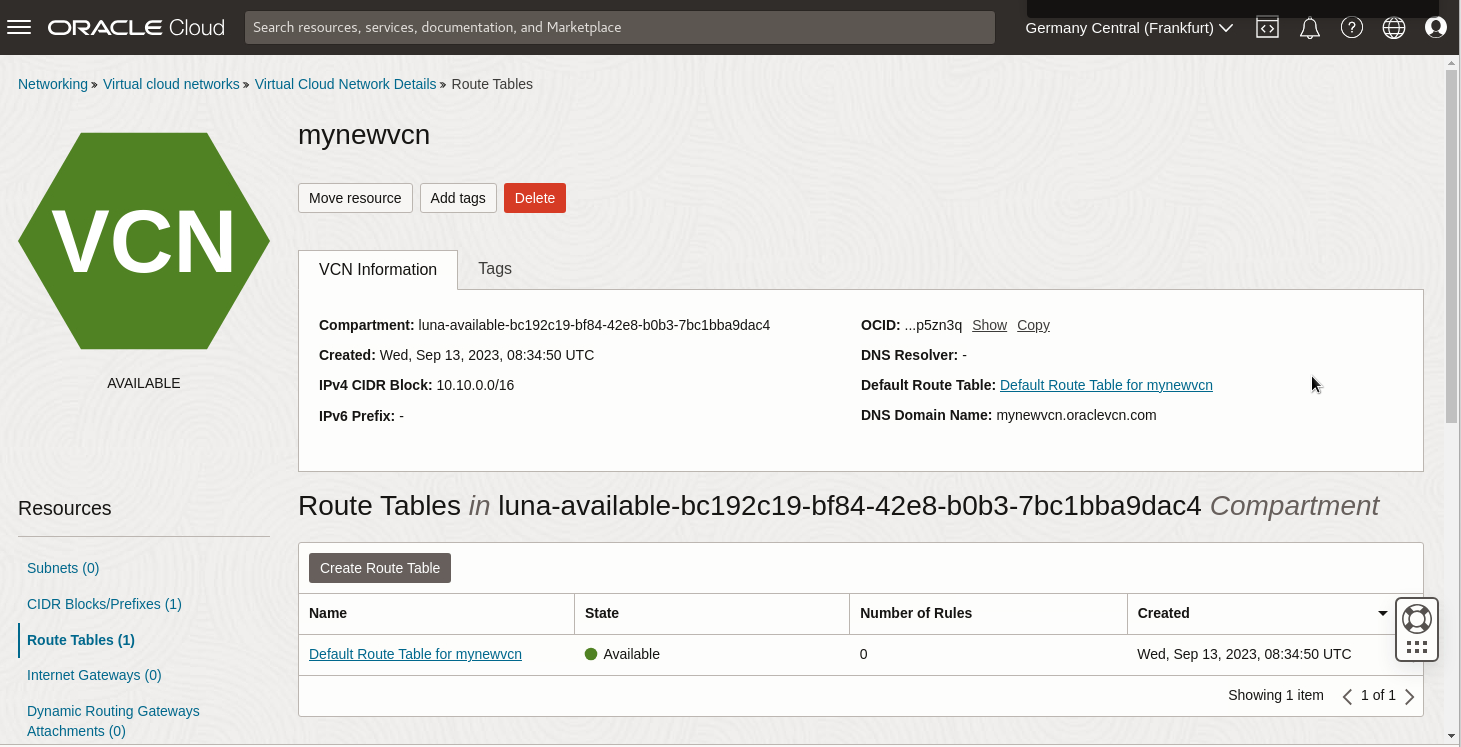
Click Route Tables under Resources, and then the name link for the default Route Table shown. There are no rules until they need to be created for their specific purposes.
Return to the VCN details page by clicking on its name in the breadcrumbs path at the top of the page.
Click on Security Lists.
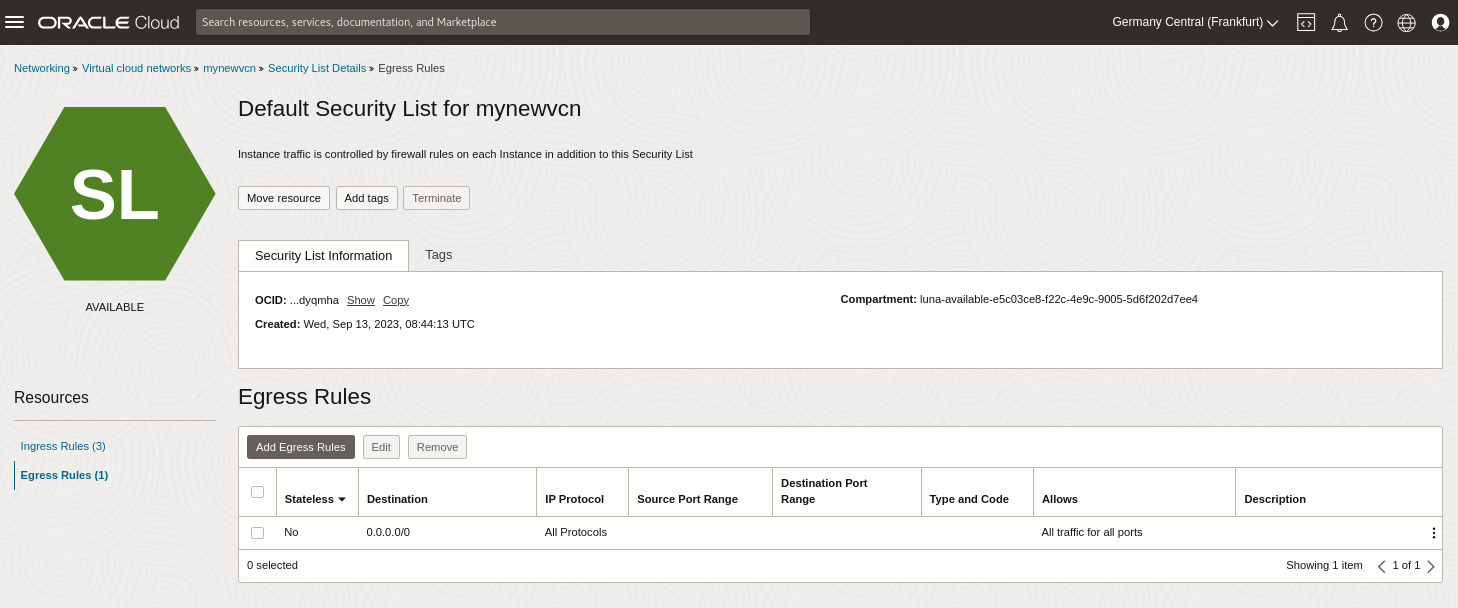
Oracle Cloud Infrastructure provides a default security list to manage connection traffic in and out of any subnets associated with the VCN.
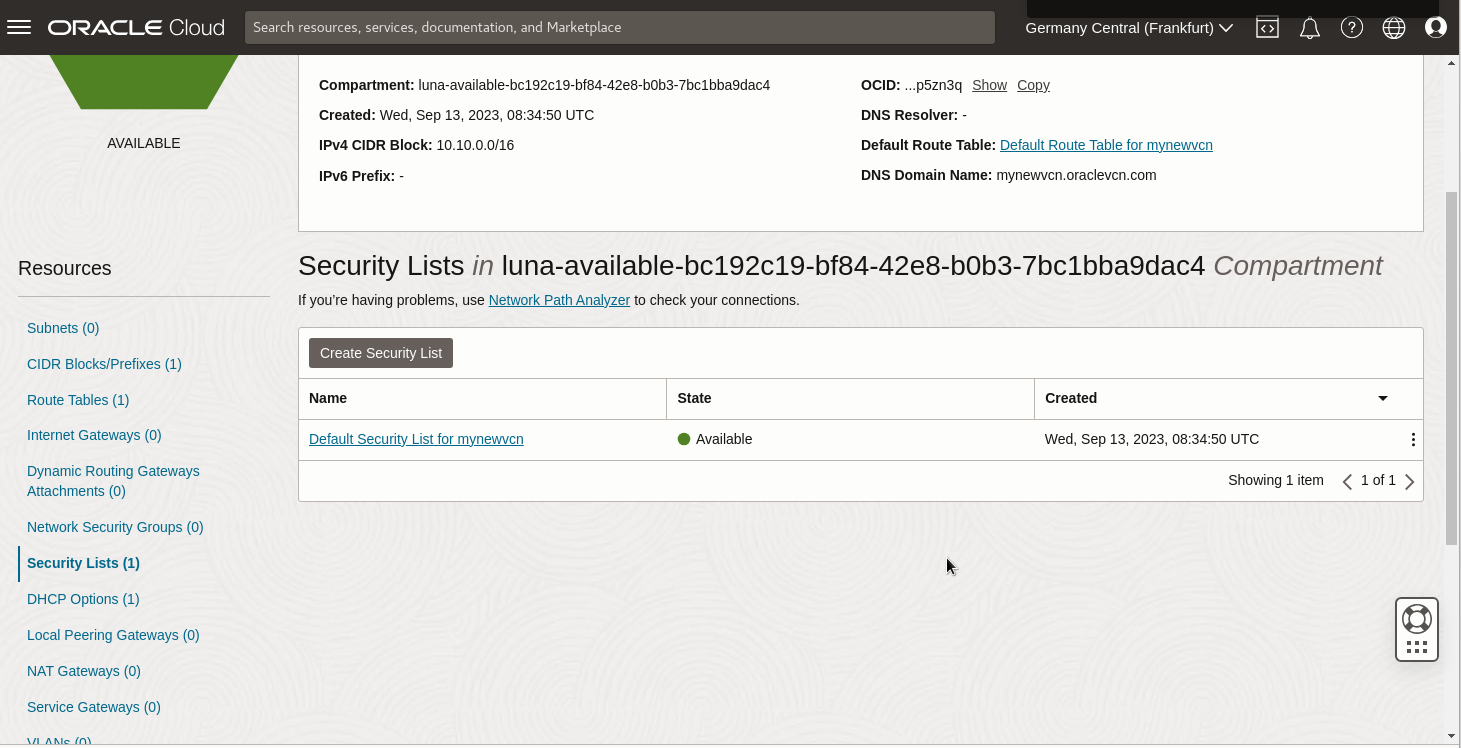
Click the security list name, we see there are three stateful Ingress Rules.

There is a rule for port 22, supporting SSH connections to instances attached to any subnet of this VCN. There are also two additional rules supporting ICMP for internal communication.
Click on Egress Rules, we see there is one stateful rule supporting all outbound traffic for all protocols on all ports.
Return to the VCN details page by clicking on its name in the breadcrumbs path at the top of the page.
Create a Subnet
Click Subnets under the Resources list.
Note: There must be at least one subnet created in order to support the creation of instances that want to use this VCN.

Click the Create Subnet button.
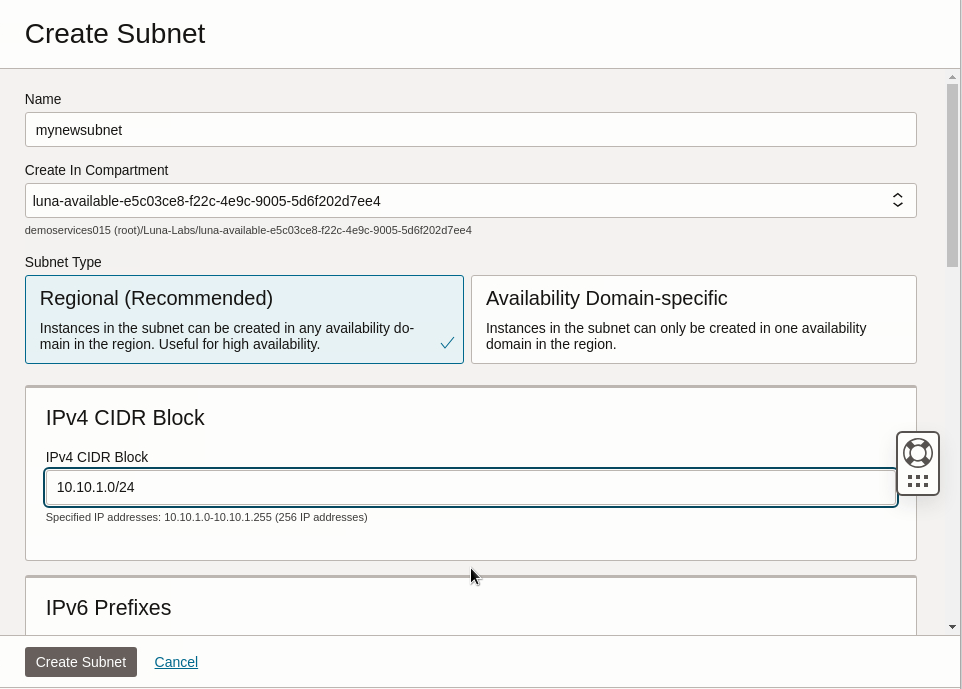
Give a subnet Name.
Create in Compartment - Leave the default compartment provided for this lab.
Subnet Type - Leave the default of Regional selected.
Note: The default type is a regional subnet, which is useful for high availability across multiple Availability Domains. If you want a subnet only available in a single availability domain, you would select Availability Domain-specific. This option is useful for creating a more isolated subnet.
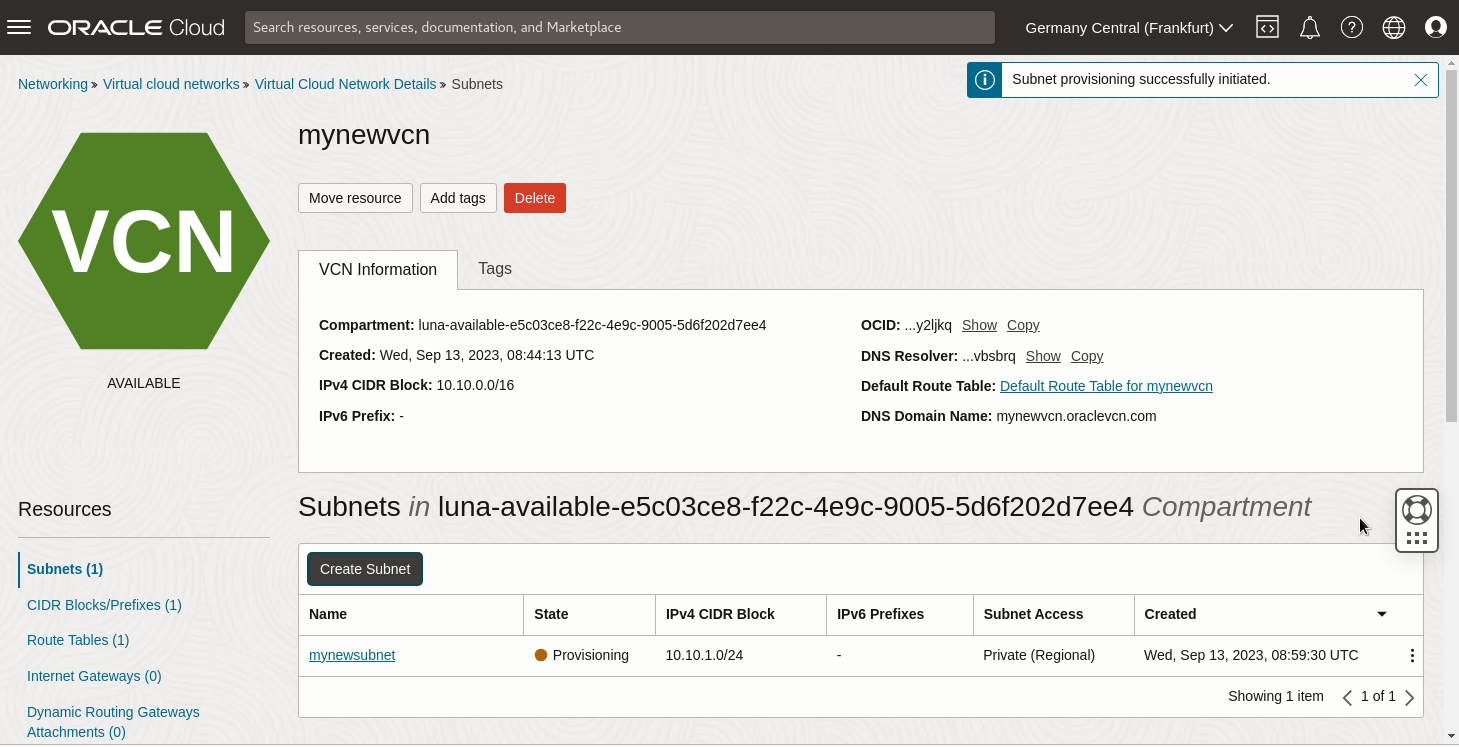
CIDR Block - Use 10.10.1.0/24 for your subnet IP range, which provides for 256 IP addresses.
Note: The range is from within the VCN range previously created, so its important to plan the block ranges. More CIDR blocks can be added after the VCN is created.
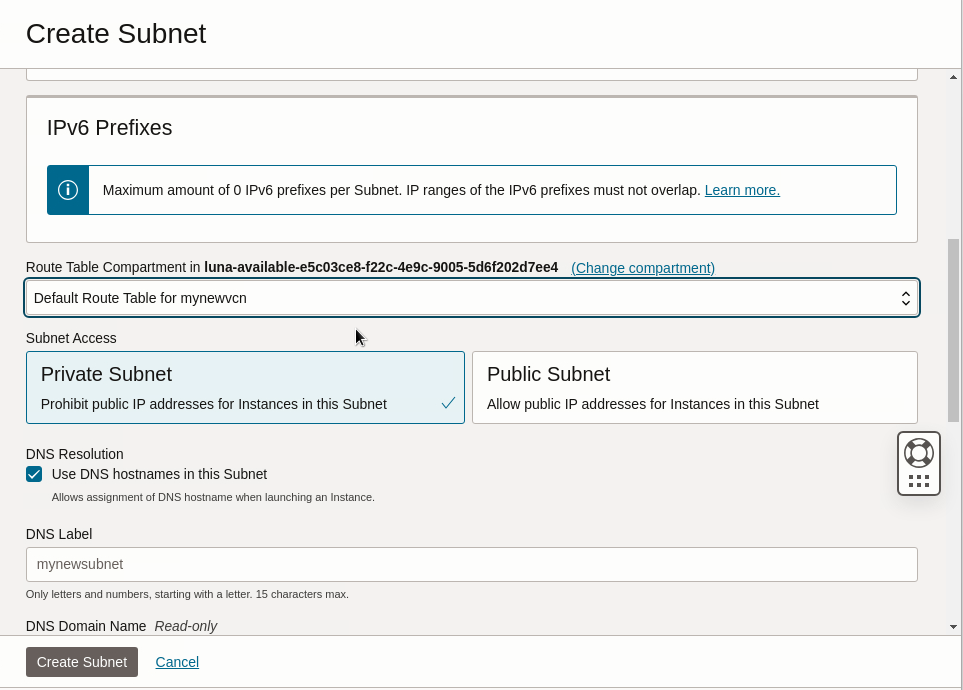
Route Table - Click the drop down and select the default route table name which was created automatically for the VCN.
Note: Clicking on the Change Compartment link allows you to change the compartment and select a different Route Table name. Do not change the compartment used for this lab. If no selection is made here it will default to the one created for the VCN.
Subnet Access - Select Private Subnet, as we are not using public IP addresses for instances attaching to this subnet.
DNS Resolution - Leave the default to use DNS hostnames in the subnet. The DNS Label field automatically inserts the subnet name, leave this setting in place, there is no need to change it.
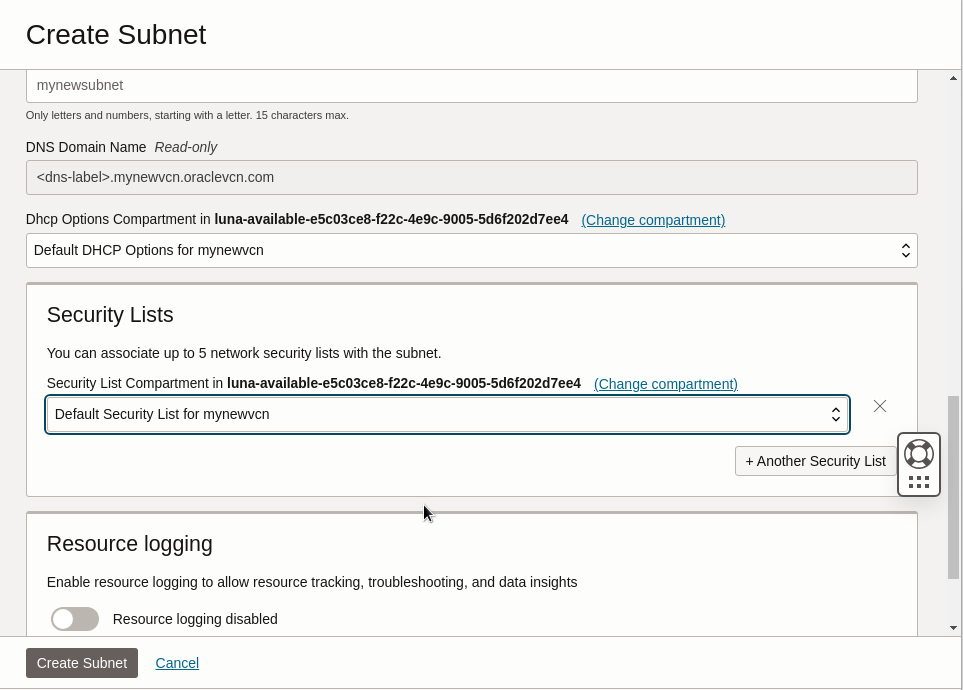
Dhcp Options - Click the dropdown and choose the default DHCP option which was created automatically for the VCN.
Note: Clicking on the Change Compartment link allows you to change the compartment and select a different DHCP Options name. Do not change the compartment used for this lab. If no selection is made here it will default to the one created for the VCN.
Security Lists - Click the dropdown and select the Default Security list created for the VCN, This manages traffic in and out of the subnet.
Note: Clicking on the Change Compartment link allows you to change the compartment and select a different Security List name. Do not change the compartment used for this lab. If no selection is made here it will default to the one created for the VCN.
Leave Resource logging disabled.
Click Create Subnet.
You are returned to the VCN Details page and can see the new subnet listed and being provisioned, after a few minutes it will become available.
Add a CIDR Block/Prefix to the VCN
Under Resources, click on CIDR Blocks/Prefixes.
Click the Add CIDR Block/IPv6 Prefix button.
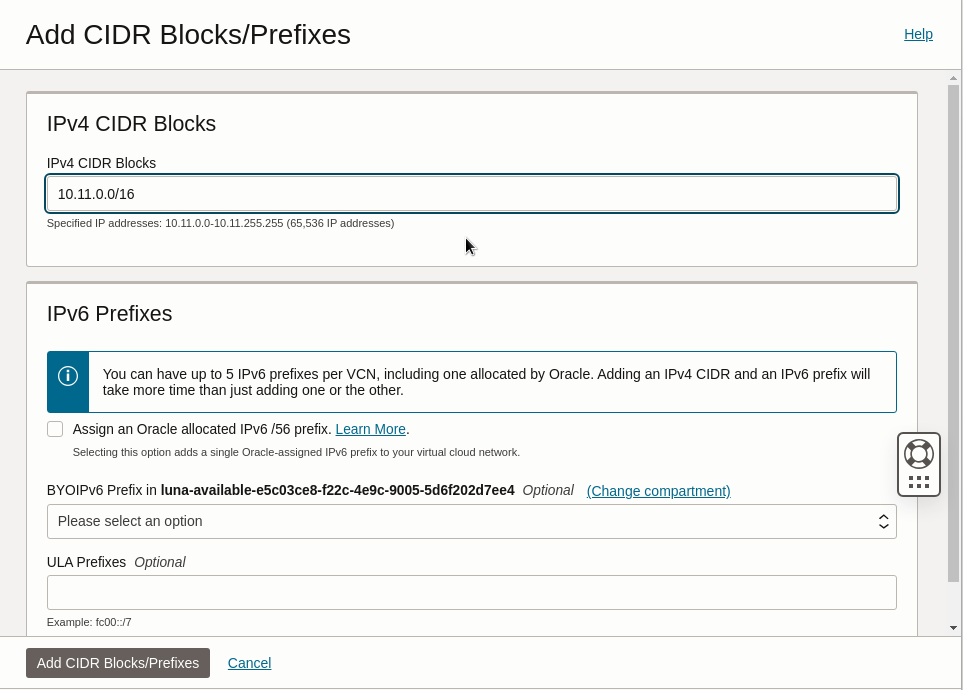
IPv4 CIDR Blocks - Input 10.11.0.0/16 for the new IPv4 CIDR Block to be available to the VCN.
Note: The block range is defined from /16 to /30. Remember that block ranges for the VCN cannot overlap.
Do not make any changes to the IPv6 Prefixes section.
Click the Add CIDR Blocks/Prefixes button.
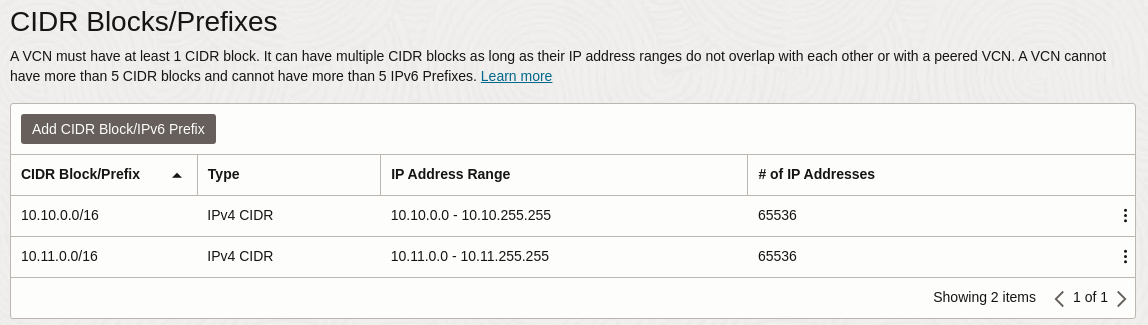
You are returned to the VCN Details page and can see the two CIDR Block ranges listed.
Delete your Virtual Cloud Network
Click the Virtual Cloud Networks link in the breadcrumbs path at the top of the details page.
Note: You can also reach the list using the console menu and navigating to Networking and Virtual Cloud Networks.
The new VCN is listed.
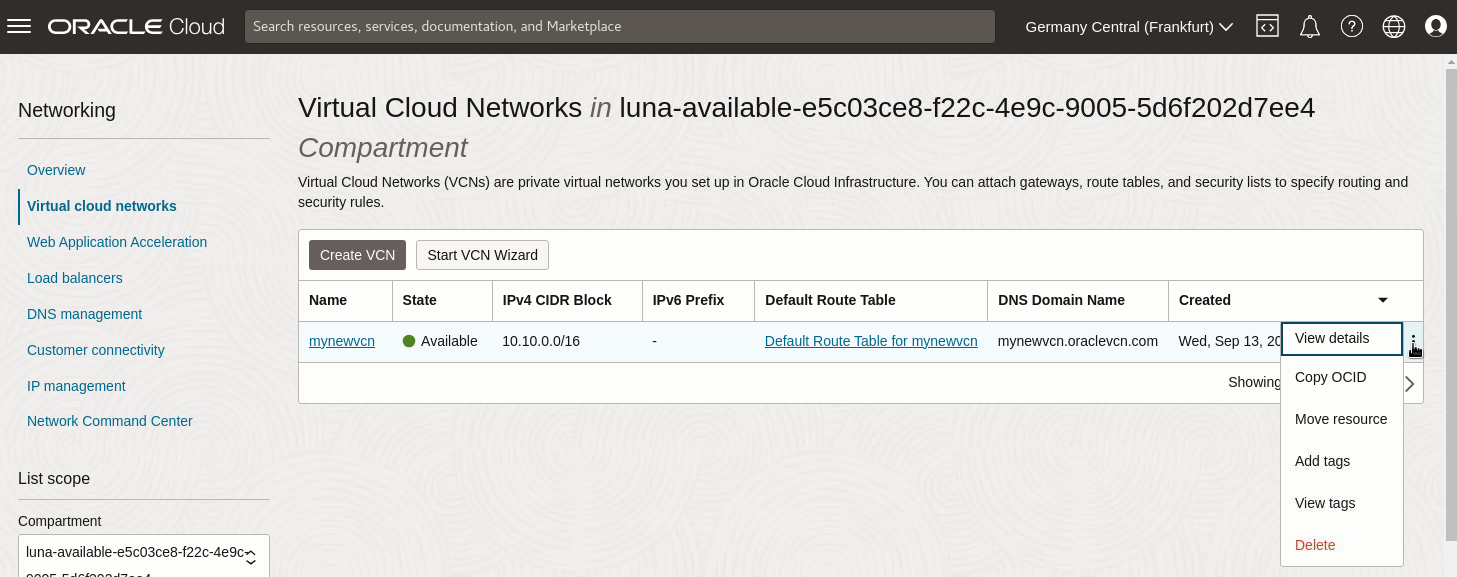
Note: There are multiple ways to delete your VCN. For example, clicking on the three dots menu to the right of your VCN row in the list, you will see Delete in red. The termination process can be started from here, but do not click on this.
Click on the name of your VCN. This opens the VCN details page.
At the top, click the Delete button.
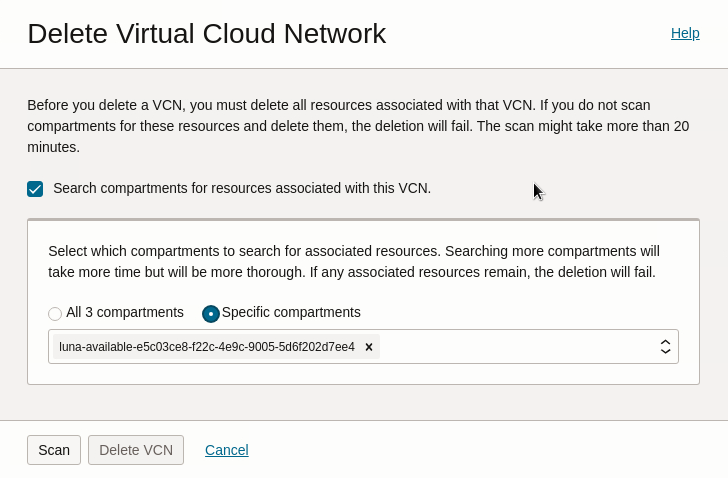
The dialog informs that all the associated resources for the VCN must be deleted before the VCN can be deleted. It will scan compartments for associated resources and list these for deletion. If you disable the search compartments tick box the Delete VCN button will become active. It will be assumed you have already deleted the associated resources.
Leave this tick box selected, you will scan for resources. Click the Specific compartments radio button to choose only your compartment. Take the default compartment listed.
Click the Scan button, opening a window listing the associated resources to be deleted.
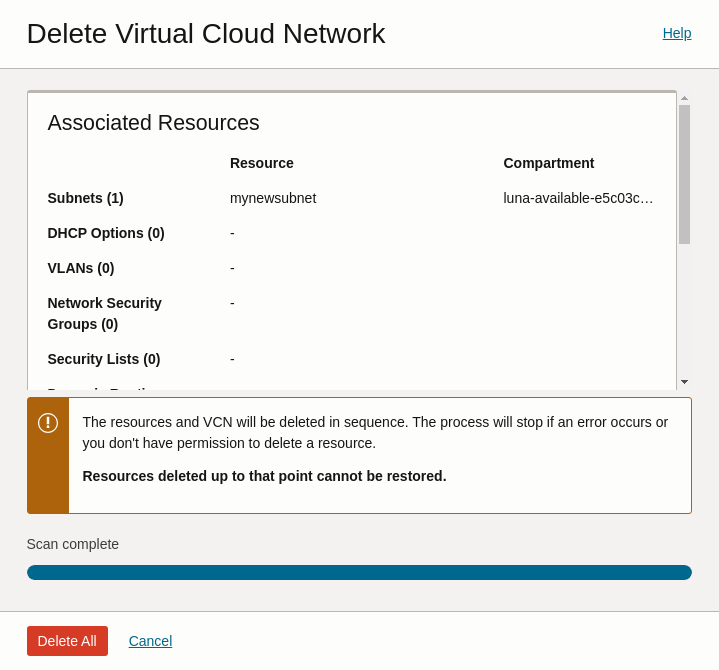
With the scan complete, read the warning in the dialog to be sure you understand that once terminated, the VCN and resources cannot be restored.
Click the Delete All button.
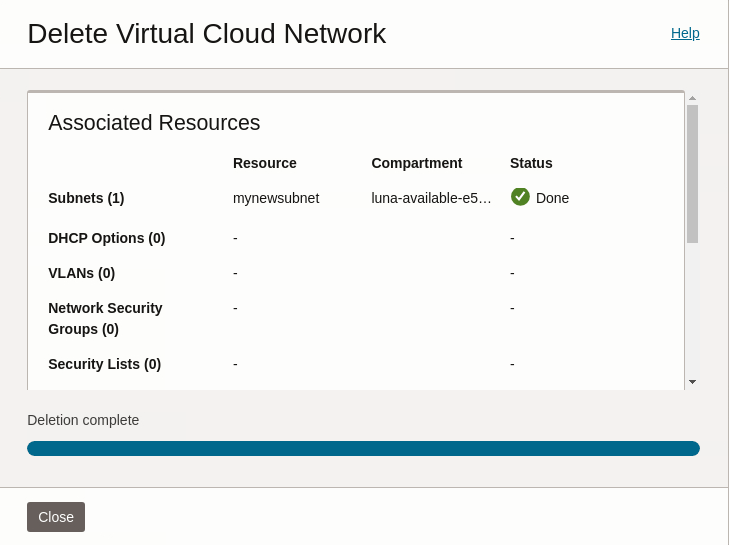
The dialog shows the associated resources being removed. When complete, you can click Close to close the dialog.
You are returned to the Virtual Cloud Networks list, and your VCN has been removed.
For More Information
You can watch a free training video covering this lab content here: Create a Virtual Cloud Network in Oracle Cloud Infrastructure
For many more free videos covering a wide range of topics about Oracle Cloud Infrastructure go to Linux on Oracle Cloud Infrastructure Training
Find extensive documentation to support your learning for Oracle Cloud Infrastructure here: https://docs.oracle.com/en-us/iaas/Content/home.htm