Manage Oracle Linux at Scale with Groups in Oracle OS Management Hub
Introduction
Learn to manage Oracle Linux updates for many OCI compute instances as a unified and standardized group in Oracle OS Management Hub. Groups provide a way to manage and monitor a collection of instances using the Oracle OS Management Hub service. You can use groups to apply errata, update software, and schedule jobs for common content management tasks to all member instances of the group.
Objectives
In this tutorial, you'll learn how to:
- Create a group in Oracle OS Management Hub
- Create a group profile to register OCI Compute instances
- Manage group members by adding and removing compute instances
- Manage the group manifest by installing and removing Oracle Linux Packages and Modules
- Install packages and modules to individual group member instances
- Review group reports for OS enhancements, security updates, bug fixes, and instance activity
- Immediately run update jobs and schedule recurring updates for the group
- Monitor job statuses and view associated work
Prerequisites
Access to an Oracle Cloud Infrastructure tenancy with:
- An administrative user group, a dynamic group identifying instance resources, and the IAM policies that enable OS Management Hub.
- Oracle Linux compute instances.
- Virtual Cloud Network (VCN) or configured network access that supports OS Management Hub.
Configure OCI Resources
Note: If running in your tenancy, read the linux-virt-labs GitHub project README.md and complete the prerequisites before deploying the lab environment.
Open a terminal on the Luna Desktop.
Clone the
linux-virt-labsGitHub project.git clone https://github.com/oracle-devrel/linux-virt-labs.gitChange into the working directory.
cd linux-virt-labs/olInstall the required collections.
ansible-galaxy collection install -r requirements.ymlUpdate the Oracle Linux instance configurations.
cat << EOF | tee instances.yml > /dev/null
compute_instances:
  1:
    instance_name: "ol-host-02"
    type: "server"
  2:
    instance_name: "ol-host-03"
    type: "server"
instance_shape: "VM.Standard.E5.Flex"
EOF
Deploy the lab environment.
ansible-playbook create_instance.yml -e localhost_python_interpreter="/usr/bin/python3.6" -e "@instances.yml"The free lab environment requires the extra variable
localhost_python_interpreter, which setsansible_python_interpreterfor plays running on localhost. This variable is needed because the environment installs the RPM package for the Oracle Cloud Infrastructure SDK for Python, located under the python3.6 modules.The default deployment shape uses the AMD CPU and Oracle Linux 8. To use an Intel CPU or Oracle Linux 9, add
-e instance_shape="VM.Standard3.Flex"or-e os_version="9"to the deployment command.Wait for the playbook to reach the pause task. Do not hit enter or close the terminal. The playbook creates OCI compute instances to use with OS Management Hub. Progress to the next step when the pause task is displayed.
Important: Do not hit enter or close the terminal window for the duration of the lab.
Access the OS Management Hub Section on the OCI Web Console
Click on the Luna Lab icon on the Luna desktop.
The login credentials for OCI will display on this page after some time. Once the page displays the Ephemeral account username and password, continue to the next step.
Open the OCI console by clicking the OCI Console quick link.
Use the ephemeral account username and password to login to the OCI console.
Use the navigation menu of the OCI console landing page to navigate to Observability and Management and click on OS Management Hub.
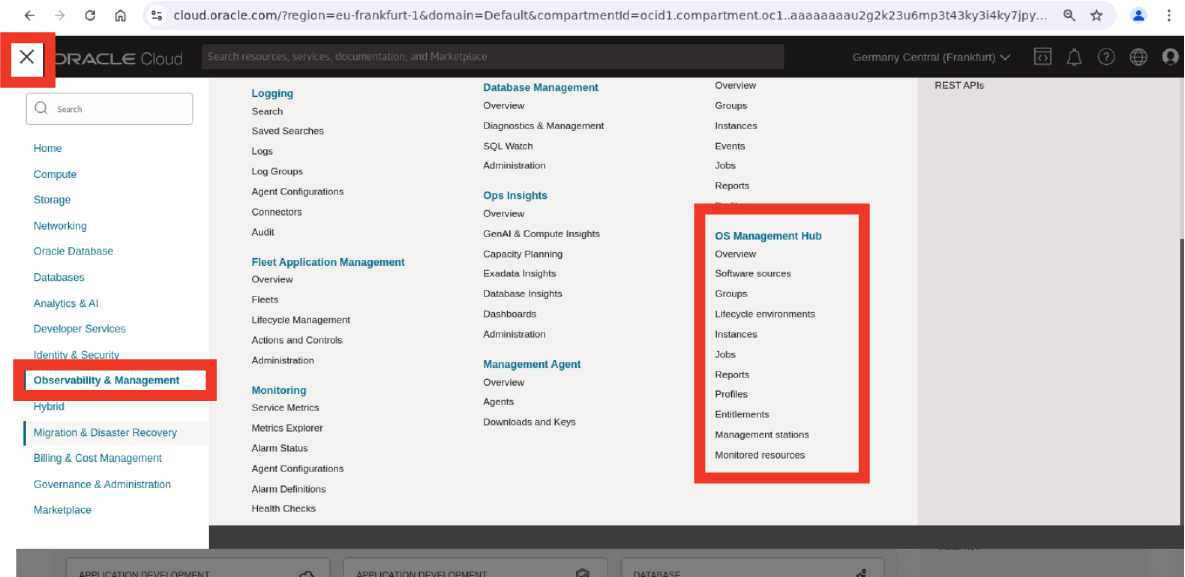
Create a Group
Groups standardize OS management tasks like applying updates and installing packages for all member instances. The group's instances must have the same OS vendor, OS version, architecture, and location, whether in OCI, on-premises, or third-party cloud.
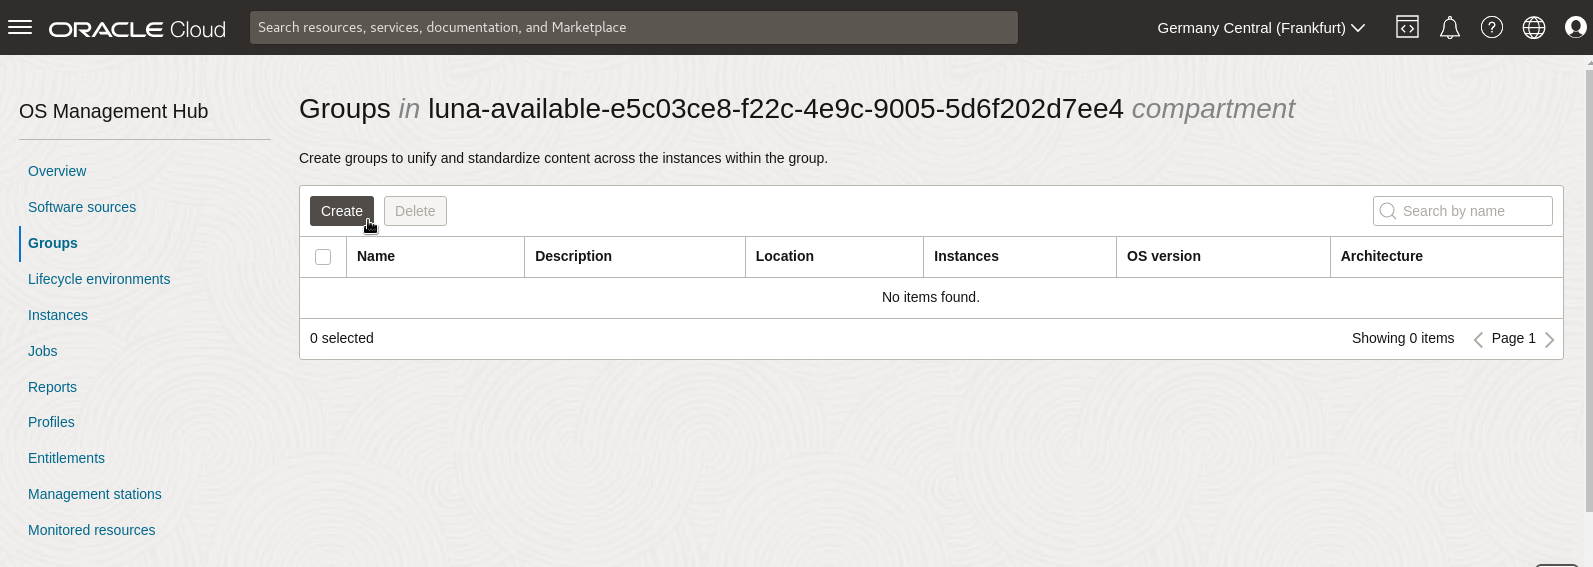
Click on Groups under the OS Management Hub navigation section.
Click Create.
Enter the identifying information for the group as the following:
- Name:
Oracle_Linux_8_hosts - Description: (Optional) Enter a description for the group.
- Name:
Set the instance location for the profile as Oracle Cloud Infrastructure.
Click Next
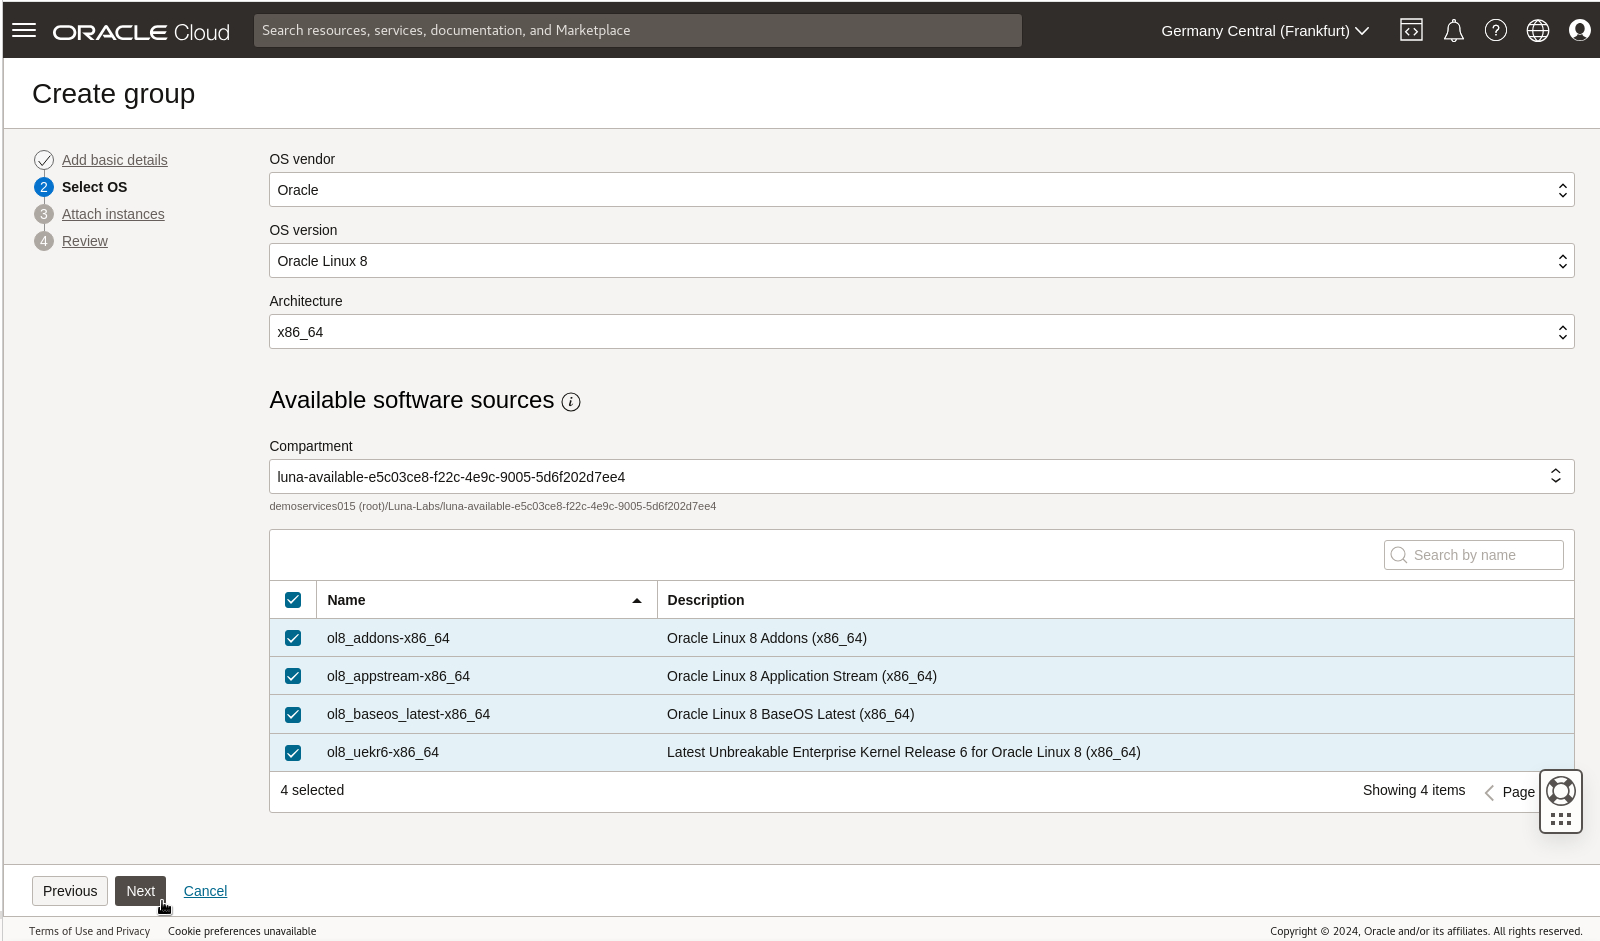
Select the OS and architecture information as the following:
- OS vendor: Oracle
- OS version: Oracle Linux 8
- Architecture: x86_64
Note: The OS vendor, version, and architecture must match the compute instances you intend to register.
Keep the default compartment selection since it contains vendor software sources.
Select the software sources to assign to the group. Select the following:
- ol8_baseos_latest-x86_64
- ol8_appstream-x86_64
- ol8_addons-x86_64
- ol8_uekr6-x86_64
These software sources will automatically be attached to an instance when the instance joins the group.
Click Next.
Click Next to skip the Attach instances step.
Note: You could attach OCI compute instances registered with OS Management Hub and match the group's OS selection, location, and compartment to the group at this stage.
Review the group details, then click Submit to create the group.
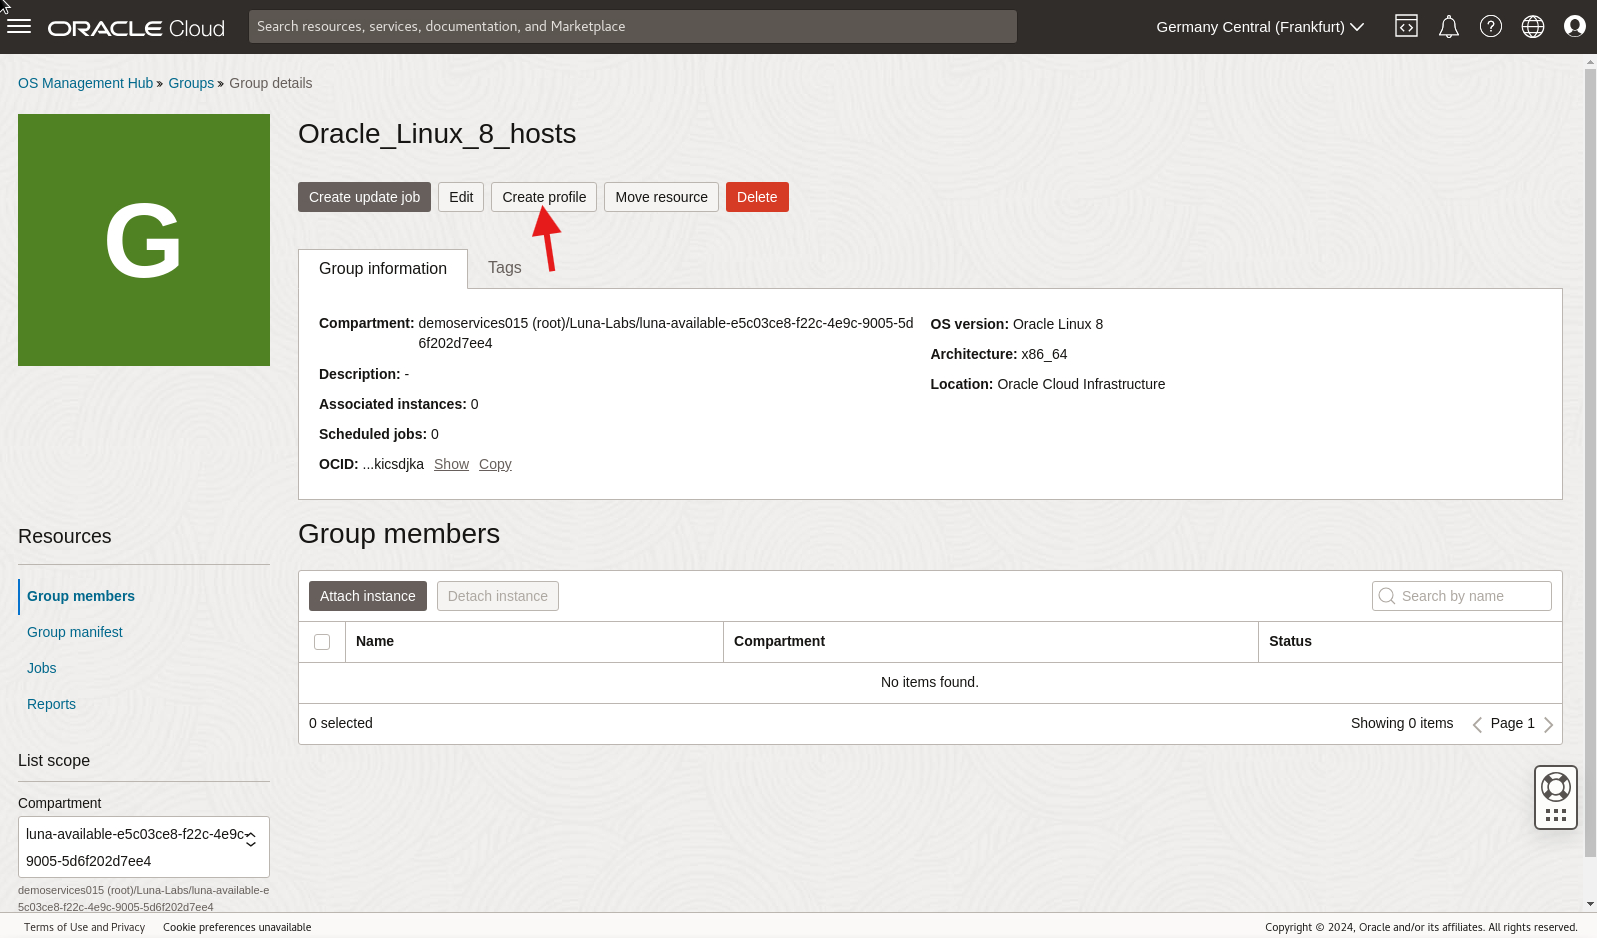
The group page displays the
Oracle_Linux_8_hostsgroup.
Create a Group Profile
A group profile can register compute instances with OS Management Hub and attach those instances to the group.
Click the name of the Oracle_Linux_8_hosts group on the Groups page under the OS Management Hub navigation section.
The group's details page contains group information and access to group resources like Group members, Group manifest, Jobs, and Reports.
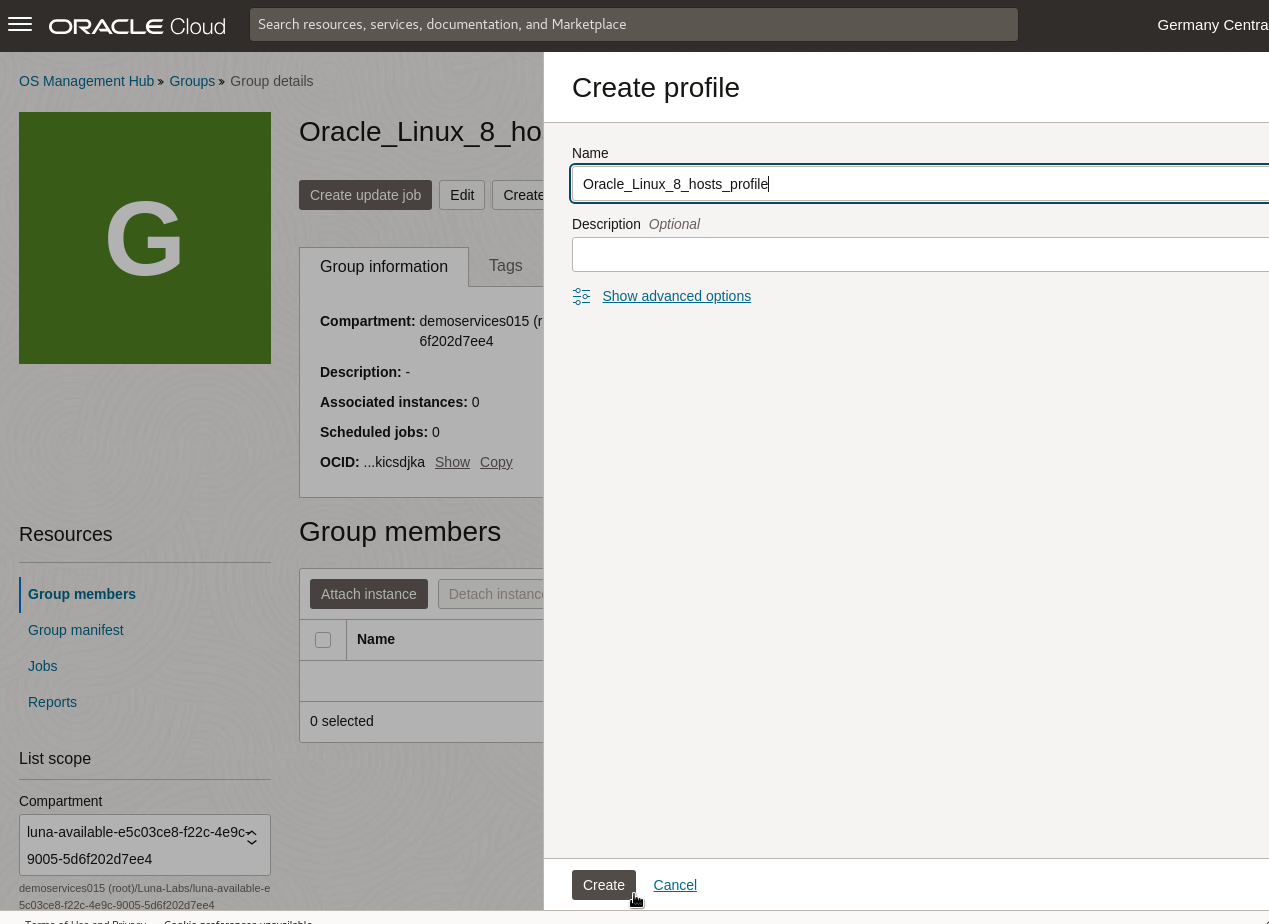
Click Create profile.
Enter the identifying information for the group profile as the following:
- Name:
Oracle_Linux_8_hosts_profile - Description: (Optional) Enter a description for the profile.
- Name:
Click Create.
This profile is now available to view on the Profiles page of the OS Management Hub navigation section and can be used to register compute instances with the
Oracle_Linux_8_hostsgroup.
Use the Group Profile to Register Compute Instances with the Group
To attach OCI compute instances to the group and register the compute instances with OS Management Hub, enable the Oracle Cloud Agent (OCA) plugin and set the Group profile at the time of compute instance creation or from an existing compute instance's details page.
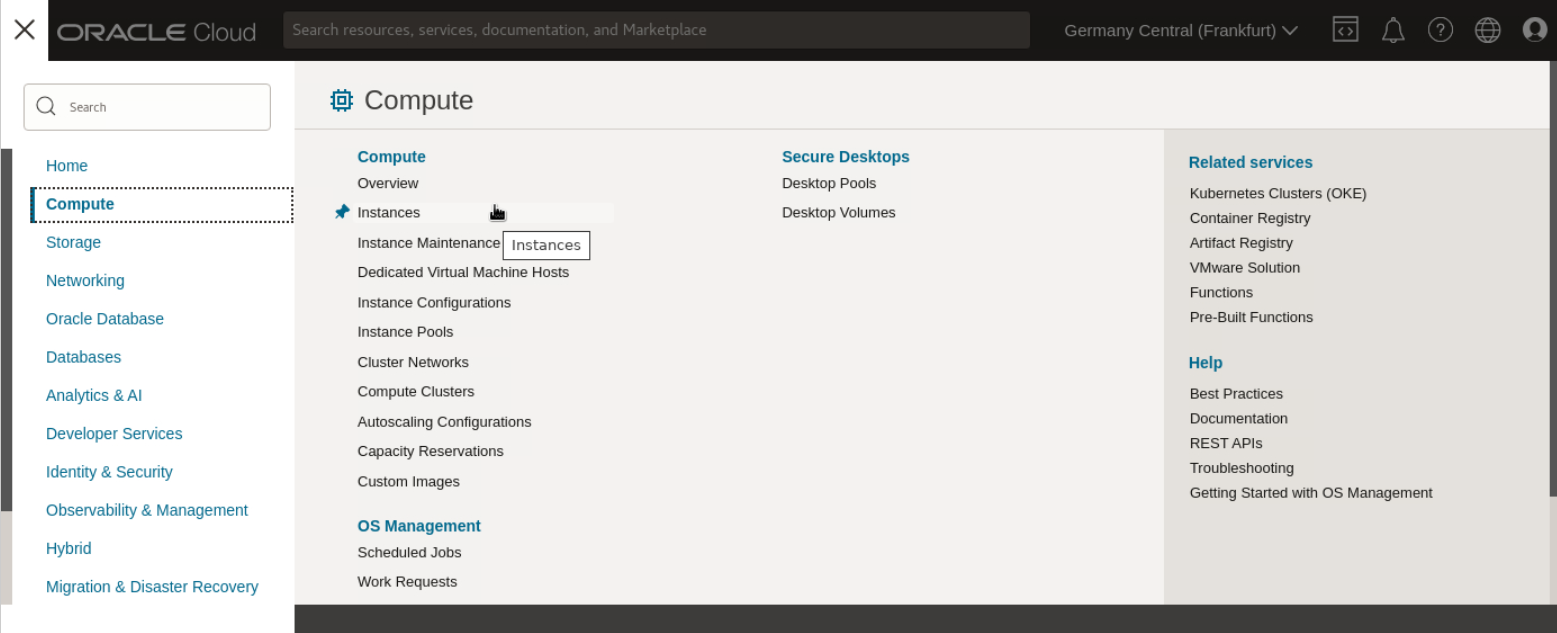
Navigate to the Compute section and select Instances using the main OCI navigation menu.
Register Existing Compute Instances with the Group
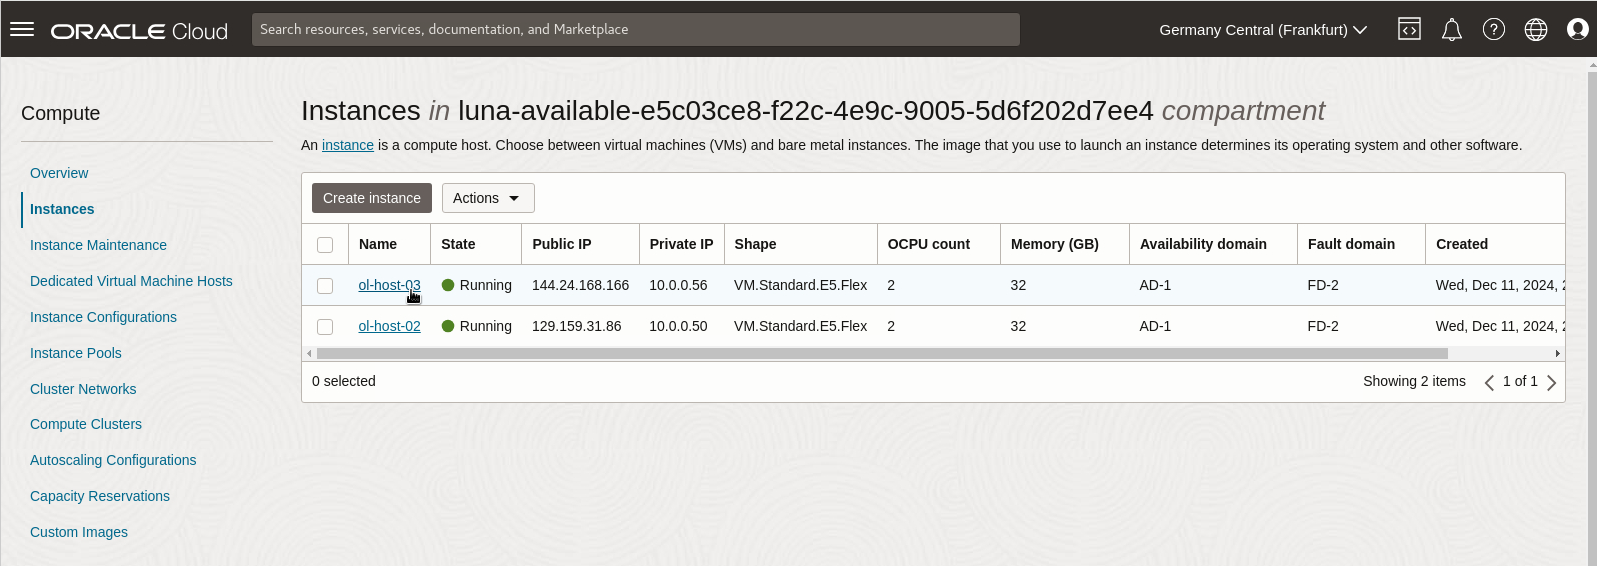
Register two instances named ol-host-02 and ol-host-03 with OS Management Hub and attach them to the group using the group profile.
Click on the name of the ol-host-03 instance.
Click the Oracle Cloud Agent tab on the compute instance's details page.
Enable the OS Management Hub Agent plugin and set the registration profile to Oracle_Linux_8_hosts_profile.
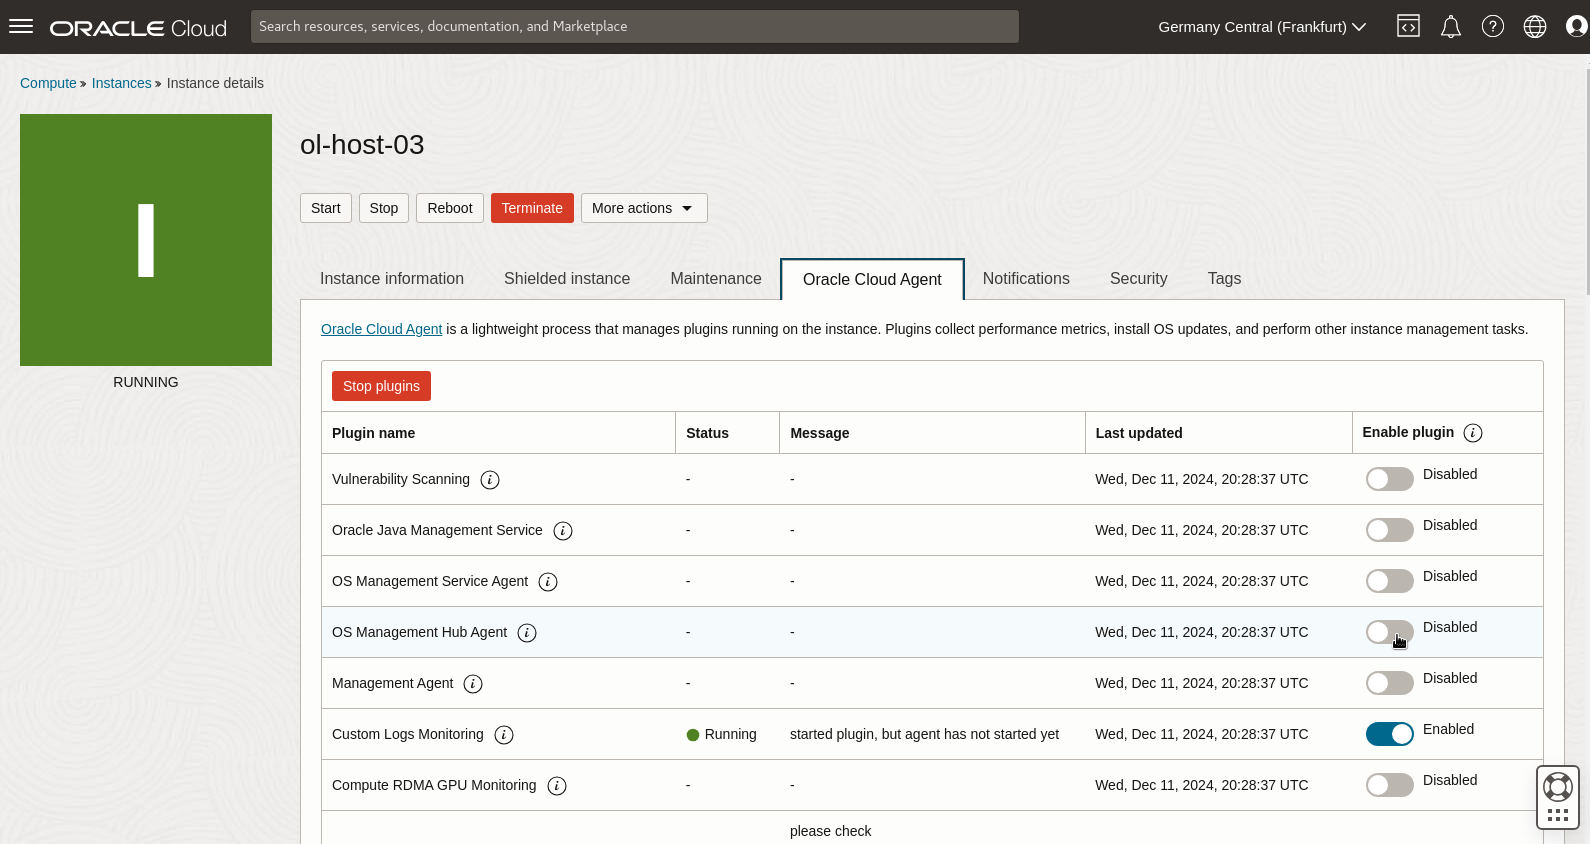
In some situations, the OS Management Hub Agent shows as stopped after being enabled. Ignore this notification and proceed to the next step.
Navigate back to Instances under the Compute section.
Click on the name of the ol-host-02 instance.
Click the Oracle Cloud Agent tab on the compute instance's details page.
Enable the OS Management Hub Agent plugin and set the registration profile to Oracle_Linux_8_hosts_profile.
In some situations, the OS Management Hub Agent shows as stopped after being enabled.
Click Groups under the OS Management Hub navigation section and click on Oracle_Linux_8_hosts.
Note: Wait for the instances to be attached to the group. This step may take several minutes. Refresh the page and wait for the two instances to display on the Group member resource.
As new Oracle Linux instances are attached to the group, the service:
- Replaces the instance's software sources with the software sources listed in the group manifest.
- Installs the latest available versions of the packages in the group manifest from the software sources in the group.
- Installs the modules and profiles in the group manifest from the software sources in the group.
- Does not remove any existing packages or modules on Oracle Linux instances.
Manage Group Members
Group members are OCI compute instances registered with the group, which you can manage from the Group members resource found on the Group details page. Group members can be detached, and other previously registered instances that match the group's OS selections can be attached to the group.
Detaching an Instance from the Group
Click Groups under the OS Management Hub navigation section and click on Oracle_Linux_8_hosts.
Click Group members under Resources on the Group details page.
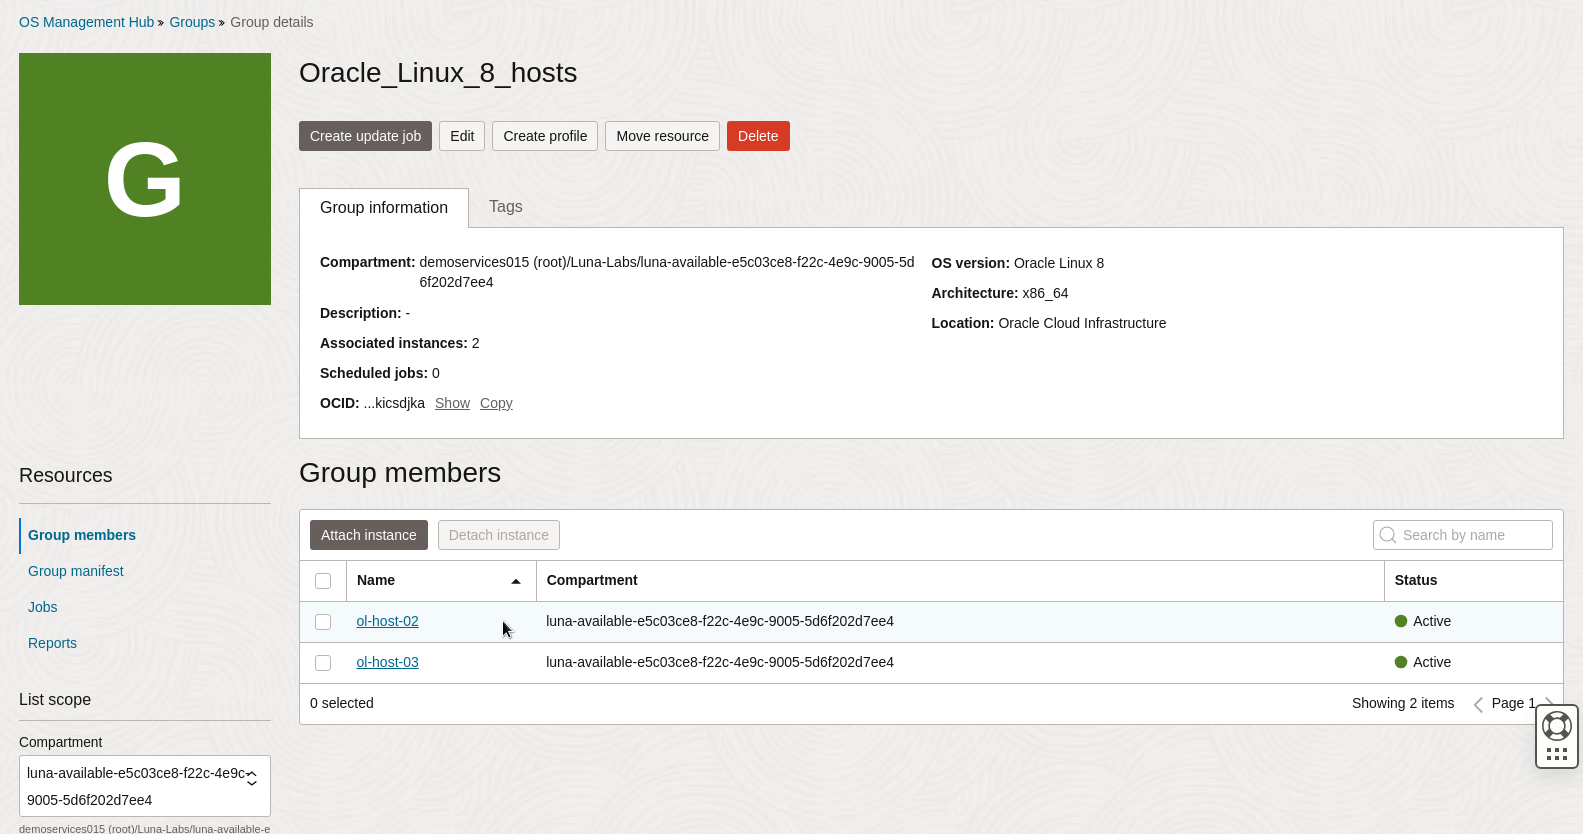
Select the ol_host_02 checkbox.
Click Detach instance.
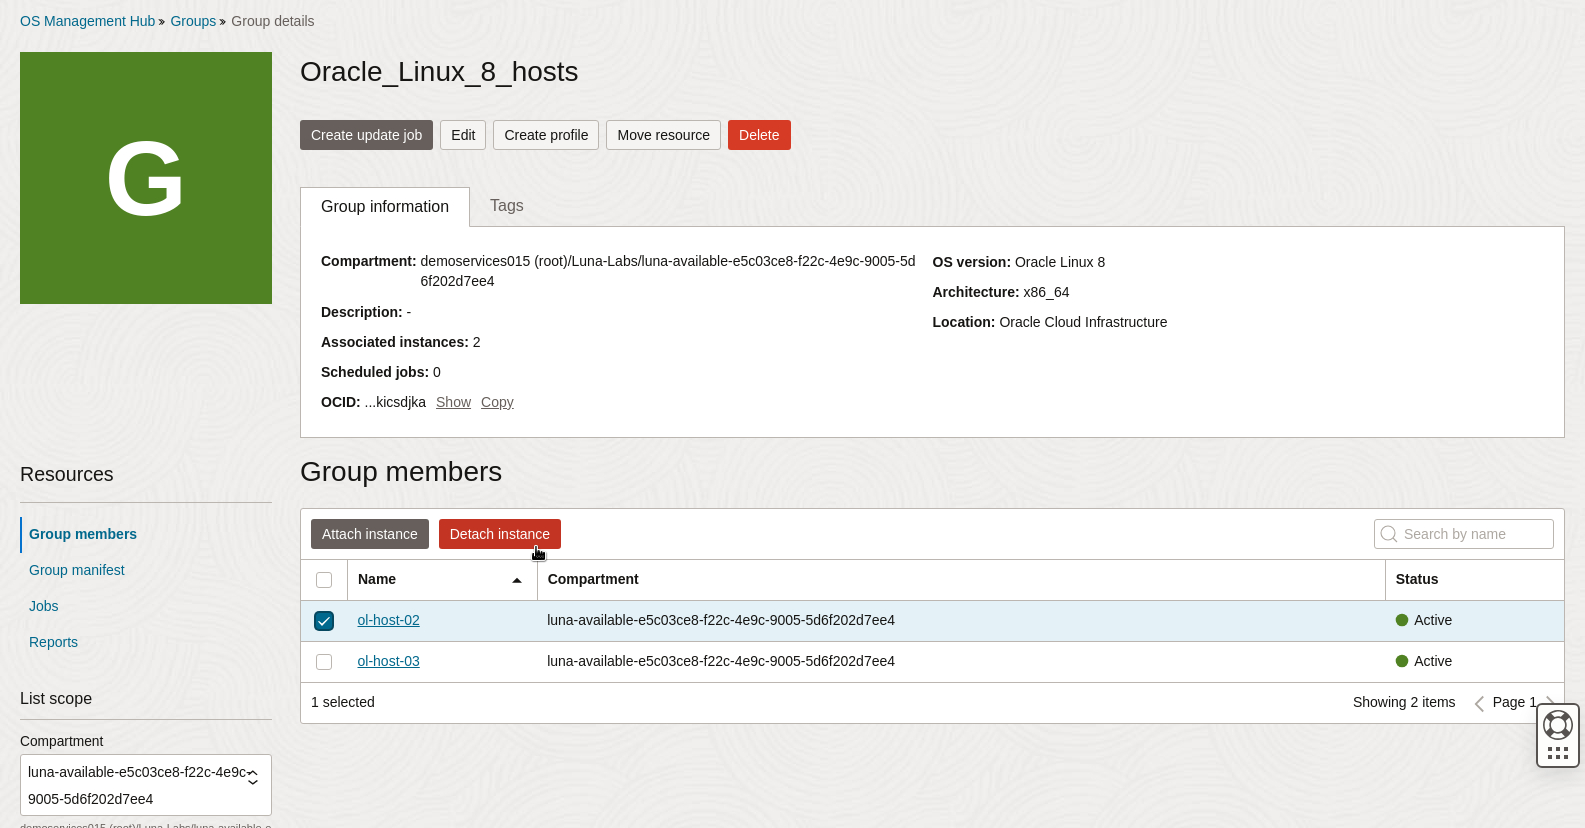
Click detach in the dialog box.
This action removes the instance from the group and is no longer in the Group member resource list. The instance is not managed as part of the group or included in any recurring group jobs.
Note: The software on the instance remains as it was when the instance left the group.
Attaching an Instance to the Group
Click Attach instance.
Keep the default compartment selection.
Select ol_host_02 and then click Select instances to attach.
If applicable, repeat the preceding steps to select multiple instances to attach.
Note: Available instances match the group's location, OS vendor, version, and architecture.
Review the selection.
Click Attach.

Registered instances that match the group can be attached and removed from the group quickly and efficiently.
Manage the Group Manifest
The group manifest defines the set of packages and modules to install to a group of Oracle Linux instances. The group manifest lists the software sources and the minimum required packages and modules. Oracle OS Management Hub reflects any changes you make to the group manifest on the group's current members.
Adding Oracle Linux Content to the Group Manifest
Click Group manifest under Resources on the Oracle_Linux_8_hosts Group details page.
This page is where software sources, packages, and modules can be added or removed from the group.
Click the Group Packages tab.
Click Add packages
Enter the following job details:
- Name: Keep the default name for the job.
- Description: (Optional) Enter a description.
Search for and select the
tmuxpackage.You can locate the search tool at the top right corner of the package table.
Note: Once a package is selected, the table saves it as chosen. You will notice that the table will display 1 selected
Search for and select the
dtracepackage.Delete the previous package search and search for
dtrace. Select it from the table. You will notice that the table will display 2 selected.Use the Latest only selection.
By default, the list only shows the latest package versions.
Schedule the job to Run immediately.
Click Add.

The Group Packages tab lists the two packages.
View the Install packages to Oracle_Linux_8_Hosts job status by clicking on the Jobs resource and selecting the In progress jobs tab.
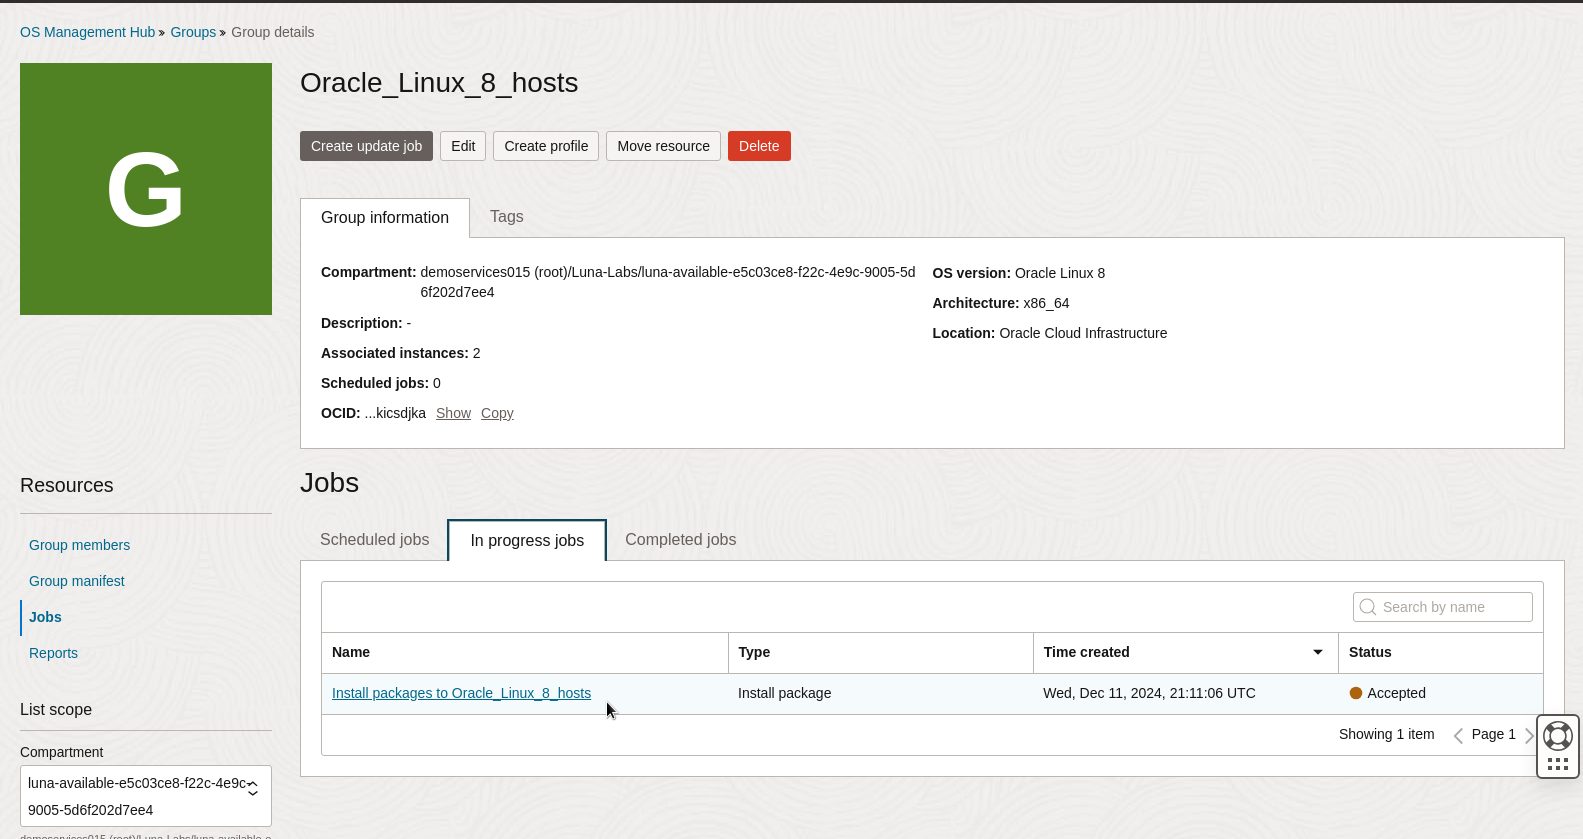
Before continuing, wait for this update job to complete and move to the Completed Jobs tab. This step may take several minutes.
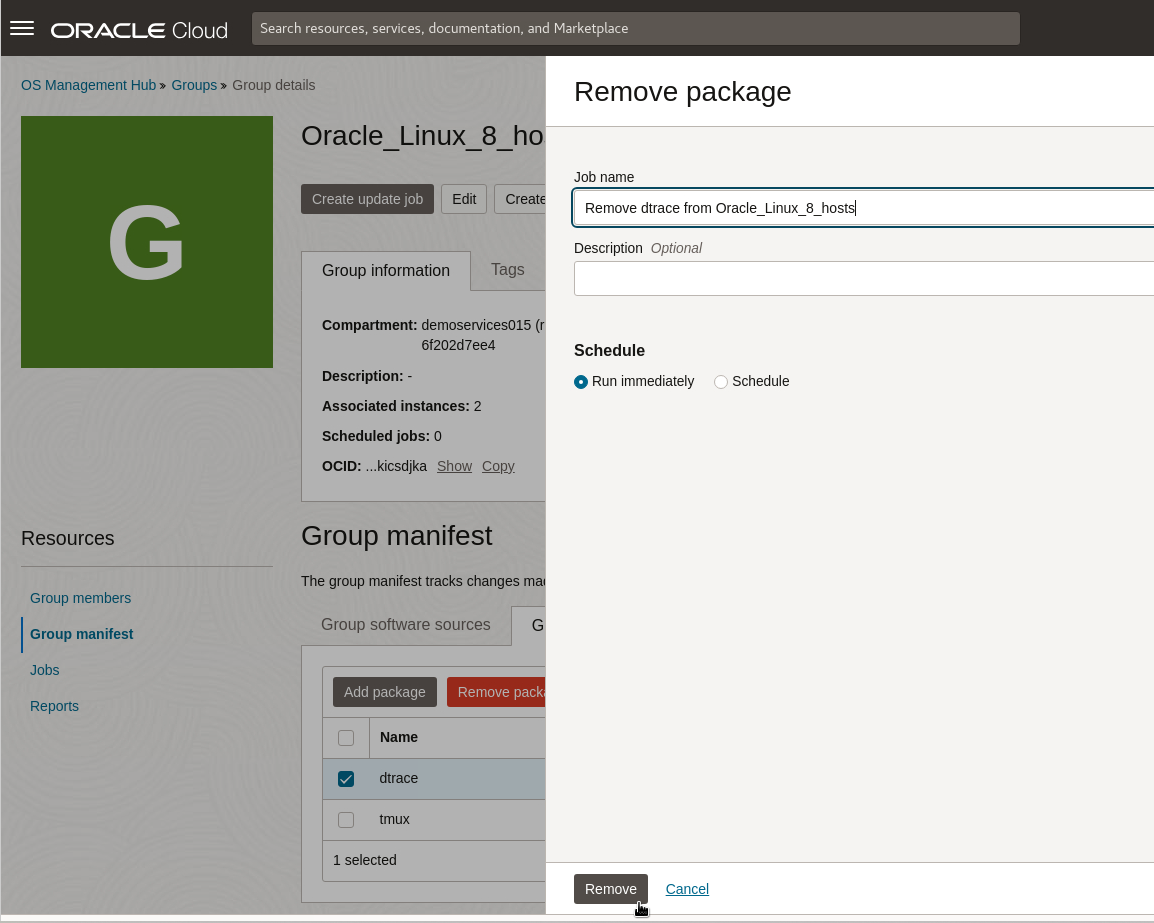
Removing Content from the Group Manifest
Click Groups under the OS Management Hub navigation section and click on Oracle_Linux_8_hosts.
Click Group manifest under Resources.
Click the Group Packages tab.
Select the
dtracepackage and click Remove package.Enter the following job details:
- Name: Keep the default name for the job.
- Description: (Optional) Enter a description.
Schedule the job to Run immediately.
Click Remove.
This step removes the package from the Group Packages tab.
View the Remove dtrace from Oracle_Linux_8_Hosts job status by clicking on the Jobs resource and selecting the In progress jobs tab.
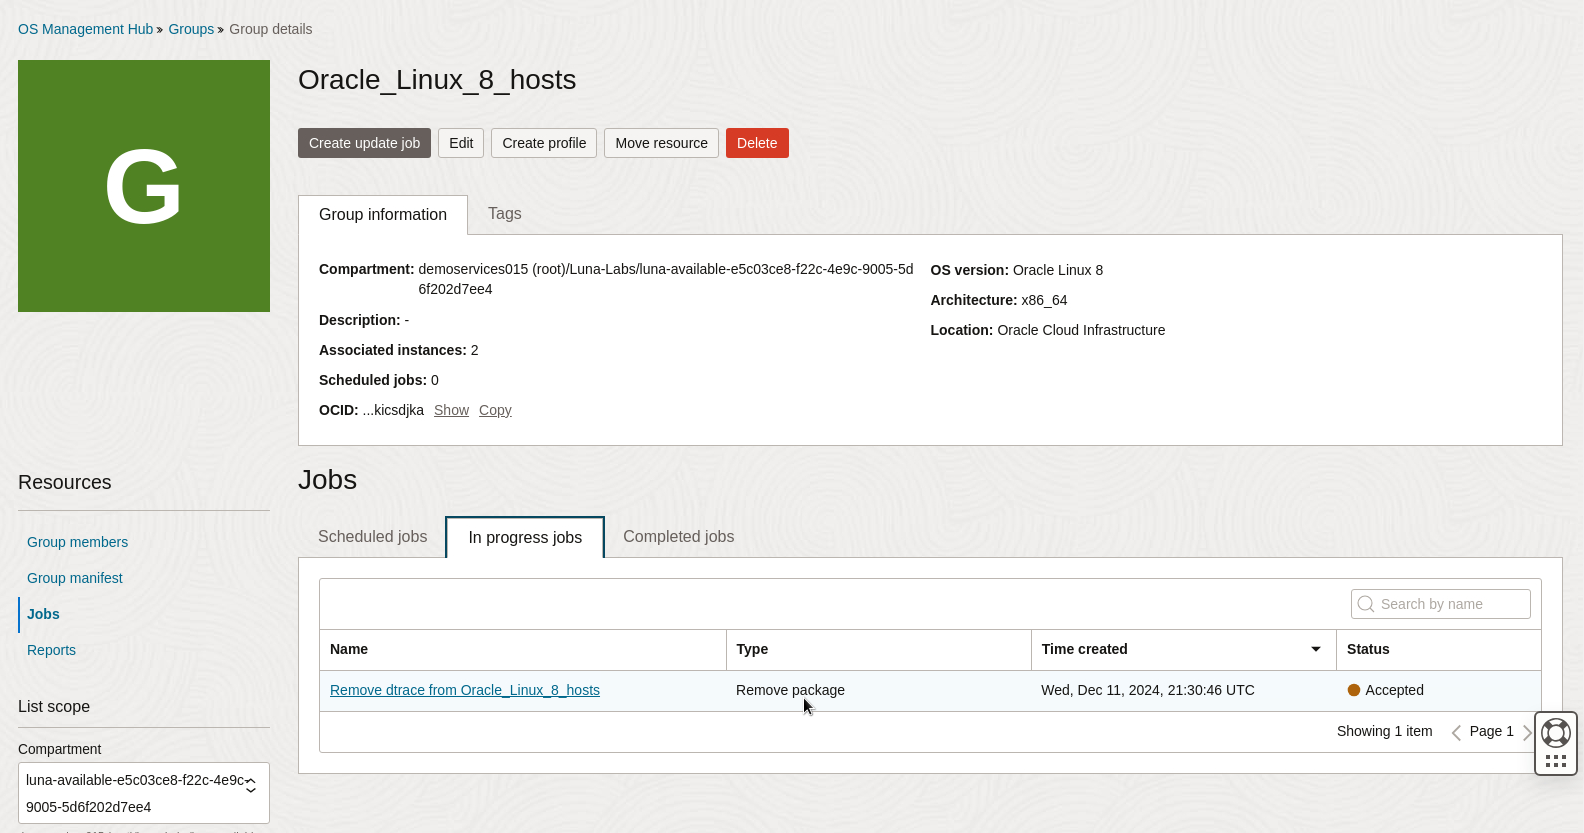
Before continuing, wait for this update job to complete and move to the Completed Jobs tab. This step may take several minutes.
Any changes you make to the group manifest, like adding or removing software sources, packages, and modules, get reflected on the current members of the group.
Updating Individual Group Member Instances
Group members can't change their attached software sources from what the group manifest specifies. The group defines the set of software sources available to its members.
However, group members can install and remove individual packages and modules independently from the manifest.
Installing Individual Packages and Modules to an Individual Group Member Instance
Installing individual updates to an instance via the Updates resource only applies to the associated updates listed in the advisory.
Click on instances under the OS Management Hub navigation section.
Select the name of an instance in the group to navigate to the instance's details page.
Click on Packages listed under resources and click the Available packages tab.
Search for and select the latest
zshpackage for x86_64 architecture.You can locate the search tool at the top right corner of the package table.
Click Install.
Enter the identifying information as the following:
- Name: Keep the default Job name.
- Description: (Optional) Enter a description.
Schedule the job to Run immediately.
Click Install.
Viewing Individual Group Member Instance Jobs
Jobs taken on an individual group member instance will only be viewable from the Jobs resource on the individual instance's details page.
The Jobs resource on the instance's details page separates jobs by Scheduled jobs, Group scheduled jobs, In-progress jobs, or Completed jobs.
View the install job status by clicking on the Jobs resource and selecting the In Progress jobs tab.
When the update is complete, the job will move to the Completed jobs tab.
Note: The console can take a few minutes to display the update job on the In progress jobs tab and the job will take several minutes to complete. If the job does not display, refresh the page.
Compare package counts for ol-host-02 and ol-host-03 on their Packages resource to view the difference.
An individual instance will contain packages not listed on the group manifest. These include:
- Packages installed before the instance joined the group.
- Packages installed on the individual instance.
- Packages installed outside of the service (for example, by using dnf install).
There might be packages on the group manifest that aren't on the instance if:
- Packages were removed from the individual instance.
- Packages were removed outside of the service (for example, by using dnf remove).
View OS Reports and Monitor Instance Activity for Groups
The reports resource displays a real-time summary of security updates, bug updates, and instance activity for instances associated with the group.
Reviewing reports for vulnerabilities and advisories helps identify available enhancements, security updates, and bug updates to run as update jobs for the group.
View Group Reports Resource
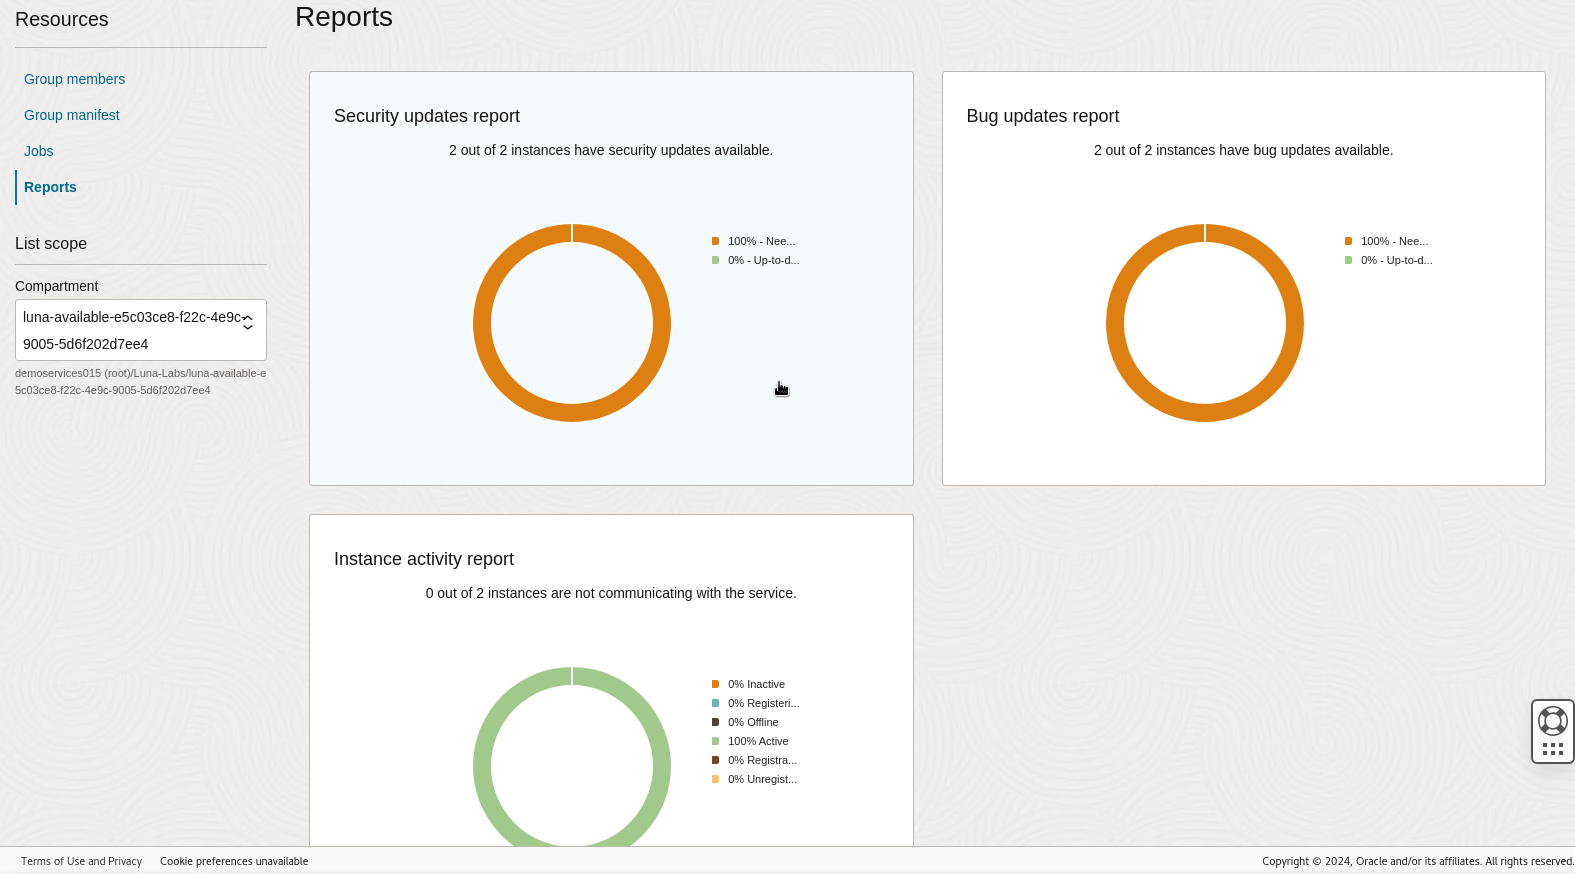
The Reports resource on the group's details page displays the following resources:
- Security updates report: Displays the number and percentage of up-to-date instances on security patches.
- Bug updates reports: Displays the number and percentage of up-to-date instances on bug patches.
- Instance activity reports: Displays the number and percentage of instances checking in with the OS Management Hub service.
Click Groups under the OS Management Hub navigation section and click on Oracle_Linux_8_hosts.
Click Reports under Resources on the Oracle_Linux_8_hosts Group details page.
Click on the Security updates report to go the the Security updates report resource.
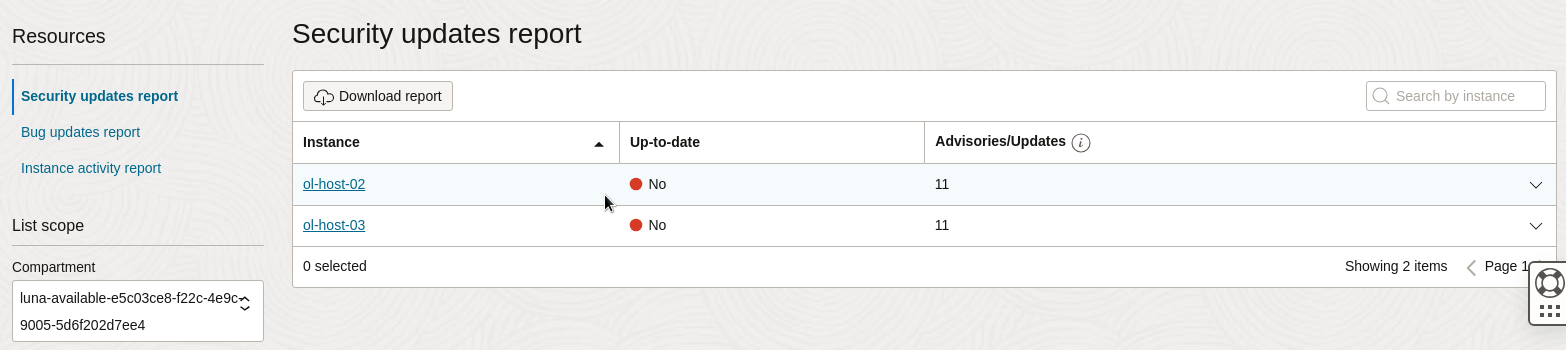
This details page contains details for security update statuses on all member instances of the group. Note any advisories or updates listed on the Security updates reports resource. You will run update jobs to address these later in the tutorial.
Click on the Bug updates report resource.

This details page displays bug updates for all member instances in the group. Note any advisories or updates listed on the Bug reports resource. You will run update jobs to address these later in the tutorial.
Click on the Instance activity report resource.
This details page displays the connectivity statuses for all member instances. The two member instances should display an active status.
Run Update Jobs and Monitor Jobs for the Group
Now that you have reviewed reports and identified advisories and available updates for the group, you will run jobs to update the group to the latest patches and content.
A job is an action that OS Management Hub takes against one or more instances, such as installing updates. When a job runs, it performs the work necessary to fulfill it, dispatches work to instances, and reports the results back to the service.
You can run update jobs immediately or schedule them for a different time. When scheduling update jobs, you can even set them as recurring events with a set frequency. Update jobs can take time to apply and display in the service.
Create an Update Job for the Group
To apply all updates to an instance that matches all or certain update types like security, bug fixes, or enhancements, then create an update job.
Click Groups under the OS Management Hub navigation section and click on Oracle_Linux_8_hosts.
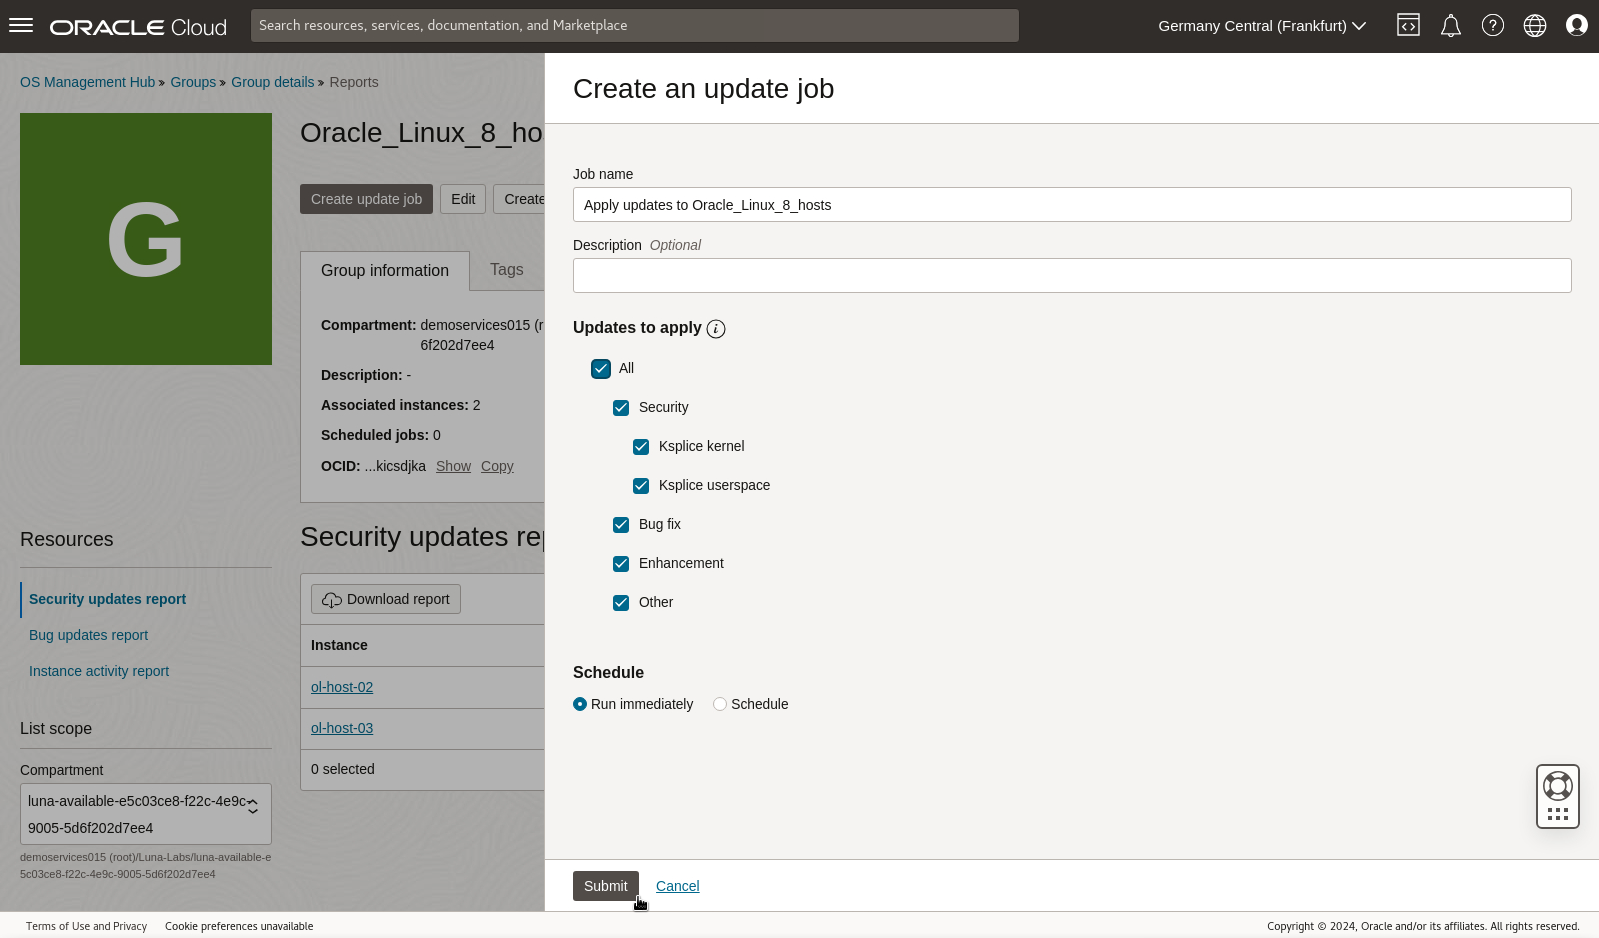
Click Create update job.
Enter the following job details:
- Name: Keep the default name for the job.
- Description: (Optional) Enter a description.
Select ALL from the Updates to apply options.
Schedule the job to Run immediately.
Click Submit.
Monitor Jobs for the Group
You can use the Jobs resource to monitor a job's status as it completes work against the group members.
View the update job status by clicking on the Jobs resource and selecting the In progress jobs tab.
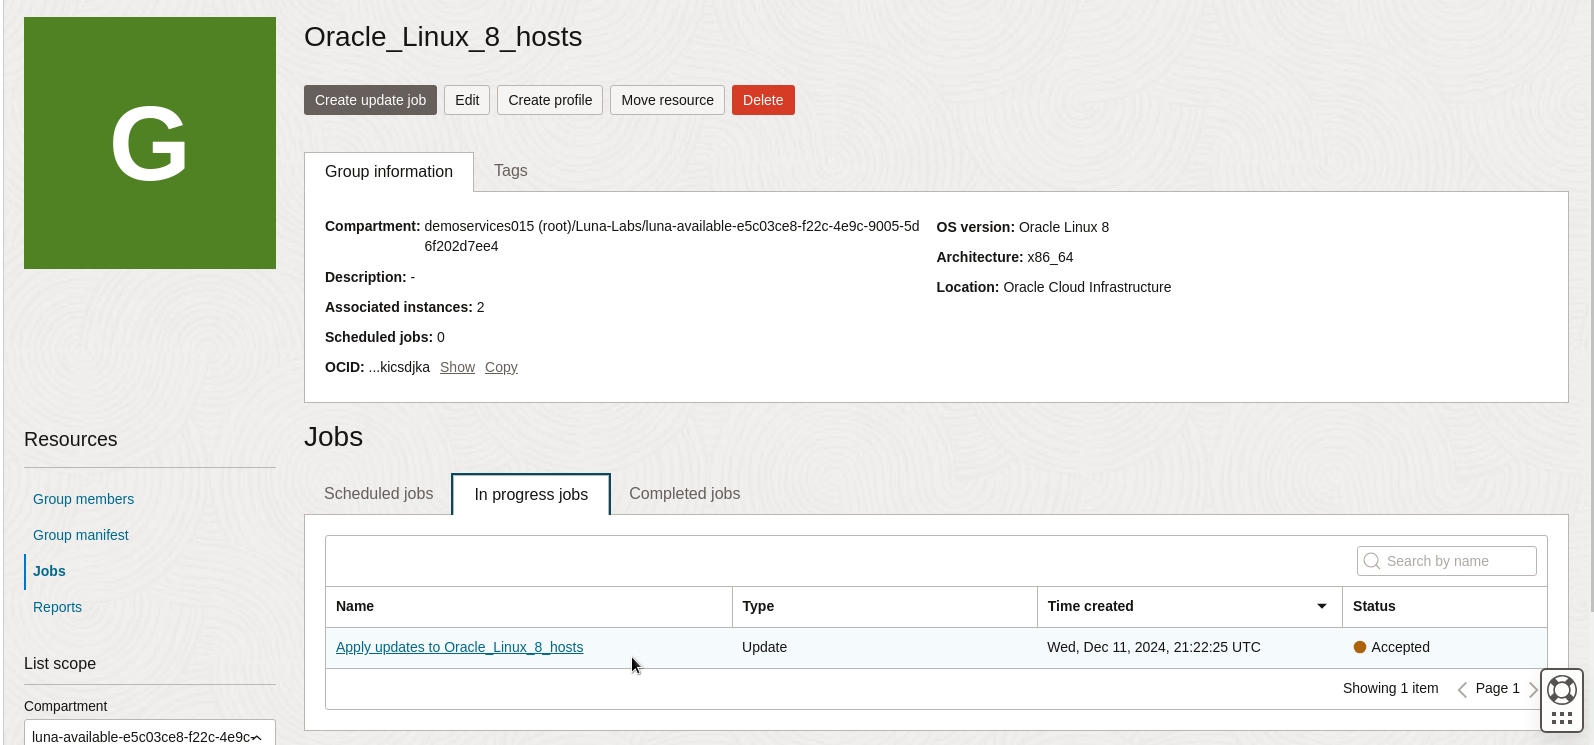
Note: The update job will take several minutes to complete and can take a few minutes to display on the console's In progress jobs tab. If the job does not display, refresh the page.
Click on the Apply updates to Oracle_Linux_8_hosts job on the In progress jobs tab.
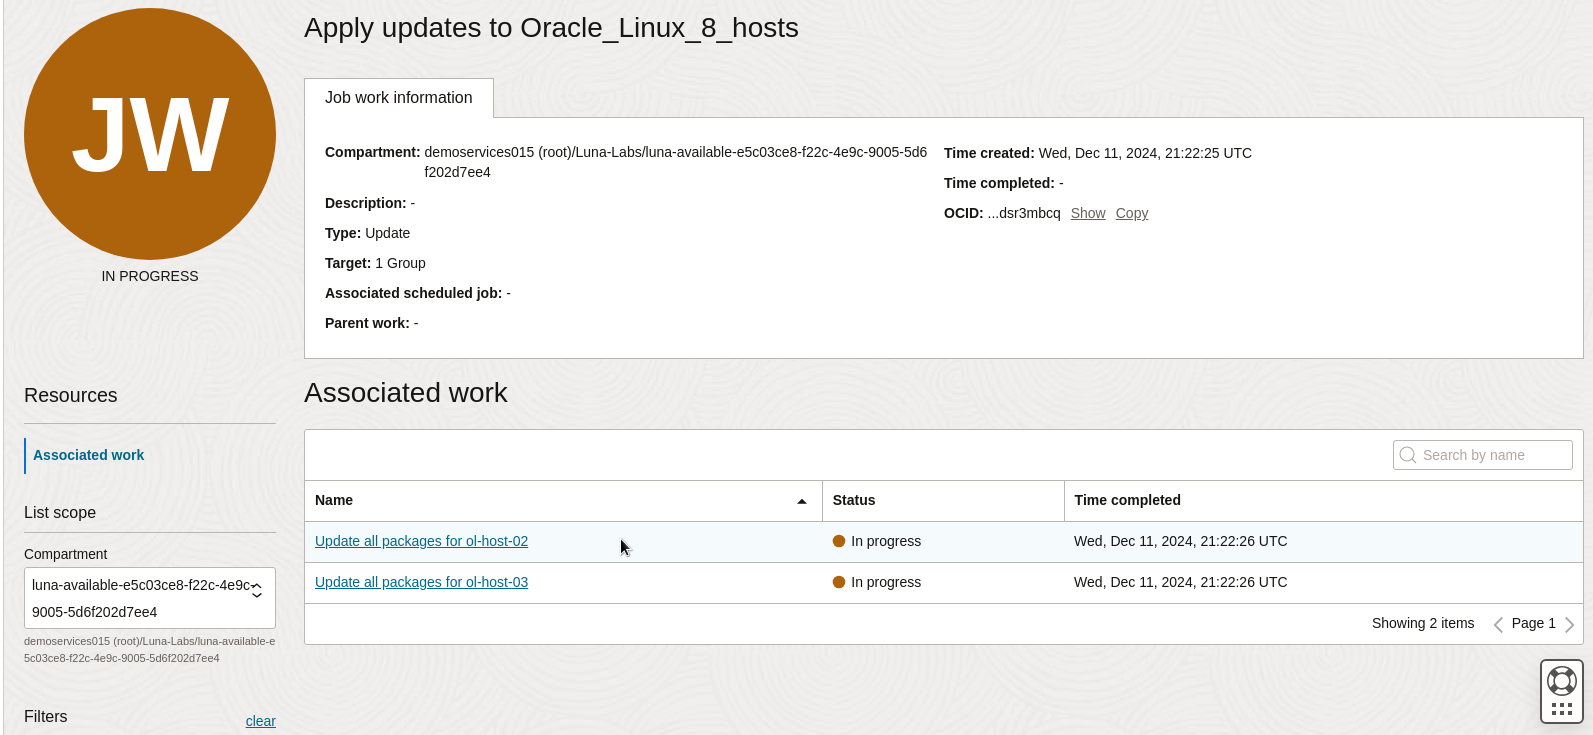
The Job work details page provides information on all work that the job will complete. The Associated work Resource lists the smaller tasks taken on each group member. For jobs that affect multiple instances, you can easily determine what associated work within a job succeeded or failed.
Return to the group's details page and the Jobs resource and click on the Completed jobs tab to view all completed jobs.
You will notice other jobs like assign software sources and install package jobs from the previous tutorial steps. A job is any action that OS Management Hub takes against the group and the group members.
Schedule a Recurring Update Job for the Group
You can schedule recurring update jobs for the group, and once you create those recurring jobs, they can be managed and modified from the Scheduled Jobs tab of the Jobs Resource.
Click Groups under the OS Management Hub navigation section and click on Oracle_Linux_8_hosts.
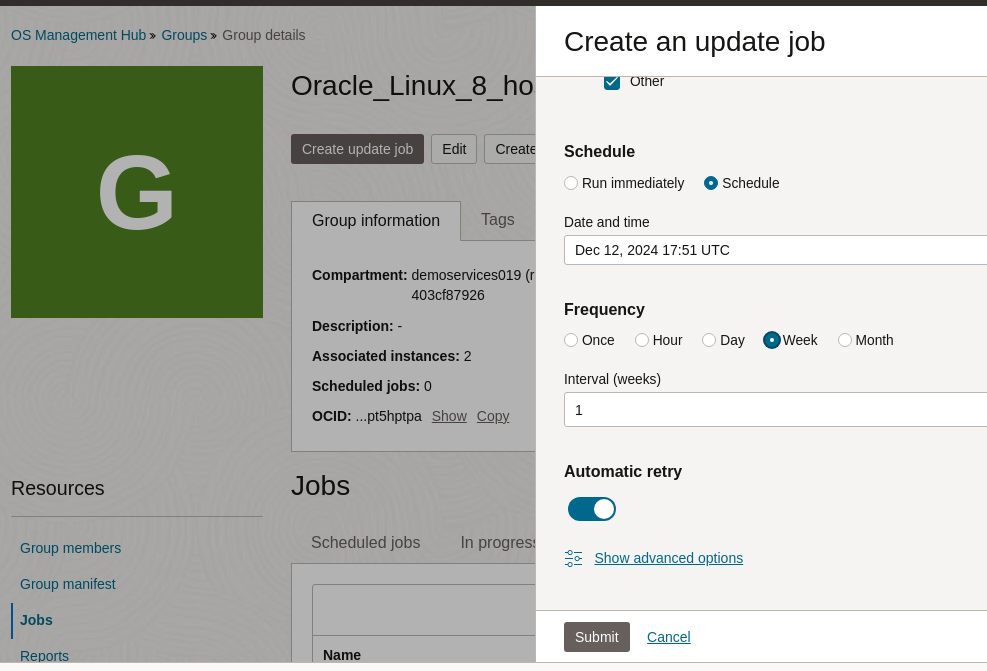
Click Create update job.
Enter the following job details:
- Name: Keep the default name for the job.
- Description: (Optional) Enter a description.
Select ALL from the Updates to apply options.
Select Schedule.
Click the calendar icon, select today's date, and schedule the job for 30 minutes from now.
Choose Week as the frequency.
Set the Interval (Weeks) to 1.
This step will schedule a recurring update job each week on the weekday and at the time set from the schedule selection.
Keep Automatic retry enabled.
If the initial execution of the job fails, the service retries the job up to three times. Each retry is five minutes apart.
Click Submit.
View the update job's status in the Scheduled Jobs tab on the Jobs page of the OS Management Hub section.
If the scheduled job does not appear, then wait some time and refresh the page.
This scheduled update job will ensure that all group members are updated regularly to the latest versions of the content defined in the Group manifest.
Next Steps
By completing this tutorial, you have learned to use groups in OS Management Hub to manage Oracle Linux OS content, schedule and run Oracle Linux OS updates, and monitor update jobs. Groups can simplify the maintenance of large Oracle Linux deployments by applying needed updates quickly and efficiently across all group members.