Lab 1 - Start SecureOracle
Overview
SecureOracle 9.1 is a demonstration platform aimed to facilitate learning of new features and capabilities of the Oracle Identity and Access Management Suite 12c R2 PS4 - Kubernetes Edition.
Note: This lab comprises a three-node Kubernetes cluster, and may need some wait time (between 5 to 10 minutes) until all resources and services become available.
Lab Timing
| No | Step | Likely |
|---|---|---|
| 1 | Starting the SecureOracle Environment | 20 minutes |
| 2 | Testing Access to Web Consoles and Applications | 10 minutes |
Prerequisites
None
Step 1: Starting the SecureOracle Environment
The SecureOracle environment is designed to be managed from the database server instance where all the Kubernetes utilities and Oracle IAM management lifecycle scripts have been installed and configured to access and manage the Kubernetes cluster. In addition, you can also use the Rancher web console described in the next steps.
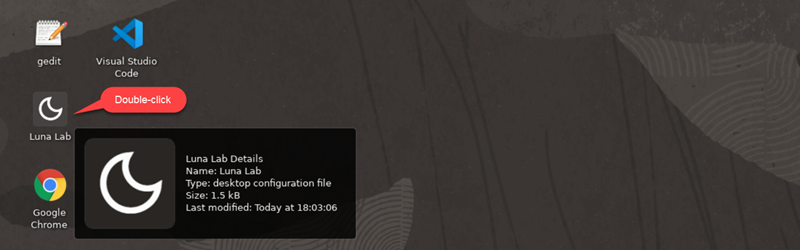
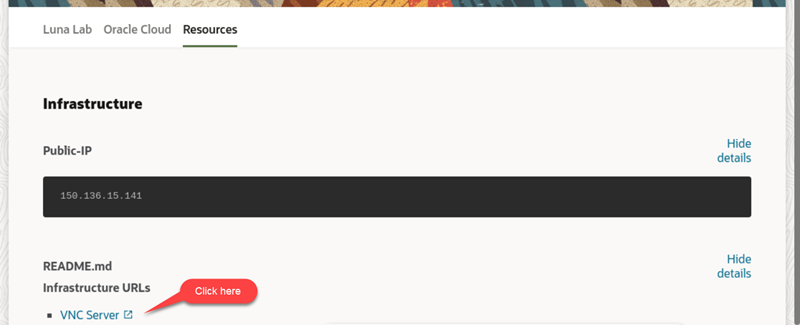
From the Luna desktop, double click in the Luna Lab icon.

A browser page shows the SecureOracle 9.1 details. A cog icon in the Resources tab indicates availability of the lab, once ready (check-mark icon) the Infrastructure URLs section along with the VNC Server link are displayed.
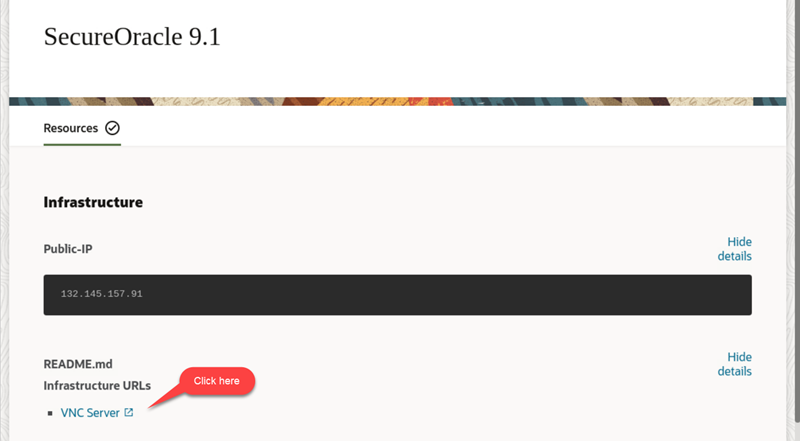
If this is the first time launching the workshop, wait 5 minutes and then right-click in the VNC Server link to copy the link address, then open a Chrome browser window and paste the link address to start a remote session.
Note: the link address opens a remote desktop session with the database server which is automatically set to oracle user. Under this desktop session you will perform all the lab exercises. Use a Chrome browser in order for the copy & paste functionality to work.
As oracle user, open the Terminal application and run the following Kubectl commands to check the context and status of the SecureOracle Kubernetes nodes.
E.g. run the following command to get the current context:
k config get-contextsThe output should be similar to the following:
CURRENT   NAME    CLUSTER   AUTHINFO   NAMESPACE
*         local   local     local
E.g. run the following command to check the status of cluster nodes:
k get nodesNote: if the lab just started, it could take up to 10 minutes for the cluster nodes to be up and running before a result can be obtained.
The output should be similar to the following:
NAME                       STATUS   ROLES                       AGE   VERSION
so91-srv1.oracledemo.com   Ready    control-plane,etcd,master   10d   v1.21.5+rke2r2
so91-srv2.oracledemo.com   Ready    control-plane,etcd,master   10d   v1.21.5+rke2r2
so91-srv3.oracledemo.com   Ready    control-plane,etcd,master   10d   v1.21.5+rke2r2
E.g. run the following command to check the status of Oracle Unified Directory (OUD) pods:
k get pod -n oracle-oud-systemThe output should be similar to the following:
NAME                   READY   STATUS    RESTARTS   AGE
oudinfra-oud-ds-rs-0   1/1     Running   0          140m
oudinfra-oud-ds-rs-1   1/1     Running   1          10h
oudinfra-oud-ds-rs-2   1/1     Running   1          10h
Note: wait until all OUD pods are up and running (READY 1/1 status) before proceeding with the next step.
As oracle user start the OIG and OAM domains.
E.g. run the following commands:
cd /home/oracle/domain-lifecycleStart OIG domain
./startDomain.sh -n oracle-oig-system -d oimclusterStart OAM domain
./startDomain.sh -n oracle-oam-system -d accessinfraNote: it could take up to 15 minutes before all pods in both domains are up and running. You can monitor the pods by running the following commands in a separate terminal (press [CTRL] + C to exit the watch command).
Monitor OIG pods
watch k get pods -n oracle-oig-systemThe output should be similar to the following:
NAME                              READY   STATUS    RESTARTS   AGE
oimcluster-adminserver            1/1     Running   0          18h
oimcluster-oim-server1            1/1     Running   0          17h
oimcluster-soa-server1            1/1     Running   0          17h
rcu-oig-helper-7cc5b9758b-r4tgt   1/1     Running   0          20h
Monitor OAM pods
watch k get pods -n oracle-oam-systemThe output should be similar to the following:
NAME                              READY   STATUS    RESTARTS   AGE
accessinfra-adminserver           1/1     Running   0          17h
accessinfra-oam-policy-mgr1       1/1     Running   0          17h
accessinfra-oam-server1           1/1     Running   0          17h
rcu-oam-helper-855486855c-8npgj   1/1     Running   0          20h
As oracle user start the Oracle HTTP Server (OHS) instances.
E.g. run the following commands:
Start OHS instances
sc start ohs1
sc start ohs2
Note: in both cases a SUCCESS or SUCCEEDED status in the output indicates the OHS instances are up and running.
Optionally, you can check the status of OHS instances with the following commands:
sc status ohs1
sc status ohs2
As oracle user check the status of all pods in the Kubernetes cluster.
E.g. run the following command:
k get pod -ANote: excluding 4 Helm pods (with completed status), all pods should be listed with a Running status. It could take a few more minutes for pods oaainstall-fido, oaainstall-oaa-admin-ui and oaainstall-spui to run if the OHS instances just started.
Type exit to close the Terminal application.
Step 2: Testing Access to Web Consoles and Applications
Open the Firefox browser within the database desktop and access the Rancher Web Console to review the SecureOracle Kubernetes cluster.
E.g. use the following URL address and credentials:
URL      : https://rancher.oracledemo.com/dashboard/auth/login
User     : admin
Password : Oracle123
Note 1: when accesing the Rancher login page you may get a Warning: Potential Security Risk Ahead, if so click in the Advanced button and then click on Accept the Risk and Continue.
Note 2: to access the cluster from the welcome page click in the hamburger button located in the top left corner to open the side panel and click in the local link under EXPLORE CLUSTER.

In the same browser, use a different tab to verify access to the different web consoles and applications.
E.g. use the following URL addresses and credentials:
Note: make sure to logoff from each console before accessing the next web console.
OAM Console
URL      : http://oam.oracledemo.com/oamconsole
User     : oamadmin
Password : Oracle123
OIM Console
URL      : http://oim.oracledemo.com/identity
User     : xelsysadm
Password : Oracle123
OAA Console
URL      : https://so91-srv1.oracledemo.com:32536/oaa-admin
User     : oaaadmin
Password : Oracle123
OIRI Console
URL      : http://oiri.oracledemo.com:30925/oiri/ui/v1/console/
User     : oiriadmin
Password : Oracle123
Mailu Console
URL      : http://mail.oracledemo.com/admin
User     : admin@oracledemo.com
Password : Oracle123
Sample OAM Web Console available in SecureOracle.

Proceed to close the browser.
You may now proceed to the next lab.
Lab 2 - Protected Application with OAA
Overview
Oracle Advanced Authentication (OAA) is a new OAM standalone service based on a micro-service architecture that provides strong Multi-factor Authentication (MFA) with a wide range of challenge factors to establish the identity of users.
This lab showcase a scenario to access a protected application with OAA using One-time Password (OTP) delivered by email notifications and Time-based One Time Password (TOTP) using the Oracle Mobile Authenticator (OMA) application.
The following use cases are available:
- Protected Application with OAA and OMA as Second Factor
- Protected Application with OAA and Email as Second Factor
Lab Timing
| No | Use Case | Likely |
|---|---|---|
| 1 | Protected Application with OAA and OMA as Second Factor | 15 minutes |
| 2 | Protected Application with OAA and Email as Second Factor | 15 minutes |
Prerequisites
The following prerequisites must be completed before running this scenario:
If you already perform this step in a previous lab, then proceed with the next step. Otherwise, from the Luna desktop, double click in the Luna Lab icon. A browser page shows the SecureOracle 9.1 details. A cog icon in the Resources tab indicates availability of the lab, once ready (check-mark icon) the Infrastructure URLs section along with the VNC Server link are displayed. If this is the first time launching the workshop, wait 5 minutes and then right-click in the VNC Server link to copy the link address, then open a Chrome browser window and paste the link address to start a remote session.

Note: the link address opens a remote desktop session with the database server which is automatically set to oracle user. Under this desktop session you will perform all the lab exercises. Use a Chrome browser in order for the copy & paste functionality to work.
As oracle user, open the Terminal application and run the following commands to check the status of the different components.
E.g. run the following command to check the status of the Kubernetes cluster
k get nodesOutput should be similar to the following:
NAME                       STATUS   ROLES                       AGE   VERSION
so91-srv1.oracledemo.com   Ready    control-plane,etcd,master   10d   v1.21.5+rke2r2
so91-srv2.oracledemo.com   Ready    control-plane,etcd,master   10d   v1.21.5+rke2r2
so91-srv3.oracledemo.com   Ready    control-plane,etcd,master   10d   v1.21.5+rke2r2
Run the following IAM lifecycle management script to check the status of the OAM and OIG clusters:
cd /home/oracle/domain-lifecycle
./clusterStatus.sh
Output should be similar to the following:
WebLogic Cluster Status -n "" -d "" -c "":

namespace          domain       cluster         min  max  goal  current  ready
---------          ------       -------         ---  ---  ----  -------  -----
oracle-oam-system  accessinfra  oam_cluster     0    5    1     1        1
oracle-oam-system  accessinfra  policy_cluster  0    5    1     1        1
oracle-oig-system  oimcluster   oim_cluster     0    5    1     1        1
oracle-oig-system  oimcluster   soa_cluster     0    5    1     1        1
Note: the soa_cluster in the OIG system contains the Oracle User Messaging Service (UMS) that is used by OAA for providing Email and SMS challenge factors.
If necessary, start the Oracle HTTP Server (OHS) instances. As oracle user check the status of the OHS instances. E.g. run the following commands:
Check status of OHS instances
sc status ohs1
sc status ohs2
Start OHS instances
sc start ohs1
sc start ohs2
Note: in both cases a SUCCESS or SUCCEEDED status in the output indicates the OHS instances are up and running.
Verify if Oracle Advanced Authentication (OAA) pods are up and running. As oracle user check the status of the OAA pods.
E.g. run the following command:
k get pod -n oracle-oaa-systemOutput should be similar to the following:
NAME                                      READY   STATUS    RESTARTS   AGE
coherence-operator-7ccc5f5698-6gx8f       1/1     Running   1          7d22h
oaainstall-cache-proxy-0                  1/1     Running   1          4d17h
oaainstall-cache-rest-0                   1/1     Running   1          4d17h
oaainstall-cache-storage-0                1/1     Running   1          4d17h
oaainstall-email-549f748769-qr9xs         1/1     Running   0          22h
oaainstall-fido-bc59c494c-rgwsf           1/1     Running   41         22h
oaainstall-oaa-8db9659f-plfbp             1/1     Running   0          22h
oaainstall-oaa-admin-ui-84bc4bdf8-2kt9f   1/1     Running   41         22h
oaainstall-oaa-policy-8c9bf84bb-mv54s     1/1     Running   0          22h
oaainstall-sms-5c8db7bb4d-r7gpf           1/1     Running   0          22h
oaainstall-spui-686bf7c74b-2qmt4          1/1     Running   41         22h
oaainstall-totp-7cf74c6446-q296j          1/1     Running   0          22h
oaainstall-yotp-585bcb8b4f-vxznd          1/1     Running   0          22h
oaamgmt-0                                 1/1     Running   0          22h
Validate that you have access to the email system. As oracle user, open the Firefox browser application and access the Mailu admin console.
E.g. use the following URL address and credentials:
URL      : http://mail.oracledemo.com/admin
User     : demousr1@oracledemo.com
Password : Oracle123
Once in the Mailu console, click in the Webmail link located in the left side panel. This will open another tab in your browser and show you the Roundcube email client. Proceed to close the browser.
The Oracle Mobile Authenticator (OMA) application is installed in your mobile device (use Google or Apple store to install the application).
A SecureOracle test account must be registered with your Oracle Mobile Authenticator, to do so proceed with the following instructions:
- Open OMA in your mobile device
- If this is the first time accessing OMA, click on Add Account, otherwise tap the plus (+) icon at the bottom of the screen
- Then tap on Enter key manually link
- In Select Account Type, choose Oracle. Then, enter the following information:
Company : Oracle Account : Demo User1 Key : DemoAppUsrOne- Tap on Save button to register the account.
Important: it's recommended to use the Firefox browser for the use cases. If Chrome browser is used, make sure Chrome's Insecure origins treated as secure flag is enabled.
Case 1: Protected Application with OAA and OMA as Second Factor
As oracle user, open the Firefox application and access the protected application.
E.g. use the following URL address and credentials:
URL      : http://sodb.oracledemo.com:7778/demoapp
User     : demousr1
Password : Oracle123
Note: accept any browser warnings regarding certificates.
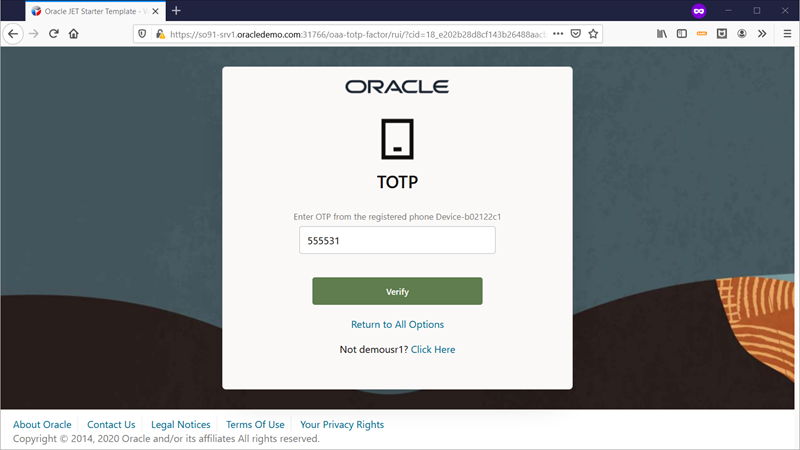
After entering the credentials, the OAA challenge page is displayed, click in the link address under Oracle Mobile Authenticator.
Next, the Oracle TOTP page is displayed. At this point, open your Oracle Mobile Authenticator (OMA) application and check the generated TOTP code for the Demo User1 account.
Switch to the Oracle TOTP page and proceed to enter the code generated by OMA.
Click the Verify button and Continue button if prompted with a warning message regarding insecure mode.
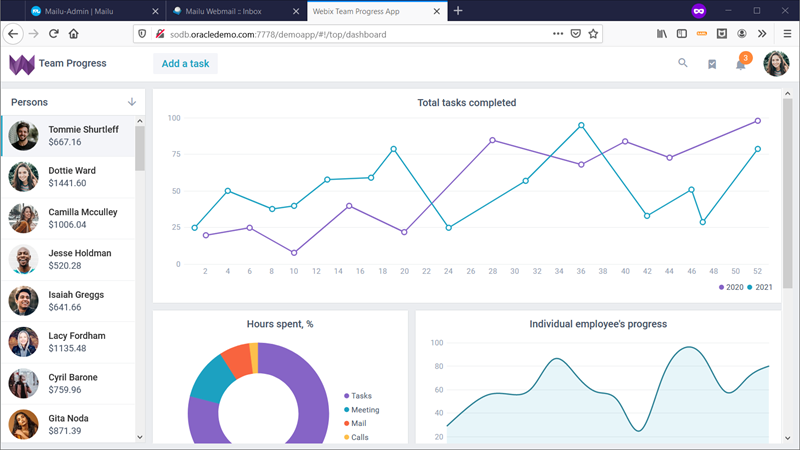
The Team Progress sample application is displayed.
Optionally, you can logout from the sample application by entering the OAM logout address.
E.g. use the following URL address to logout:
http://sodb.oracledemo.com:7777/oam/server/logoutNote: if you try to access the protected application again, you are prompted to choose and enter a second factor only. You must close the browser to enter again the login credentials and second factor.
Proceed to close the browser.
Case 2: Protected Application with OAA and Email as Second Factor
As oracle user, open the Firefox application and access the email system.
E.g. use the following URL address and credentials:
URL      : http://mail.oracledemo.com/admin
User     : demousr1@oracledemo.com
Password : Oracle123
Once in the Mailu console, click in the Webmail link located in the left side panel. This will open another tab in your browser and show you the Roundcube email client.
Open a new tab in the browser and access the protected application.
E.g. use the following URL address and credentials:
URL      : http://sodb.oracledemo.com:7778/demoapp
User     : demousr1
Password : Oracle123
Note: accept any browser warnings regarding certificates. Also, be aware that protected applications use cookies, so if you previously login and established a session with the same credentials, you may not be prompted with a challenge page.
After entering the credentials, the OAA challenge page is displayed, click in the link address under Email Challenge.
Next, the Oracle Email page is displayed. At this point, switch to the Roundcube email client page and check your inbox for new notifications. You should receive a notification with subject One-Time Pin: OAA in your inbox. Click the Refresh button if needed.
Once the notification is received, switch to the Oracle Email page and proceed to enter the PIN number received by email.
Click the Verify button and Continue button if prompted with a warning message regarding insecure mode.
The Team Progress sample application is displayed.
Optionally, you can logout from the sample application by entering the OAM logout address.
E.g. use the following URL address to logout (OAM port 7777):
http://sodb.oracledemo.com:7777/oam/server/logoutNote: if you try to access the protected application again, you are prompted to choose and enter a second factor only. You must close the browser to enter again the login credentials and second factor.
Proceed to close the browser.
You may now proceed to the next lab.
Lab 3 - Protecting Oracle databases with ORA and OAA
Overview
Oracle RADIUS Agent (ORA) is a RADIUS based authentication service that acts as an intermediary between the client applications requiring authentication services and one or more authentication providers. The client applications can be a VPN server, Linux servers using SSH, Oracle databases, or any RADIUS based client application. Currently, standard LDAP authentication providers like Oracle Unified Directory, Oracle Internet Directory, and Microsoft Active Directory are supported.
Oracle Advanced Authentication (OAA) is a new OAM standalone service based on a micro-service architecture that provides strong Multi-factor Authentication (MFA) with a wide range of challenge factors to establish the identity of users.
This lab showcase a scenario to access the Oracle database with strong authentication using ORA integrated with OAA.
The following use cases are available:
- Database Authentication with ORA and OMA as Second Factor
- Database Authentication with ORA and Email as Second Factor
Lab Timing
| No | Use Case | Likely |
|---|---|---|
| 1 | Database Authentication with ORA and OMA as Second Factor | 15 minutes |
| 2 | Database Authentication with ORA and Email as Second Factor | 15 minutes |
Prerequisites
The following prerequisites must be completed before running this scenario:
If you already perform this step in a previous lab, then proceed with the next step. Otherwise, from the Luna desktop, double click in the Luna Lab icon. A browser page shows the SecureOracle 9.1 details. A cog icon in the Resources tab indicates availability of the lab, once ready (check-mark icon) the Infrastructure URLs section along with the VNC Server link are displayed. If this is the first time launching the workshop, wait 5 minutes and then right-click in the VNC Server link to copy the link address, then open a Chrome browser window and paste the link address to start a remote session.

Note: the link address opens a remote desktop session with the database server which is automatically set to oracle user. Under this desktop session you will perform all the lab exercises. Use a Chrome browser in order for the copy & paste functionality to work.
As oracle user, open the Terminal application and run the following commands to check the status of the different components.
E.g. run the following command to check the status of the Kubernetes cluster
k get nodesOutput should be similar to the following:
NAME                       STATUS   ROLES                       AGE   VERSION
so91-srv1.oracledemo.com   Ready    control-plane,etcd,master   10d   v1.21.5+rke2r2
so91-srv2.oracledemo.com   Ready    control-plane,etcd,master   10d   v1.21.5+rke2r2
so91-srv3.oracledemo.com   Ready    control-plane,etcd,master   10d   v1.21.5+rke2r2
Run the following IAM lifecycle management script to check the status of the OIG clusters:
cd /home/oracle/domain-lifecycle
./clusterStatus.sh -n oracle-oig-system -d oimcluster
Output should be similar to the following:
WebLogic Cluster Status -n "oracle-oig-system" -d "oimcluster" -c "":

namespace          domain      cluster      min  max  goal  current  ready
---------          ------      -------      ---  ---  ----  -------  -----
oracle-oig-system  oimcluster  oim_cluster  0    5    1     1        1
oracle-oig-system  oimcluster  soa_cluster  0    5    1     1        1
Note: the soa_cluster in the OIG system contains the Oracle User Messaging Service (UMS) that is used by OAA for providing Email and SMS challenge factors.
Verify if Oracle RADIUS Agent (ORA) pods are up and running. As oracle user check the status of the ORA pods.
E.g. run the following command:
k get pod -n oracle-ora-systemOutput should be similar to the following:
NAME                          READY   STATUS    RESTARTS   AGE
radiusagent-dbbdb9cd7-kqs82   1/1     Running   0          32h
Verify if Oracle Advanced Authentication (OAA) pods are up and running. As oracle user check the status of the OAA pods.
E.g. run the following command:
k get pod -n oracle-oaa-systemOutput should be similar to the following:
NAME                                      READY   STATUS    RESTARTS   AGE
coherence-operator-7ccc5f5698-6gx8f       1/1     Running   1          7d22h
oaainstall-cache-proxy-0                  1/1     Running   1          4d17h
oaainstall-cache-rest-0                   1/1     Running   1          4d17h
oaainstall-cache-storage-0                1/1     Running   1          4d17h
oaainstall-email-549f748769-qr9xs         1/1     Running   0          22h
oaainstall-fido-bc59c494c-rgwsf           1/1     Running   41         22h
oaainstall-oaa-8db9659f-plfbp             1/1     Running   0          22h
oaainstall-oaa-admin-ui-84bc4bdf8-2kt9f   1/1     Running   41         22h
oaainstall-oaa-policy-8c9bf84bb-mv54s     1/1     Running   0          22h
oaainstall-sms-5c8db7bb4d-r7gpf           1/1     Running   0          22h
oaainstall-spui-686bf7c74b-2qmt4          1/1     Running   41         22h
oaainstall-totp-7cf74c6446-q296j          1/1     Running   0          22h
oaainstall-yotp-585bcb8b4f-vxznd          1/1     Running   0          22h
oaamgmt-0                                 1/1     Running   0          22h
Make sure you have access to the email system. As oracle user, open the Firefox application and access the Mailu admin console.
E.g. use the following URL address and credentials:
URL      : http://mail.oracledemo.com/admin
User     : mfauser1@oracledemo.com
Password : Oracle123
Once in the Mailu console, click in the Webmail link located in the left side panel. This will open another tab in your browser and show you the Roundcube email client. Proceed to close the browser.
Make sure Oracle Mobile Authenticator (OMA) application is installed in your mobile device (use Google or Apple store to install the application).
A SecureOracle test account must be registered with your Oracle Mobile Authenticator, to do so proceed with the following instructions:
- Open OMA in your mobile device
- If this is the first time accessing OMA, click on Add Account, otherwise tap the plus (+) icon at the bottom of the screen
- Then tap on Enter key manually link
- In Select Account Type, choose Oracle
Then, enter the following information:
Company : Oracle Account : MFA User1 Key : OmaSecretValueOne- Tap on Save button to register the account.
Case 1: Database Authentication with ORA and OMA as Second Factor
As oracle user, open a Terminal application and set the Oracle database environment.
E.g. run the following command to set the database environment:
. ./setDBenv.shNote: note the space between the two dots.
Login to the Oracle database.
E.g. run the following command:
sqlplus /@iamdbAt the Oracle - Login window, enter the following credentials:
Username : mfauser1
Password : Oracle123
Click the OK button. Next, at the Oracle - Challenge window, enter 1 to select Oracle Mobile Authenticator and click OK to continue.
A new Oracle - Challenge window is displayed prompting to enter the OTP code.
At this point, open your Oracle Mobile Authenticator application and check the generated TOTP code for the MFA User1 account.
Switch to the Oracle - Challenge window and proceed to enter the code generated by OMA.
Click the OK button.
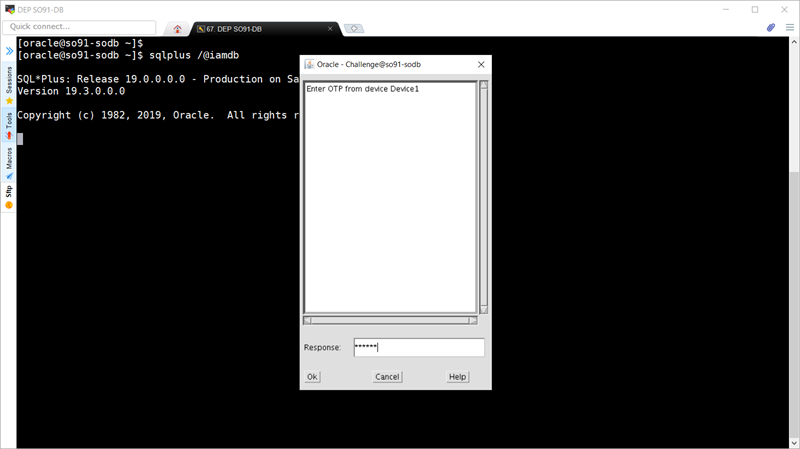
Now, you should logged in to the Oracle database.
At the SQL prompt, enter the following commands to check your database roles.
E.g. run the following commands:
SQL> @/home/oracle/oracle-docker-ora/format.sql
SQL> select username, granted_role from user_role_privs;
The output should be similar to the following:
USERNAME             GRANTED_ROLE
-------------------- --------------------------------------------------
MFAUSER1             EMPLOYEES_ROLE
Optionally, check access to the Employees table.
E.g. run the following command:
SQL> select * from hr.employees;Exit SQLPlus by typing the exit command.
Type exit again to close the Terminal application.
Case 2: Database Authentication with ORA and Email as Second Factor
As oracle user, open the Firefox application and access the email system.
E.g. use the following URL address and credentials:
URL      : http://mail.oracledemo.com/admin
User     : mfauser1@oracledemo.com
Password : Oracle123
Once in the Mailu console, click in the Webmail link located in the left side panel. This will open another tab in your browser and show you the Roundcube email client.
As oracle user, open a Terminal application and set the Oracle database environment.
E.g. run the following command to set the database environment:
. ./setDBenv.shNote: note the space between the two dots.
Login to the Oracle database.
E.g. run the following command:
sqlplus /@iamdbAt the Oracle - Login window, enter the following credentials:
Username : mfauser1
Password : Oracle123
Click the OK button. Next, at the Oracle - Challenge window, enter 2 to select Email Challenge and click OK to continue.
A new Oracle - Challenge window is displayed prompting to enter the OTP code.
At this point, check the inbox in the Roundcube email client. You should receive a notification with subject One-Time Pin: OAA in your inbox. Click the Refresh button if needed.
Once the notification is received, switch to the Oracle - Challenge window and proceed to enter the PIN number received by email.
Click the OK button.
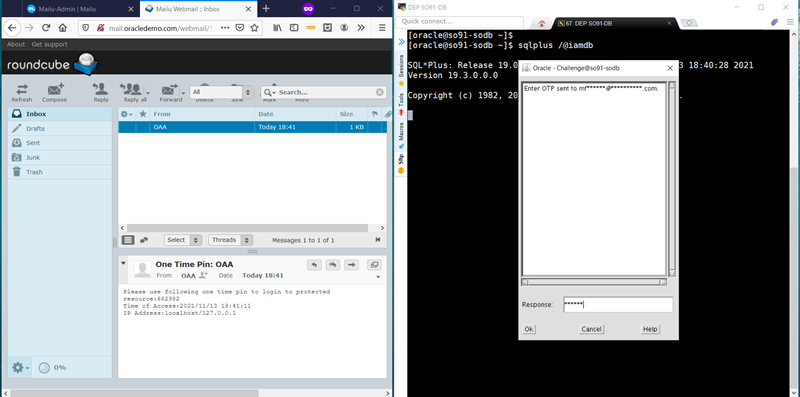
Now, you should logged in to the Oracle database.
At the SQL prompt, enter the following commands to check your database roles.
E.g. run the following commands:
SQL> @/home/oracle/oracle-docker-ora/format.sql
SQL> select username, granted_role from user_role_privs;
The output should be similar to the following:
USERNAME             GRANTED_ROLE
-------------------- --------------------------------------------------
MFAUSER1             EMPLOYEES_ROLE
Optionally, check access to the Employees table.
E.g. run the following command:
SQL> select * from hr.employees;Exit SQLPlus by typing the exit command.
Type exit again to close the Terminal application.
You may now proceed to the next lab.
Lab 4 - Role Mining Analysis with OIRI
Overview
Oracle Identity Role Intelligence (OIRI) is a new OIG service based on a micro-service architecture that provides an intelligent, automated, and flexible way to optimize role-based access control (RBAC).
OIRI offers the following key capabilities:
- Discovery of entitlements patterns across peer groups
- Support for top-down approach for role mining based on user attributes, or for bottom-up approach that filters data based on applications and entitlements, or a hybrid approach
- Compare candidate roles with existing role to avoid role explosion
- Ability to fine tune the candidate roles based on user affinity and role affinity
- Automated publishing of roles to OIG to trigger workflow for role adoption
- Ability to merge data from different sources, such as OIG database and flat files, and provide what if analysis before moving candidate roles to production
This lab showcase a scenario to walkthrough OIRI command line interfaces, review data imports and analyze role mining tasks.
The following use cases are available:
- Walkthrough OIRI and DING Command Line Interfaces
- Reviewing Data Imports
- Analyzing Role Mining Tasks
Lab Timing
| No | Use Case | Likely |
|---|---|---|
| 1 | Walkthrough OIRI and DING Command Line Interfaces | 10 minutes |
| 2 | Reviewing Data Imports | 10 minutes |
| 3 | Analyzing Role Mining Tasks | 10 minutes |
Prerequisites
The following prerequisites must be completed before running this scenario:
If you already perform this step in a previous lab, then proceed with the next step. Otherwise, from the Luna desktop, double click in the Luna Lab icon. A browser page shows the SecureOracle 9.1 details. A cog icon in the Resources tab indicates availability of the lab, once ready (check-mark icon) the Infrastructure URLs section along with the VNC Server link are displayed. If this is the first time launching the workshop, wait 5 minutes and then right-click in the VNC Server link to copy the link address, then open a Chrome browser window and paste the link address to start a remote session.


Note: the link address opens a remote desktop session with the database server which is automatically set to oracle user. Under this desktop session you will perform all the lab exercises. Use a Chrome browser in order for the copy & paste functionality to work.
As oracle user, open the Terminal application and run the following commands to check the status of the different components.
E.g. run the following command to check the status of the Kubernetes cluster
k get nodesOutput should be similar to the following:
NAME                       STATUS   ROLES                       AGE   VERSION
so91-srv1.oracledemo.com   Ready    control-plane,etcd,master   10d   v1.21.5+rke2r2
so91-srv2.oracledemo.com   Ready    control-plane,etcd,master   10d   v1.21.5+rke2r2
so91-srv3.oracledemo.com   Ready    control-plane,etcd,master   10d   v1.21.5+rke2r2
Run the following IAM lifecycle management script to check the status of the OIG clusters:
cd /home/oracle/domain-lifecycle
./clusterStatus.sh -n oracle-oig-system -d oimcluster
Output should be similar to the following:
WebLogic Cluster Status -n "oracle-oig-system" -d "oimcluster" -c "":

namespace          domain      cluster      min  max  goal  current  ready
---------          ------      -------      ---  ---  ----  -------  -----
oracle-oig-system  oimcluster  oim_cluster  0    5    1     1        1
oracle-oig-system  oimcluster  soa_cluster  0    5    1     1        1
Verify if Oracle Identity Role Intelligence (OIRI) pods are up and running. As oracle user check the status of the OIRI pods.
E.g. run the following command:
k get pod -n oracle-oiri-systemOutput should be similar to the following:
NAME                                             READY   STATUS    RESTARTS   AGE
oiri-8cc4ddf65-xgvkz                             1/1     Running   0          2d4h
oiri-cli-77c68c4857-kvfmh                        1/1     Running   1          4d6h
oiri-ingress-nginx-controller-7b8cb6f84c-6d7zp   1/1     Running   1          4d21h
oiri-ui-6cf9d84cc4-wz7w2                         1/1     Running   1          4d21h
Run the following command:
k get pod -n oracle-ding-systemOutput should be similar to the following:
NAME                                    READY   STATUS    RESTARTS   AGE
ding-cli-7c7d669c77-g7n7g               1/1     Running   1          4d6h
spark-history-server-84dd786d86-fk5fk   1/1     Running   1          4d17h
Note: OIRI is deployed in two namespaces: oracle-oiri-system and oracle-ding-system
Make sure you have access to the OIRI Web Console. As oracle user, open the Firefox application and access the OIRI Web Console.
E.g. use the following URL address and credentials:
URL      : http://oiri.oracledemo.com:30925/oiri/ui/v1/console/
User     : oiriadmin
Password : Oracle123
Case 1: Walkthrough OIRI and DING Command Line Interfaces
The oiri-cli and ding-cli container images expose command line interfaces (CLIs) to help with OIRI installation and management of data ingestion tasks. These images usually run from secure VMs with connectivity to the K8s cluster. In SecureOracle however, these images have been deployed inside the K8s cluster to facilitate the execution of demo scenarios and development of further use cases.
As oracle user, open a Terminal application. Access the oiri-cli container and review the command line interface.
E.g. run the following command to access the container:
k exec -it deploy/oiri-cli -n oracle-oiri-system -- /bin/bashOnce in the container, run the following command to learn about the options and sub-commands available:
oiri-cli helpNote: type the exit command to exit the container.
Access the ding-cli container and review the command line interface.
E.g. run the following command to access the container:
k exec -it deploy/ding-cli -n oracle-ding-system -- /bin/bashOnce in the container, run the following command to learn about the options and sub-commands available:
ding-cli helpType the exit command to exit the container.
Case 2: Reviewing Data Imports
As oracle user, open the Firefox application and access the OIRI Web Console.
E.g. use the following URL address and credentials:
URL      : http://oiri.oracledemo.com:30925/oiri/ui/v1/console/
User     : oiriadmin
Password : Oracle123
In the OIRI home page, click in the hamburger icon located at the top left corner and select Data Import.
In the Manage Data Import page, click in the View Results button available in any of the listed import results.
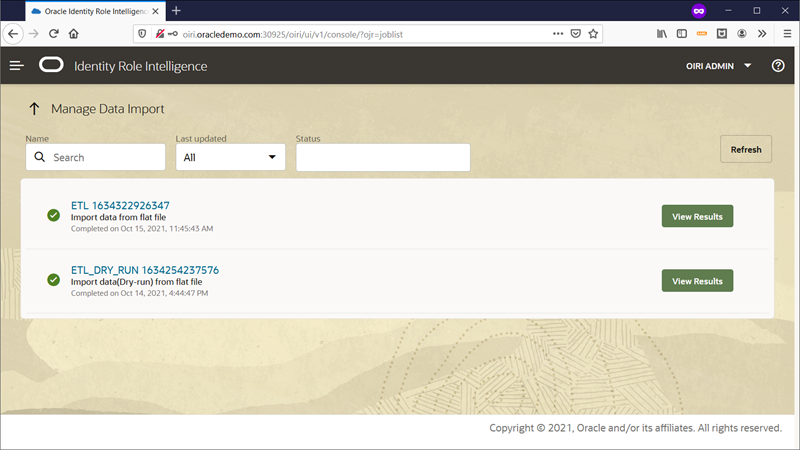
Note: using the DING command line interface you can import data in two ways: dry-run import and actual import. The dry-run import allows you to validate if the data to be imported fits into the OIRI database. This will fetch data from the source, such as Oracle Identity Governance database or flat files, and validate it against the metadata of the OIRI database.
The View Results option in the case of dry-run imports, shows the different source entities along with the data count, time taken, data validity and a summary of the probable data to be imported under the Details link.
Proceed to close the browser.
Case 3: Analyzing Role Mining Tasks
As oracle user, open the Firefox application and access the OIRI Web Console.
E.g. use the following URL address and credentials:
URL      : http://oiri.oracledemo.com:30925/oiri/ui/v1/console/
User     : oiriadmin
Password : Oracle123
In the OIRI home page, click in the hamburger icon located at the top left corner and select All Tasks.
In the Manage Tasks page, click in the View Candidate Roles button available in the listed starlight task.
The Candidate Roles page is displayed along with a Role Distribution Chart and a list of Candidate Roles. Mouse over the tiles in the distribution chart to see more details, clicking in a tile will automatically select the candidate role in the list.
Select one of the candidate roles in the list and click in the Review Role button.
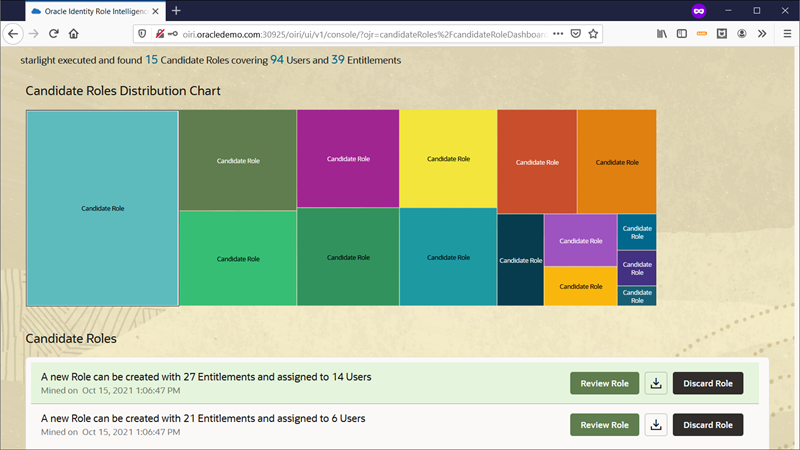
In the Review and Adjust a Candidate Role page, you can analyze the candidate role across several dimensions.
The Entitlements horizontal bar shows the number of entitlements that are part of the candidate role out of the total number of entitlements included in the role mining task.
The Users horizontal bar shows the number of users that are part of the candidate role out of the total number of users included in the role mining task.
The Role Analytics section displays the percentage of top three attributes in the candidate role based on configuration. For example, Top Managers represent the top managers among the users that are part of the candidate role. If all users belong to one organization, then 100 percent is shown in the Top Organization.
The gear icon opens the Configure Role Analytics Graphs window to adjust your analysis along with the top 3 attributes to display.
The option Looks Good Publish the Role allows you to publish the candidate role. A selection to publish the role online or offline determines if the candidate role is published to Oracle Identity Governance or to a CSV file respectively.
Click in the user name located at top right corner and select Sign Out to exit the application.
Proceed to close the browser.
You have completed the last lab.
Lab 5 - Application Onboarding with OIG
Overview
Oracle Identity Governance(OIG) is a powerful and flexible enterprise identity management system that automatically manages user's access privileges within enterprise IT resources. Application onboarding is the process of registering or associating an application with Oracle Identity Manager so that Oracle Identity Manager can provision or reconcile user information in or from that application. Oracle Identity Manager provides a quick and convenient way to onboard applications by using the Applications option on the Manage tab in Identity Self Service. You can perform all the necessary configurations to onboard an application from a single console. This simplified solution has the following benefits:
- You can configure new or existing applications by using a single user interface: Identity Self Service.
- You can export configurations as application templates and configure applications by using these templates, instead of Oracle Identity Manager.
This lab showcase scenarios to walkthrough OIG Application Onboarding interface, create a flat file target application and perform accounts and entitlement reconciliation.
The following use cases are available:
- Preparing the Environment
- Creating Application
- Providing Basic Information
- Updating Schema Information
- Providing Settings Information
- Reviewing and Submitting Application Details
- Performing Reconciliation
Lab Timing
| No | Use Case | Likely |
|---|---|---|
| 1 | Preparing the Environment | 5 minutes |
| 2 | Creating Application | 3 minutes |
| 3 | Providing Basic Information | 5 minutes |
| 4 | Updating Schema Information | 5 minutes |
| 5 | Providing Settings Information | 5 minutes |
| 6 | Reviewing and Submitting Application Details | 2 minutes |
| 7 | Performing Reconciliation | 10 minutes |
Prerequisites
The following prerequisites must be completed before running this scenario:
If you already perform this step in a previous lab, then proceed with the next step. Otherwise, from the Luna desktop, double click in the Luna Lab icon. A browser page shows the SecureOracle 9.1 details. A cog icon in the Resources tab indicates availability of the lab, once ready (check-mark icon) the Infrastructure URLs section along with the VNC Server link are displayed. If this is the first time launching the workshop, wait 5 minutes and then right-click in the VNC Server link to copy the link address, then open a Chrome browser window and paste the link address to start a remote session.


Note: the link address opens a remote desktop session with the database server which is automatically set to oracle user. Under this desktop session you will perform all the lab exercises. Use a Chrome browser in order for the copy & paste functionality to work.
As oracle user, open the Terminal application and run the following command to check the status of the different components.
E.g. run the following command to check the status of the Kubernetes cluster
k get nodesOutput should be similar to the following:
NAME                       STATUS   ROLES                       AGE   VERSION
so91-srv1.oracledemo.com   Ready    control-plane,etcd,master   10d   v1.21.5+rke2r2
so91-srv2.oracledemo.com   Ready    control-plane,etcd,master   10d   v1.21.5+rke2r2
so91-srv3.oracledemo.com   Ready    control-plane,etcd,master   10d   v1.21.5+rke2r2
Run the following IAM lifecycle management script to check the status of the OIG clusters:
cd /home/oracle/domain-lifecycle
./clusterStatus.sh -n oracle-oig-system -d oimcluster
Output should be similar to the following:
WebLogic Cluster Status -n "oracle-oig-system" -d "oimcluster" -c "":

namespace          domain      cluster      min  max  goal  current  ready
---------          ------      -------      ---  ---  ----  -------  -----
oracle-oig-system  oimcluster  oim_cluster  0    5    1     1        1
oracle-oig-system  oimcluster  soa_cluster  0    5    1     1        1
Verify if Oracle Identity Governance (OIG) pods are up and running. As oracle user check the status of the OIG pods.
E.g. run the following command:
k get pod -n oracle-oig-systemOutput should be similar to the following:
NAME                                             READY   STATUS    RESTARTS   AGE
oimcluster-adminserver                           1/1     Running   0          2d4h
oimcluster-oim-server1                           1/1     Running   0          4d6h
oimcluster-soa-server1                           1/1     Running   0          4d21h
rcu-oig-helper-7d7997d94-9cqgx                   1/1     Running   0          4d21h
Make sure you have access to the OIG Identity Console. As oracle user, open the browser window and access the OIG Identity Console.
E.g. use the following URL address and credentials:
URL      : http://oim.oracledemo.com/identity
User     : xelsysadm
Password : Oracle123
Case 1: Preparing the Environment
Open a new browser window/tab from the Luna desktop. Paste the below URL in the browser address bar and hit Enter
E.g. use the following URL address:
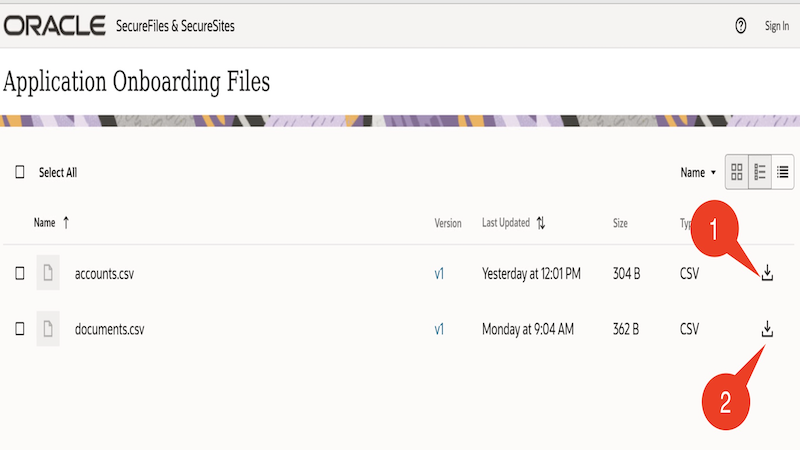
URL : https://securesites-prodapp.cec.ocp.oraclecloud.com/documents/link/LFC440DDB0F1AC5BC40EA8247DD6DF62DF22CC05862A/folder/F25AE6C087F11426433E07BE04B2C5D1E7BE65597941/_Application_Onboarding_FilesClick the hamburger icon towards the right and click the Download icons to download the files :- accounts.csv and documents.csv
As oracle user, open a Terminal application. Execute the below set of commands to create the directory structure.
E.g. run the following commands to create directories for storing sample files downloaded in previous step:
cd /home/oracle/Downloads

mkdir -p SampleFiles/accounts

mkdir -p SampleFiles/access

mv accounts.csv SampleFiles/accounts/

mv documents.csv SampleFiles/access/

ll SampleFiles/accounts/

ll SampleFiles/access/
Copy the sample directory created in previous step into the OIG container by executing the below command
E.g. run the following command to copy sample directory into OIG container:
k cp /home/oracle/Downloads/SampleFiles oimcluster-oim-server1:/u01/oracle/user_projects/domains/oimcluster -n oracle-oig-systemVerify the directory inside OIG container
E.g. run the following command to access OIG container:
k exec -it oimcluster-oim-server1 -n oracle-oig-system -- /bin/bashOnce in the container, run the following command to verify the directory got successfully pasted:
cd /u01/oracle/user_projects/domains/oimcluster/SampleFiles
ll accounts/
ll access/
Type the exit command to exit the container.
Case 2: Creating Application
As oracle user, open the browser and access the OIG Identity Console.
E.g. use the following URL address and credentials:
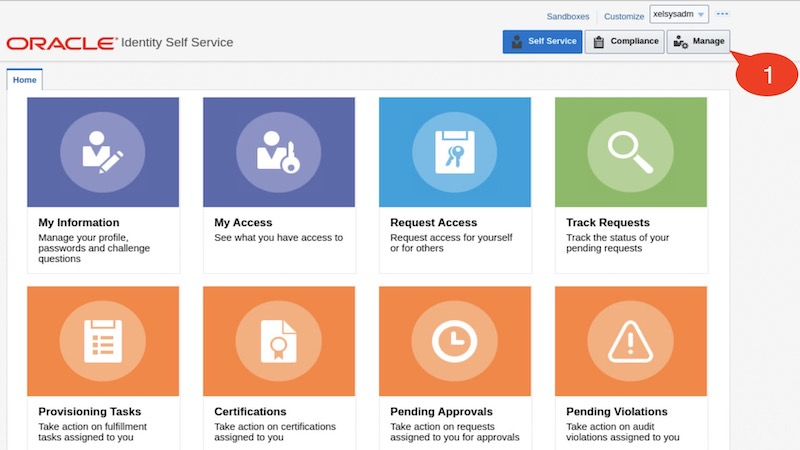
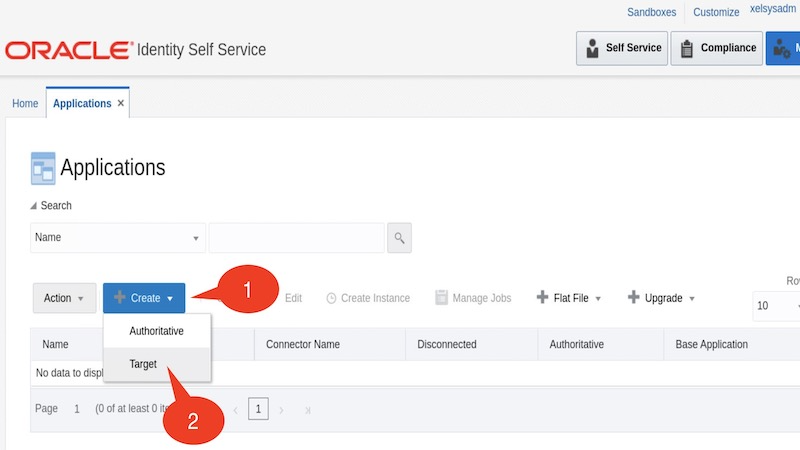
URL      : http://oim.oracledemo.com/identity
User     : xelsysadm
Password : Oracle123
Click Manage tab and then Applications
On the Applications page, click the Create menu on the toolbar, and then select the Target option to create a Target application
Case 3: Providing Basic Information
On the Basic Information page, ensure that the Connector Package option is selected
From the Select Bundle drop-down list, select Flat File Connector 12.2.1.3.0
Enter the Application Name, Display Name, and Description for the application
E.g. use the following values:
Application Name : DMS
Display Name     : Document Management System
Description      : Document Management System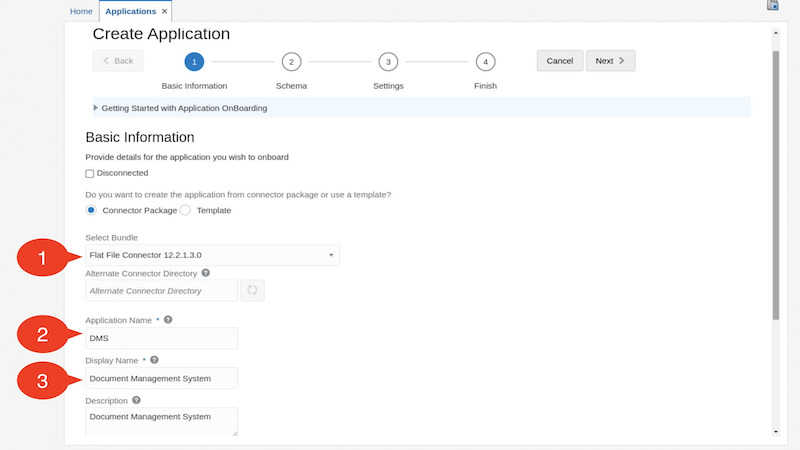
Expand the Advanced Settings section, enter value for the parameter flatFileLocation
E.g. use the following value:
flatFileLocation : /u01/oracle/user_projects/domains/oimcluster/SampleFiles/accounts/accounts.csv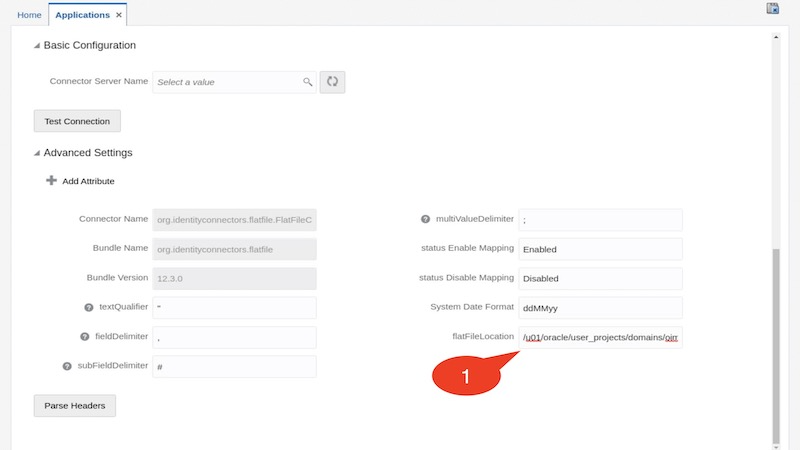
Click on Parse Headers to parse the headers of your flat file. In the Flat File Schema Properties table :
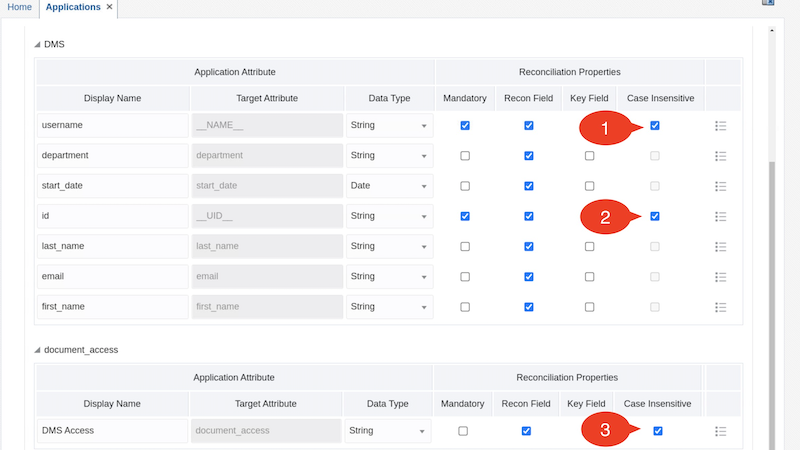
- Mark the document_access as multivalued by selecting the corresponding checkbox in the MVA column
- Select the Name column for username attribute
- Change the datatype of start_date attribute by selecting the Date datatype from the Data Type column
- Select the UID column for id attribute
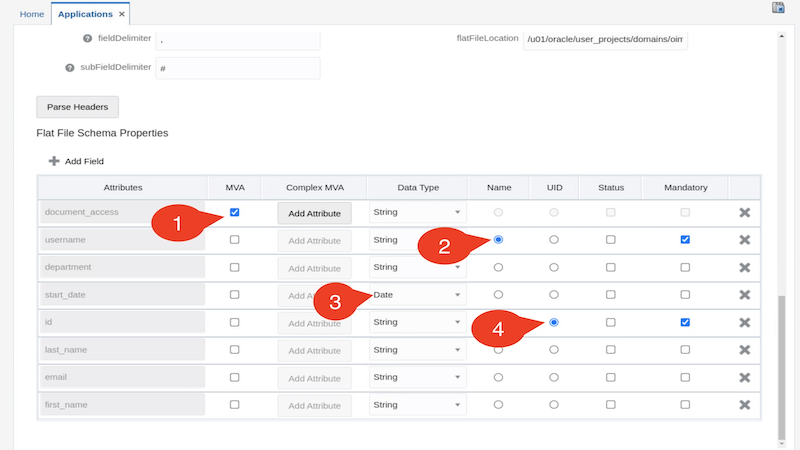
Click Next to proceed to the Schema page
Case 4: Updating Schema Information
Expand the document_access attribute and change the display name
E.g. use the following value:
Display Name : DMS Access
Click the Advanced Settings icon for document_access attribute
Select the Lookup and Entitlement checkbox
Provide below details
E.g. use the following values:
List of Values : lookup.dms.access
Length         : 15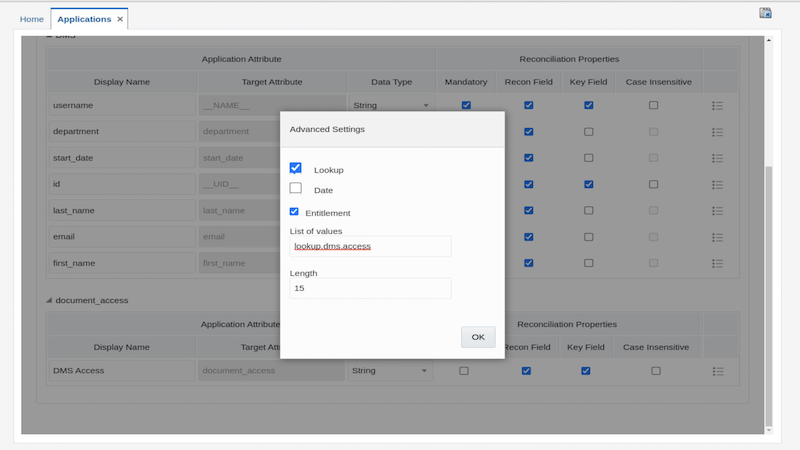
Select the Case Insensitive column for username, id and document_access attributes
Click Next to proceed to the Settings page
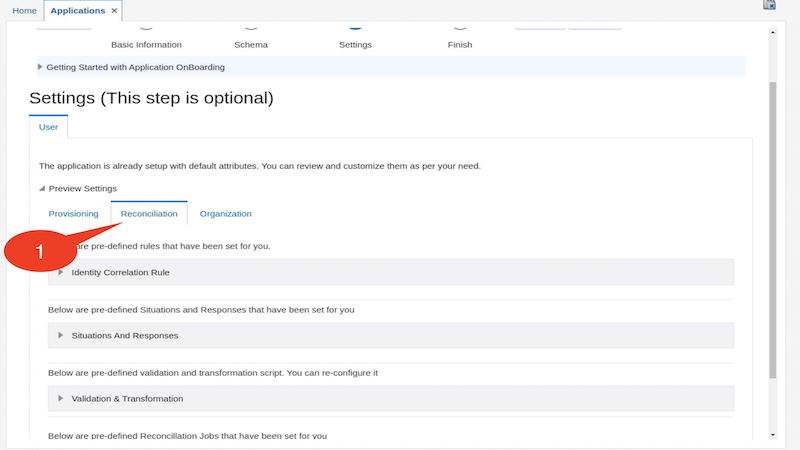
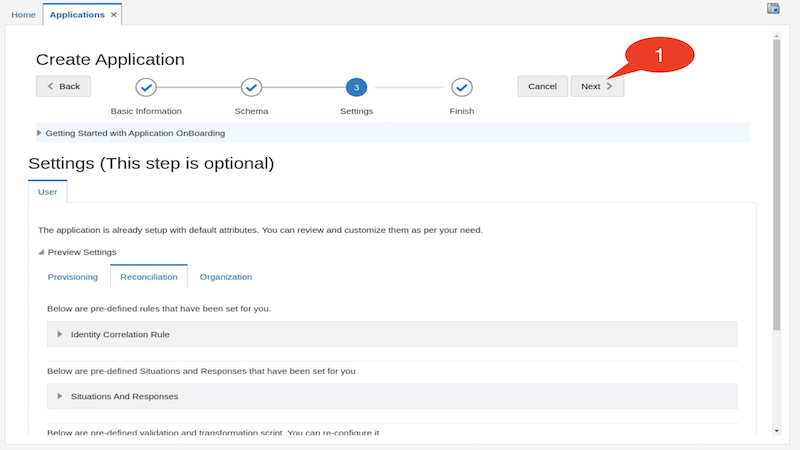
Case 5: Providing Settings Information
In the Settings page, click on Preview Settings to preview the settings
On the Provisioning tab, from the Account Name dropdown, select username

On the Reconciliation tab ,expand the Reconciliation Jobs
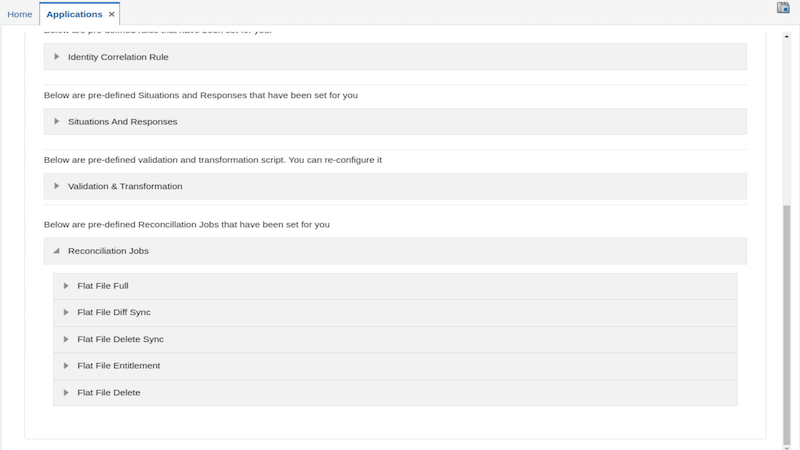
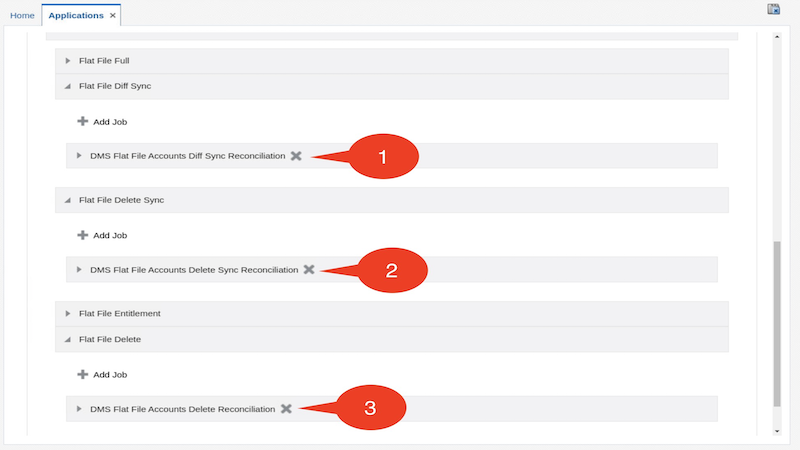
Delete the jobs under Flat File Diff Sync, Flat File Delete Sync and Flat File Delete as these jobs are not necessary for this workshop
Expand the DMS Flat File Entitlements Loader under the Flat File Entitlement job and fill these details
E.g. use the following values:
Flat File directory : /u01/oracle/user_projects/domains/oimcluster/SampleFiles/access
Lookup Name         : lookup.dms.access
Code Key Attribute  : ID
Decode Attribute    : Access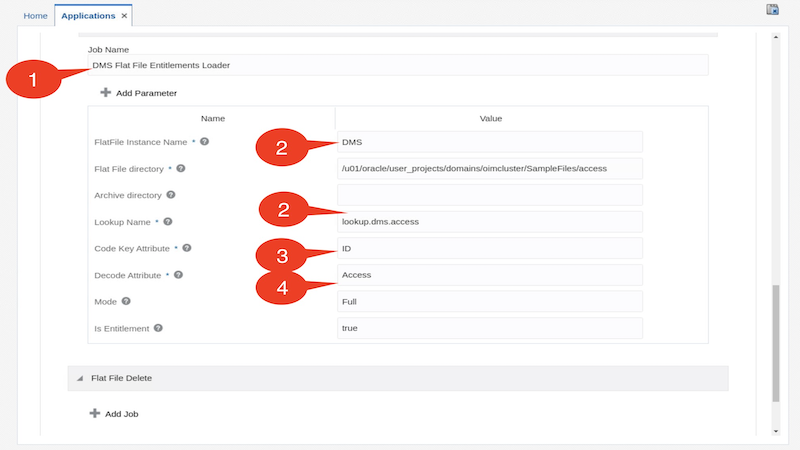
Expand the DMS Flat File Accounts Loader under the Flat File Full job and fill these details
E.g. use the following value:
Flat File directory : /u01/oracle/user_projects/domains/oimcluster/SampleFiles/accounts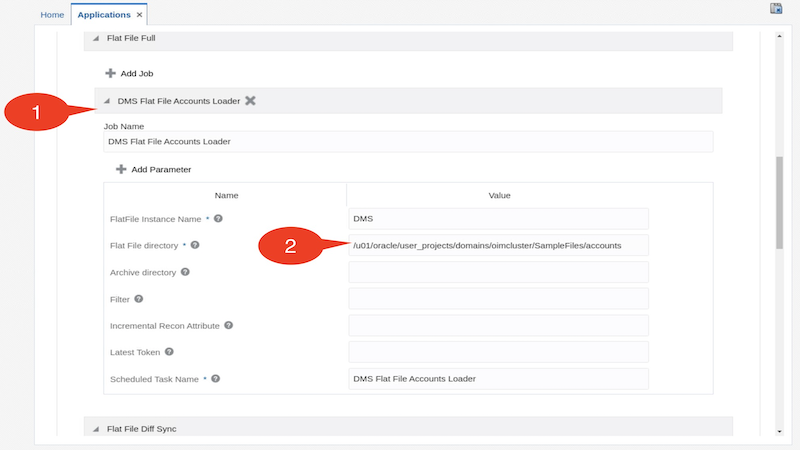
Click Next to proceed to the Finish page
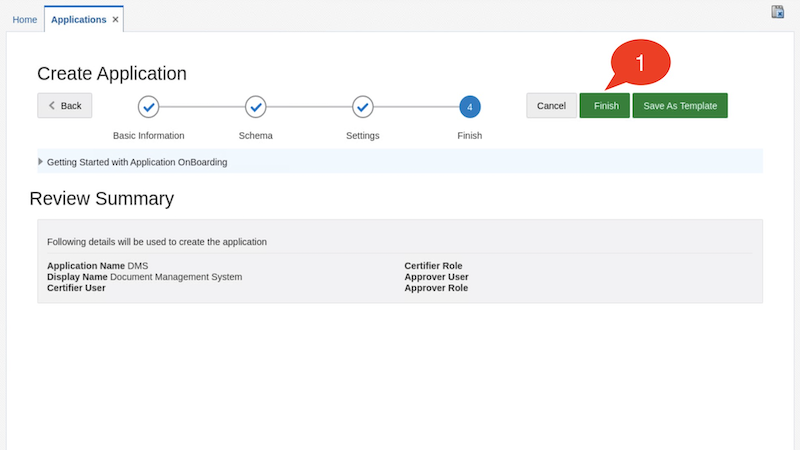
Case 6: Review and Submit the Application Details
On the Finish page, review your application summary and click Finish to submit the application
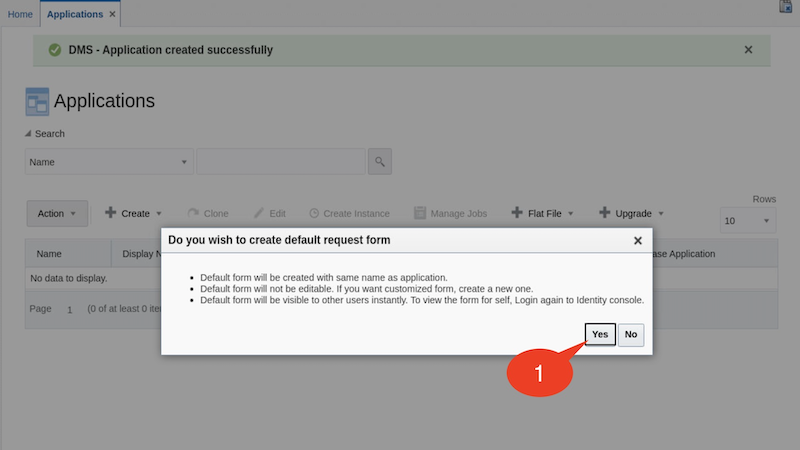
Click Yes to create default request form
On the Applications page, click on the Search icon. Notice that the DMS application we created is listed

Log out and log in again into the Identity Self Service
Case 7: Perform Reconciliation
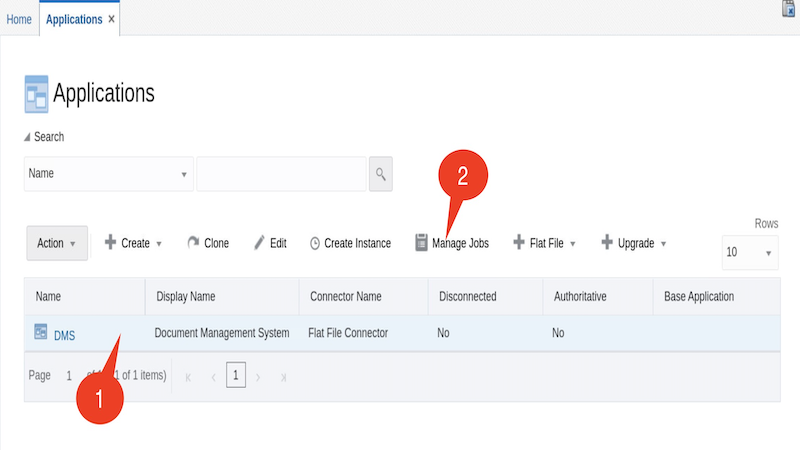
Choose the Applications tile on the Manage tab
Click Search icon and highlight the row for the DMS application
Select Manage Jobs
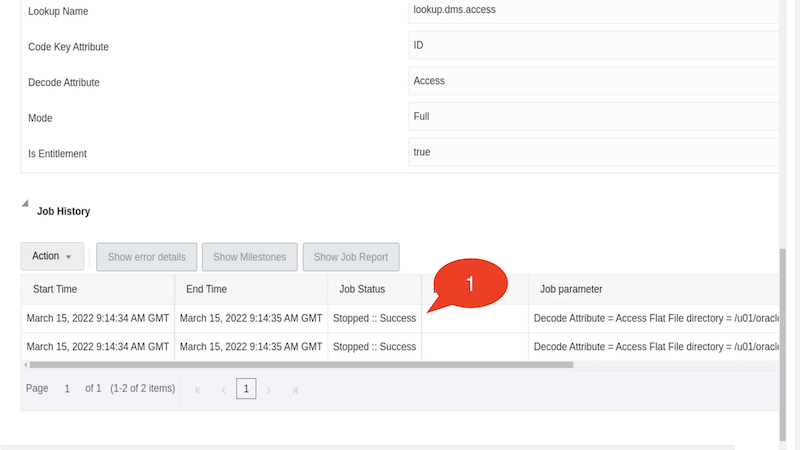
Expand the Flat File Entitlement and then expand the DMS Flat File Entitlements Loader
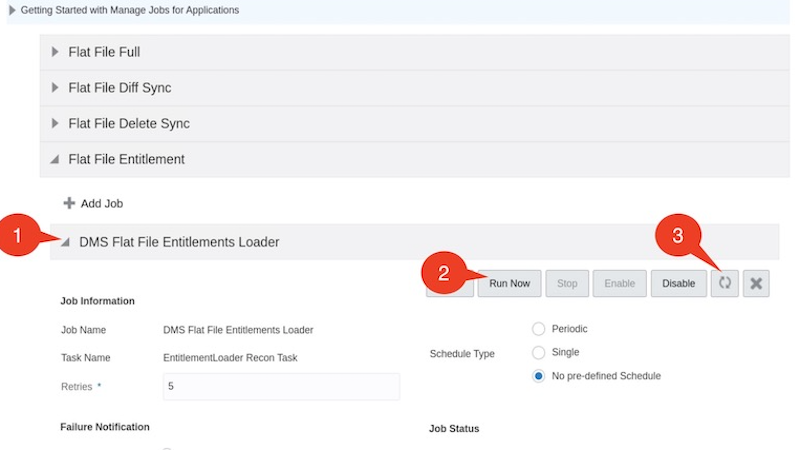
Click Run now and click on the Refresh icon a few times times until you see that the Stopped::Success result appears under Job History
Note: If you do not see an entry under Job History, run the job again, refresh and verify if the job ran successfully
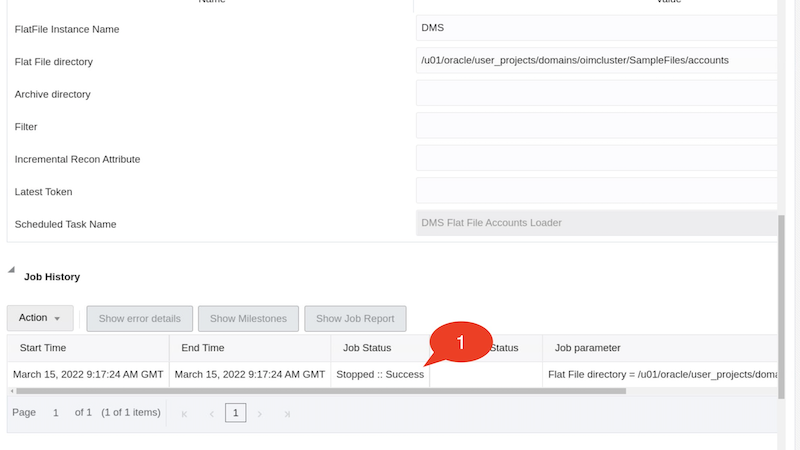
Expand the Flat File Full and then expand the DMS Flat File Accounts Loader
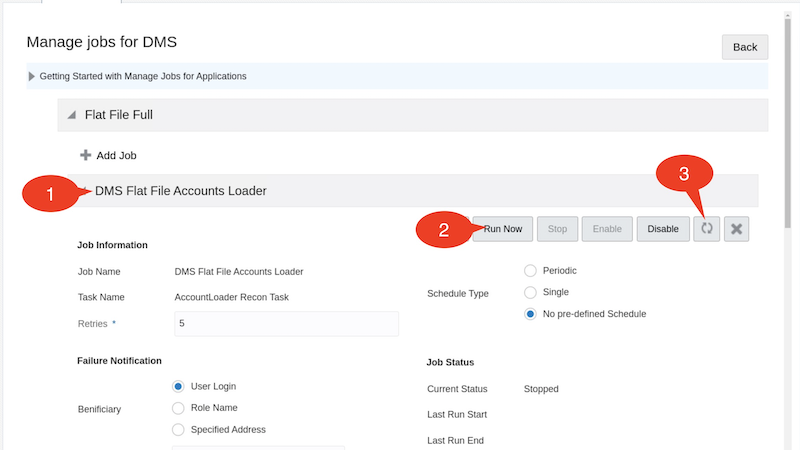
Click Run now and click on the Refresh icon a few times until you notice that the Stopped::Success result appears under Job history
Note: If you do not see an entry under Job History, run the job again, refresh and verify if the job ran successfully
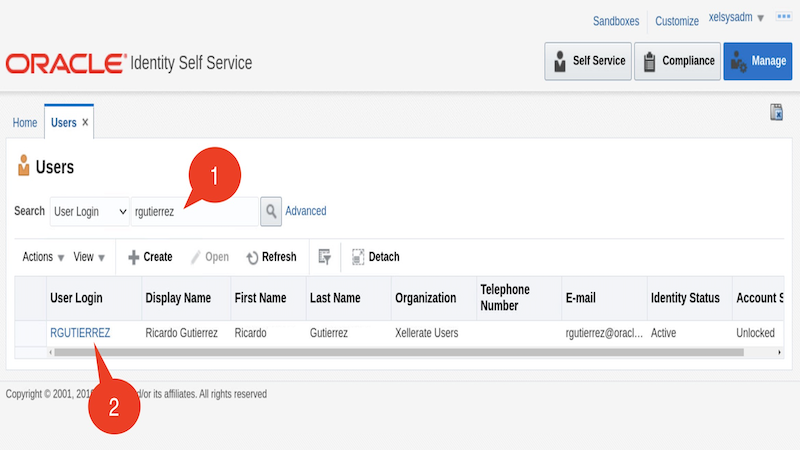
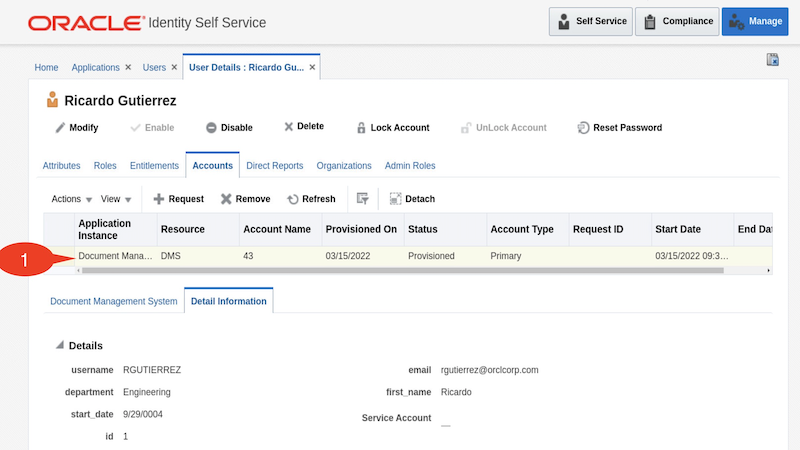
Go to Users tile on the Manage tab and click on user with username 'RGUTIERREZ'
Click on Accounts tab to validate the DMS application got provisioned to the user
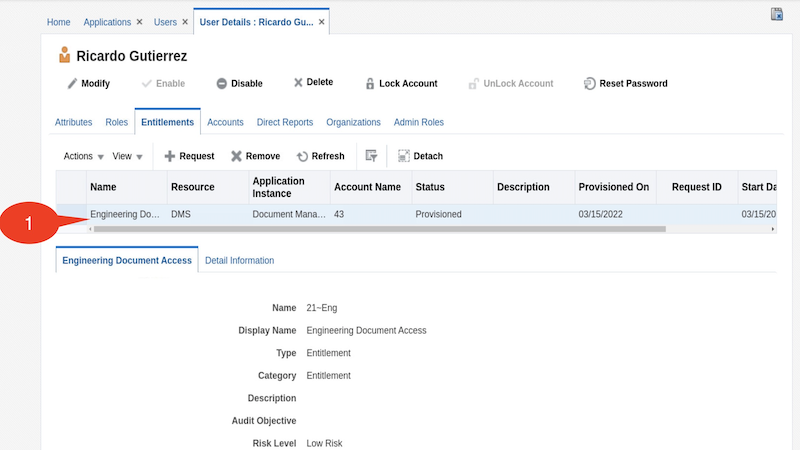
Click on Entitlements tab to validate the entitlement Engineering Document Access got provisioned to the user
You have successfully completed the lab.