Get started with Load Balancing
Introduction
The Load Balancing service allows you to create highly available load balancers within your VCN. All load balancers come with provisioned bandwidth. You can choose to create a load balancer with either a public or a private IP address. Load balancers support SSL handling for both incoming traffic and traffic with your application servers.
When you create a load balancer with a public IP address you specify two subnets, each in a different availability domain, on which the load balancer can run. The two subnets ensure the high availability of the load balancer. A private load balancer requires only one subnet.
This tutorial is an introduction to Load Balancing. You can follow the steps here to create a public load balancer and verify it with a basic web server application. For complete details about the service and its components, see Overview of Load Balancing .
Before You Begin
To try out the Load Balancing service for this tutorial, you must have these things set up first:
- A virtual cloud network (VCN) with two subnets (each in a different availability domain) and an internet gateway
- Two instances running (in different subnets)
- A web application (such as Apache HTTP Server) running on each instance
If you don't have these items set up yet, you can follow the steps shown here.
Tip: If you need an introduction to VCNs and instances, try the Tutorial - Launching Your First Linux Instance first.
VCN and Instance Setup
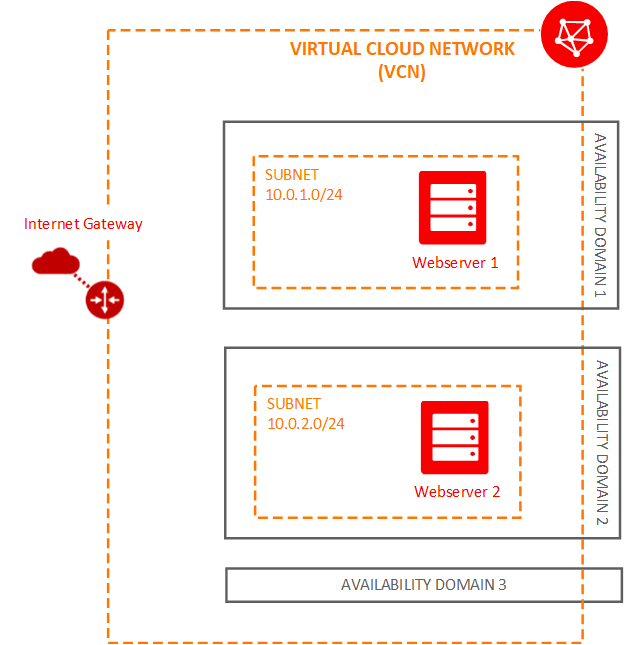
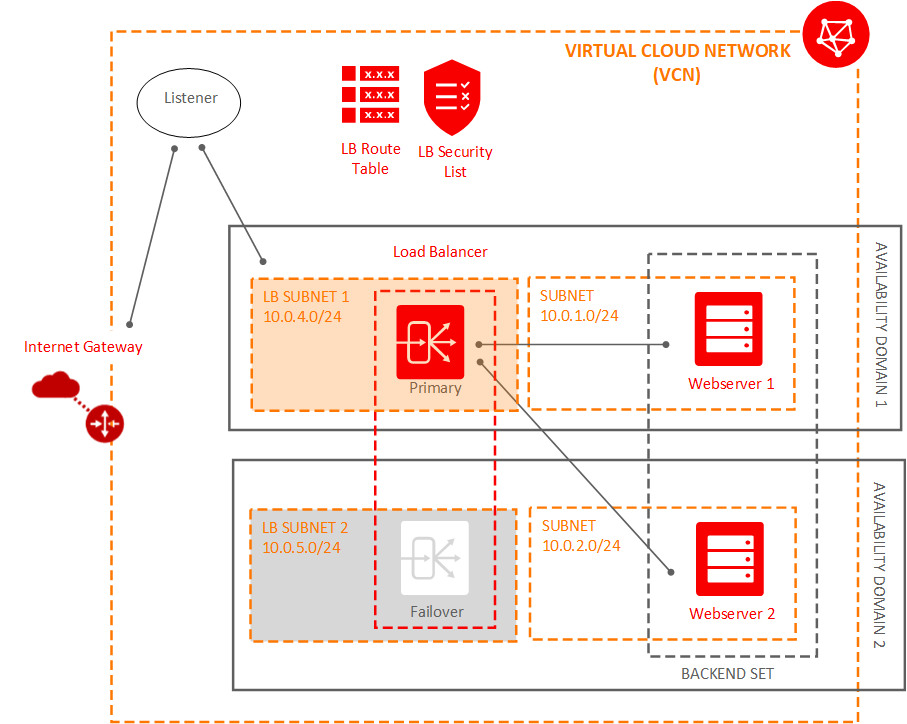
The following diagram shows the prerequisite VCN and instances:
Create a VCN
Sign in to Oracle Cloud Infrastructure Console using your cloud tenant name, user name, and password.
Open the navigation menu. Under Core Infrastructure, go to Networking and click Virtual Cloud Networks.
Ensure that the appropriate compartment is selected in the Compartment list on the left.
Click Networking Quickstart.
Select VCN with Internet Connectivity, and then click Start Workflow.
Enter the following:
- VCN Name: Enter a name for your cloud network. The name is incorporated into the names of all the related resources that are automatically created. Avoid entering confidential information.
- Compartment: This field defaults to your current compartment. Select the compartment you want to create the VCN and related resources in, if not already selected.
- VCN CIDR Block: Enter a valid CIDR block for the VCN. For example 10.0.0.0/16.
- Public Subnet CIDR Block: Enter a valid CIDR block for the subnet. The value must be within the VCN's CIDR block. For example: 10.0.0.0/24.
- Private Subnet CIDR Block: Enter a valid CIDR block for the subnet. The value must be within the VCN's CIDR block and not overlap with the public subnet's CIDR block. For example: 10.0.1.0/24.
- Accept the defaults for any other fields.
Click Next.
Review the list of resources that the workflow will create for you. Notice that the workflow will set up security list rules and route table rules to enable basic access for the VCN.
Click Create to start the short workflow.
After the workflow completes, click View Virtual Cloud Network.
The cloud network has the following resources and characteristics:
- Internet gateway .
- Internet gateway.
- NAT gateway .
- NAT gateway.
- Service gateway with access to the Oracle Services Network.
- Service gateway with access to the Oracle Services Network.
- A regional publicsubnet with access to the internet gateway. This subnet uses the VCN's default security list and default route table. Instances in this subnet may optionally have public IP addresses.
- A regional privatesubnet with access to the NAT gateway and service gateway. This subnet uses a custom security list and custom route table that the workflow created. Instances in this subnet cannot have public IP addresses.
- Use of the Internet and VCN Resolver for DNS.
Launch two instances
This example uses the VM.Standard2.1 shape . If you prefer, you can choose a larger shape.
Open the navigation menu. Under Core Infrastructure, go to Compute and click Instances.
Click Create Instance.
On the Create Compute Instance page, for Name, enter a name, for example: Webserver1.
In the Configure placement and hardware section, enter the following:
- Availability domain: Select the first availability domain in the list (AD-1).
- Image: Select the Oracle Linux 7.x image.
- Shape: Click Change Shape, and then make the following selections:
- For Instance type, select Virtual Machine.
- For Shape series, select Intel Skylake, and then select the VM Standard2.1 shape (1 OCPU, 15 GB RAM).
- Click Select Shape.
In the Configure networking section, configure the network details for the instance. Do not accept the defaults.
- For Network, leave Select existing virtual cloud network selected
- Virtual cloud network in <compartment_name>: Select the cloud network that you created. If necessary, click Change compartment to switch to the compartment containing the cloud network that you created.
- For Subnet, leave Select existing subnet selected.
- Subnet in <compartment_name>: Select the public subnet in availability domain 1. If necessary, click Change compartment to switch to the compartment that contains the correct subnet.
- Leave the Use network security groups to control traffic check box cleared.
- Select the Assign a public IP address option. This creates a public IP address for the instance, which you need to access the instance. If you have trouble selecting this option, confirm that you selected the public subnet that was created with your VCN, not a private subnet.
In the Add SSH keys section, upload the public key (.pub) portion of the key pair that you want to use for SSH access to the instance. Browse to the key file that you want to upload, or drag and drop the file into the box.
If you do not have an SSH key pair, see Creating a Key Pair .
In the Configure boot volume section, leave all the options cleared.
Click Show Advanced Options. On the Networking tab, ensure that the Hostname field is blank.
Click Create.
Repeat the previous steps. This time, enter the name
Webserver2and select the subnet in availability domain 2.
Start a web application on each instance
This example uses Apache HTTP Server.
Connect to your instance. If you need help, see Connecting to Your Instance .
Run yum update:
sudo yum -y updateInstall the Apache HTTP Server:
sudo yum -y install httpdAllow Apache (HTTP and HTTPS) through the firewall:
sudo firewall-cmd --permanent --add-port=80/tcpsudo firewall-cmd --permanent --add-port=443/tcpNote:
Open the Firewall
If you choose to run a different application than Apache, ensure that you run the preceding command to open the firewall for your application's port.
Reload the firewall:
sudo firewall-cmd --reloadStart the web server:
sudo systemctl start httpdAdd an index.htm file on each server that indicates which server it is, for example:
On Webserver 1:
sudo suecho 'WebServer1' >/var/www/html/index.htmlOn Webserver 2:
sudo suecho 'WebServer2' >/var/www/html/index.html
Tutorial Overview
In this tutorial, you create a public load balancer and verify it. A load balancer requires configuration of several components to be functional, and this tutorial walks you through each step to help you understand these components.
To create and test the load balancer, complete the following steps:
Add two subnets to your VCN to host your load balancer.
Create a load balancer.
Create a backend set with health check.
Add backend servers to your backend set.
Create a listener.
Update the load balancer subnet security list and allow internet traffic to the listener.
Verify your load balancer.
Update rules to protect your backend servers.
Delete your load balancer.
Add Two Subnets to Your VCN to Host Your Load Balancer
Your load balancer must reside in different subnets from your application instances. This configuration allows you to keep your application instances secured in subnets with stricter access rules, while allowing public internet traffic to the load balancer in the public subnets.
To add the public subnets to your VCN:
Add a Security List
Open the navigation menu. Under Core Infrastructure, go to Networking and click Virtual Cloud Networks.
The list of VCNs in the current compartment is displayed.
Click the name of the VCN that includes your application instances.
Under Resources, click Security Lists.
Click Create Security List.
- Create in Compartment: This field defaults to your current compartment. Select the compartment you want to create the security list in, if not already selected.
- Enter a Name, for example, "LB Security List".
- Delete the entry for the ingress rule and the entry for the egress rule. The security list must have no rules. The correct rules are added automatically during the load balancer workflow.
- Tags: Leave as is (you can add tags later if you like).
- Click Create Security List.
- Return to your Virtual Cloud Network Details page.
Add a Route Table
Under Resources, click Route Tables.
Click Create Route Table. Enter the following:
- Create in Compartment: This field defaults to your current compartment. Select the compartment you want to create the route table in, if not already selected.
- Name: Enter a name, for example, "LB Route Table".
- Target Type: Select Internet Gateway.
- Destination CIDR Block: Enter 0.0.0.0/0.
- Compartment: Select the compartment that contains your VCN's internet gateway.
- Target: Select your VCN's internet gateway.
- Tags: Leave as is (you can add tags later if you like).
- Click Create Route Table.
Create the first subnet
Under Resources, click Subnets.
Click Create Subnet.
Enter or select the following:
- Name: Enter a name, for example, "LB Subnet 1".
- availability domain: Choose the first availability domain (AD-1).
- CIDR Block: Enter 10.0.4.0/24.
- Route Table: Select the LB Route Table you created.
- Subnet Access: Select Public Subnet.
- DNS Resolution: Select Use DNS Hostnames in this Subnet.
- DHCP Options: Select Default DHCP Options for LB_Network.
- Security Lists: Select the LB Security List you created.
- Tags: Leave as is (you can add tags later if you like).
Click Create.
Create the second subnet
Create a second load balancer subnet in a different availability domain.
In the details page of your VCN, click Create Subnet.
Enter the following:
- Name: Enter a name, for example, "LB Subnet 2".
- availability domain: Choose the second availability domain (AD-2).
- CIDR Block: Enter 10.0.5.0/24.
- Route Table: Select the LB Route Table you created.
- Subnet Access: Select Public Subnet.
- DNS Resolution: Select Use DNS Hostnames in this Subnet.
- DHCP Options: Select Default DHCP Options for LB_Network.
- Security Lists: Select the LB Security List you created.
- Tags: Leave as is (you can add tags later if you like).
Click Create.
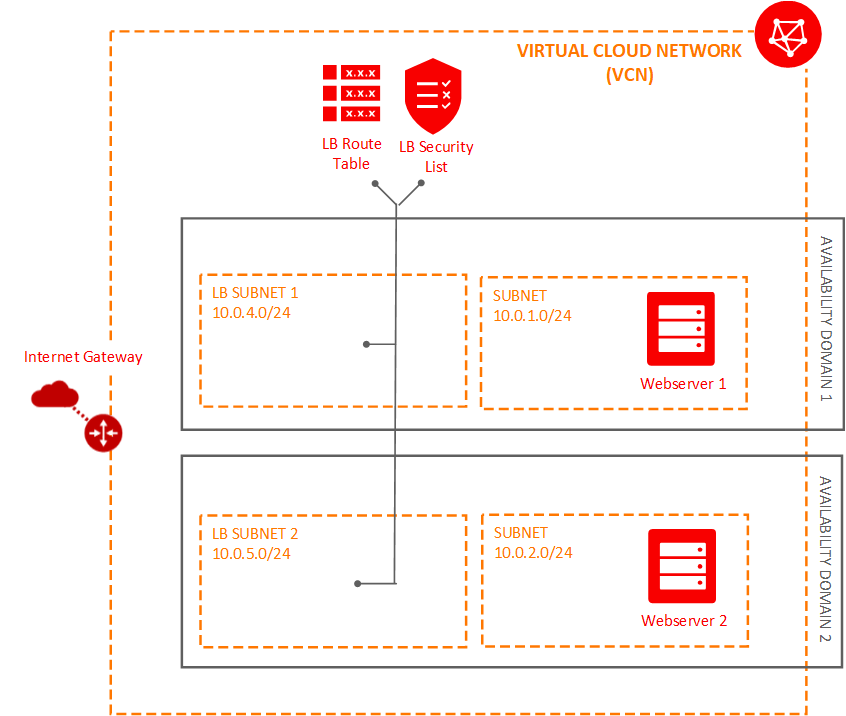
The following figure shows the new components added to the VCN:
Create the Load Balancer
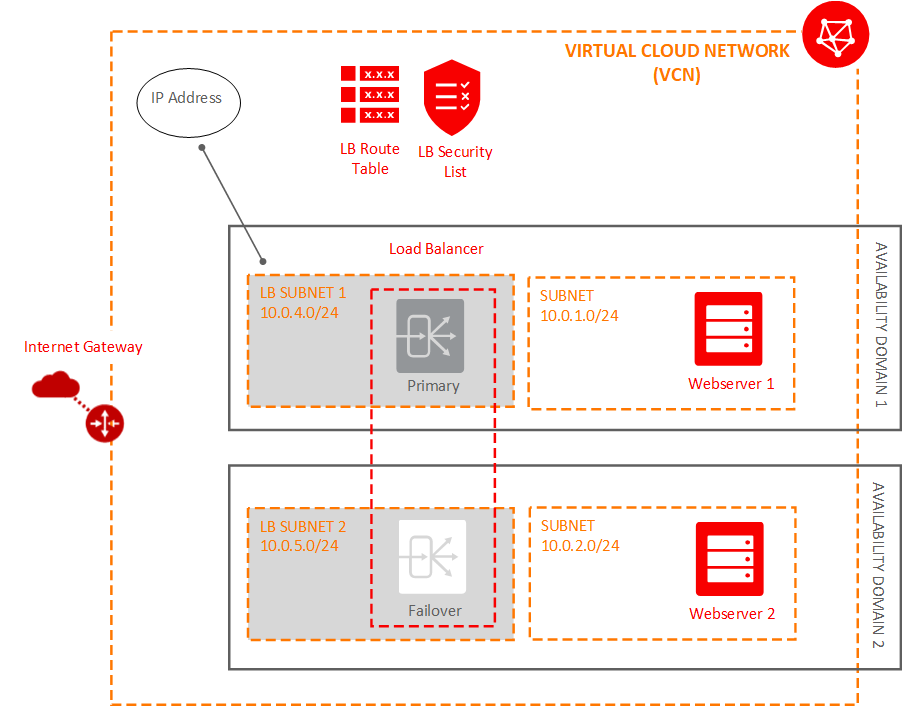
When you create a public load balancer, you choose its shape (size) and you select two subnets, each in a different availability domain. This configuration ensures that the load balancer is highly available. It is active in only one subnet at a time. This load balancer comes with a public IP address and provisioned bandwidth corresponding to the shape you chose.
Tip: Although the load balancer resides in a subnet, it can direct traffic to backend sets that reside in any of the subnets within the VCN.
Open the navigation menu. Under the Core Infrastructure group, go to Networking and click Load Balancers.
Ensure that the appropriate compartment is selected on the left.
Click Create Load Balancer.
Enter the following:
- Name: Enter a name for your load balancer.
- Shape: Select 100 Mbps. The shape specifies the bandwidth of the load balancer. For the tutorial, use the smallest shape. The shape cannot be changed later.
- Virtual Cloud Network: Select the virtual cloud network for your load balancer.
- Visibility: Choose Create Public Load Balancer.
- Subnet (1 of 2): Select LB Subnet 1.
- Subnet (2 of 2): Select LB Subnet 2. The second subnet must be in a different availability domain than the first subnet you chose.
Click Create.
When the load balancer is created, you get a public IP address. You route all your incoming traffic to this IP address. The IP address is available from both subnets that you specified, but it is active in only one subnet at a time.
Create a Backend Set
A backend set is a collection of backend servers to which your load balancer directs traffic. A list of backend servers, a load balancing policy, and a health check script define each backend set. A load balancer can have multiple backend sets, but for this tutorial, you create only one backend set that includes both of your web servers.
In this step, you define the backend set policy and health check. You add your servers in a separate step.
To create the backend set:
Click the name of your load balancer and view its details.
Click Create Backend Set.
In the dialog box, enter:
- Name: Give your load balancer backend set a name. The name cannot contain spaces.
- Policy: Choose Weighted Round Robin.
Enter the Health Check details.
Load Balancing automatically checks the health of the instances for your load balancer. If it detects an unhealthy instance, it stops sending traffic to the instance and reroutes traffic to healthy instances. In this step, you provide the information required to check the health of servers in the backend set and ensure that they can receive data traffic.
- Protocol: Select HTTP.
- Port: Enter 80
- URL Path (URI): Enter /
The rest of the fields are optional and can be left blank for this tutorial.
Click Create.
When the Backend Set is created, the Work Request shows a status of Succeeded. Close the Work Request dialog box.
What is a policy?
The policy determines how traffic is distributed to your backend servers.
- Round Robin - This policy distributes incoming traffic sequentially to each server in a backend set list. When each server has received a connection, the load balancer repeats the list in the same order.
- IP Hash - This policy uses an incoming request's source IP address as a hashing key to route non-sticky traffic to the same backend server. The load balancer routes requests from the same client to the same backend server as long as that server is available.
- Least Connections - This policy routes incoming non-sticky request traffic to the backend server with the fewest active connections.
Add Backends (Servers) to Your Backend Set
After the backend set is created, you can add compute instances (backend servers) to it. To add a backend server, you can enter the OCID for each instance and your application port. The OCID enables the Console to create the security list rules required to enable traffic between the load balancer subnets and the instance subnets.
Tip: Security lists are virtual firewall rules for your VCN that provide ingress and egress rules to specify the types of traffic allowed in and out of a subnet. Update your VCN's security list rules to allow traffic flow between the load balancer subnets and the backend server subnets. In this step, you can have the security lists automatically updated by providing the instance OCIDs.
To add a server to your backend set:
On the details page of your load balancer, click Backend Sets. The backend set you just created is displayed.
Click the name of the backend set and view its details.
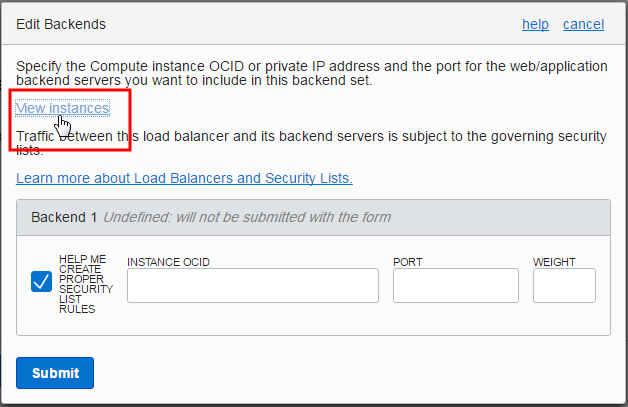
Click Edit Backends.
In the dialog:
Ensure that Help me create proper security list rules is checked.
OCID: Paste the OCID of the first instance (Webserver1).
Port: Enter 80.
Weight: Leave blank to weight the servers evenly.
Repeat the Create the Load Balancer through Add Backends (Servers) to Your Backend Set sections, pasting in the OCID for the second instance (Webserver2).
Click Create Rules.
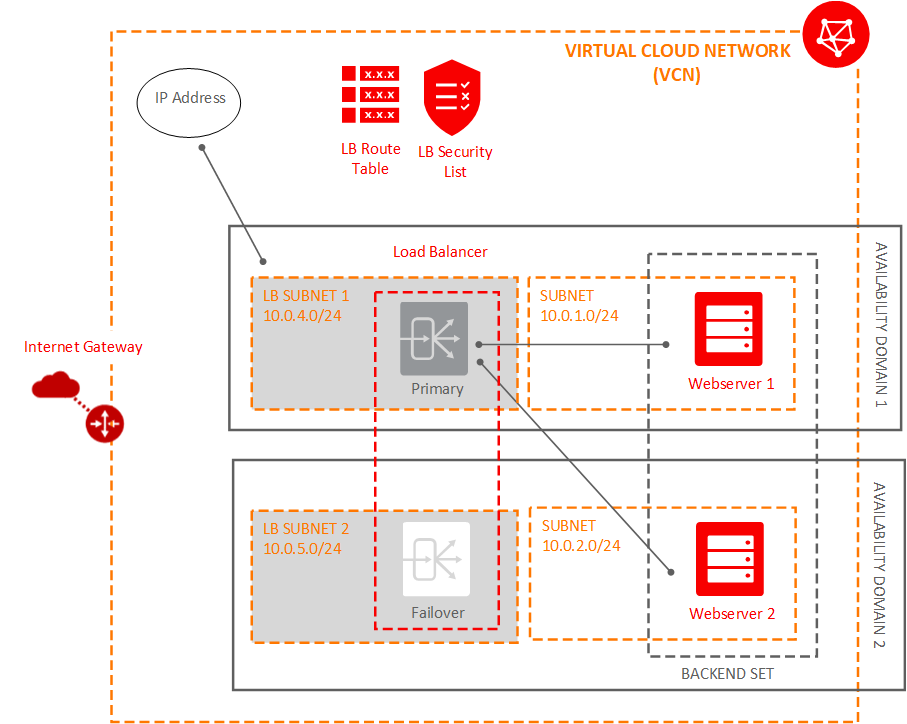
The following figure shows the components created in this task:
What rules are added to my security lists?
The system updates the security list used by your load balancer subnets to allow egress traffic from the load balancer to each backend server's subnet:
Updates to the security list for your load balancer subnets:
- Allow egress traffic to the backend server 1 subnet (for example, Public-Subnet-AD1)
- Allow egress traffic to the backend server 2 subnet (for example, Public-Subnet-AD2)

The system updates the security list used by your backend server subnets to allow ingress traffic from the load balancer subnets:
Updates to the security list for your backend server subnets:
- Allow ingress traffic from load balancer subnet 1
- Allow ingress traffic from load balancer subnet 2

How do I get the OCID of an instance?
The OCID (Oracle Cloud Identifier) is displayed when you view the instance, on the instance details page.
In the dialog, right-click View Instances and select a browser option to open the link in a new tab.
A new Console browser tab launches, displaying the instances in the current compartment.
In the tab that just opened, if your instances are not in the current compartment, select the compartment to which the instance belongs. (Select from the list on the left side of the page.)
A shortened version of the OCID is displayed next to each instance.
Click the instance that you're interested in.
A shortened version of the OCID is displayed on the instance details page.
Click Copy to copy the OCID. You can then paste it into the Instance ID field.
Create the Listener for Your Load Balancer
A listener is an entity that checks for connection requests. The load balancer listener listens for ingress client traffic using the port you specify within the listener and the load balancer's public IP.
In this tutorial, you define a listener that accepts HTTP requests on port 80.
Note:
Listening on Multiple Ports
A listener can listen on one port. To listen on more ports (such as 443 for SSL), create another listener.For information on enabling SSL for your load balancer, see Managing SSL Certificates .
To create a listener:
On your Load Balancer Details page, click Listeners.
Click Create Listener.
Enter the following:
- Name: Enter a friendly name.
- Protocol: Select HTTP.
- Port: Enter 80 as the port on which to listen for incoming traffic.
- Backend Set: Select the backend set you created.
Click Create.
Update Load Balancer Security Lists and Allow Internet Traffic to the Listener
When you create a listener, you must also update your VCN's security list to allow traffic to that listener.
Allow the Listener to Accept Traffic
The subnets where the load balancer resides must allow the listener to accept traffic. To enable the traffic to get to the listener, update the load balancer subnet's security list.
To update the security list to allow the listener to accept traffic:
Open the navigation menu. Under Core Infrastructure, go to Networking and click Virtual Cloud Networks.
The list of VCNs in the current compartment is displayed.
Click Security Lists. A list of the security lists in the cloud network is displayed.
Click the LB Security List. The details are displayed.
Click Edit All Rules.
Under Allow Rules for Ingress, click Add Rule.
Enter the following ingress rule:
- Source Type: Select CIDR
- Source CIDR: Enter 0.0.0.0/0
- IP Protocol: Select TCP
- Destination Port Range: Enter 80 (the listener port).
Click Save Security List Rules.
If you created other listeners, add an ingress rule for each listener port to allow traffic to the listener. For example, if you created a listener on port 443, repeat the previous steps using Destination Port Range: 443.
The following figure shows the component created in this task:
Verify Your Load Balancer
To test your load balancer's functionality, you can open a web browser and navigate to its public IP address (listed on the load balancer's detail page). If the load balancer is properly configured, you can see the name of one of the web server instances:
Open a web browser.
Enter the load balancer public IP address.
The index.htm page of one of your web servers appears.
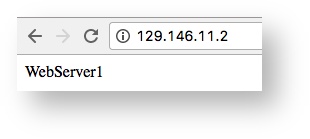
Refresh the web page.
The index.htm page of the other web server now appears.
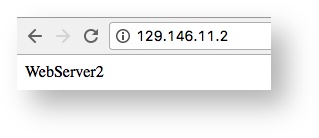
Because you configured the load balancer backend set policy as Round Robin, refreshing the page alternates between the two web servers.
Update Rules to Limit Traffic to Backend Servers
Update the default security list and the default route table to limit traffic to your backend servers. If you used the Create Virtual Cloud Network Plus Related Resources option to create your VCN and you are not going to terminate this load balancer immediately, these actions are important.
To delete the default route table rule:
Open the navigation menu. Under Core Infrastructure, go to Networking and click Virtual Cloud Networks.
Click the name of your VCN and review its details.
Under Resources, click Route Tables.
Click the Default Route Table for the VCN.
Click Edit Route Rules.
Click the X next to the route rule, and then click Save.
There are now no Route Rules for the default route table.
To edit the default security list rules:
Go to your Virtual Cloud Network Details page.
Under Resources, click Security Lists.
Click the Default Security List for the VCN.
Click Edit All Rules.
Under Allow Rules for Ingress, delete the following rules:
Action Source CIDR IP Protocol Destination Port Range Delete 0.0.0.0/0 TCP 22 Delete 0.0.0.0/0 ICMP 3,4 Delete 10.0.0.0/16 ICMP 3 Under Allow rules for Egress, delete the rule. There can be no Egress Rules.
Now your instances can receive data traffic from, and direct traffic to, only the load balancer subnets. You no longer can connect directly to your instance's public IP address.
Delete Your Load Balancer
When your load balancer becomes available, you are billed for each hour that you keep it running. Once you no longer need a load balancer, you can delete it. When the load balancer is deleted, you stop incurring charges for it. Deleting a load balancer does not affect the backend servers or subnets used by the load balancer.
To delete your load balancer:
Open the navigation menu. Under the Core Infrastructure group, go to Networking and click Load Balancers.
Choose the Compartment that contains your load balancer.
Next to your load balancer, click the Actions icon (three dots), and then click Terminate.
Confirm when prompted.
If you want to delete the instances and VCN you created for this tutorial, follow the instructions in Cleaning Up Resources from the Tutorial .
Learn More
Explore other labs on docs.oracle.com/learn or access more free learning content on the Oracle Learning YouTube channel . Additionally, visit education.oracle.com/learning-explorer to become an Oracle Learning Explorer.
For product documentation, visit Oracle Help Center .