Monitor and Update Oracle Linux with Oracle OS Management Hub
Introduction
Learn to manage and monitor OS updates for Oracle Linux compute instances using Oracle OS Management Hub in Oracle Cloud Infrastructure. Use a centralized management console to update Oracle Linux OS and monitor updates and patches in Oracle Cloud Infrastructure.
Objectives
In this tutorial, you'll learn how to:
- Create a registration profile
- Register new and existing OCI compute instances with OS Management Hub
- Review reports for OS enhancements, security updates, bug fixes, and instance activity
- Run update jobs and monitor job statuses
Prerequisites
Access to an Oracle Cloud Infrastructure tenancy with:
- An administrative user group, a dynamic group identifying instance resources, and the IAM policies that enable OS Management Hub.
- Oracle Linux compute instances.
- Virtual Cloud Network (VCN) or configured network access that supports OS Management Hub.
Configure OCI Resources
Note: If running in your tenancy, read the linux-virt-labs GitHub project README.md and complete the prerequisites before deploying the lab environment.
Open a terminal on the Luna Desktop.
Clone the
linux-virt-labsGitHub project.git clone https://github.com/oracle-devrel/linux-virt-labs.gitChange into the working directory.
cd linux-virt-labs/olInstall the required collections.
ansible-galaxy collection install -r requirements.ymlUpdate the Oracle Linux instance configuration.
cat << EOF | tee instances.yml > /dev/null
compute_instances:
  1:
    instance_name: "ol-host-02"
    type: "server"
instance_shape: "VM.Standard.E5.Flex"
EOF
Deploy the lab environment.
ansible-playbook create_instance.yml -e localhost_python_interpreter="/usr/bin/python3.6" -e "@instances.yml"The free lab environment requires the extra variable
local_python_interpreter, which setsansible_python_interpreterfor plays running on localhost. This variable is needed because the environment installs the RPM package for the Oracle Cloud Infrastructure SDK for Python, located under the python3.6 modules.The default deployment shape uses the AMD CPU and Oracle Linux 8. To use an Intel CPU or Oracle Linux 9, add
-e instance_shape="VM.Standard3.Flex"or-e os_version="9"to the deployment command.Wait for the playbook to reach the pause task. Do not hit enter. The playbook has created OCI resources to use with OS Management Hub.
Important: Do not hit enter or close this terminal window for the duration of the lab.
Access the OS Management Hub Section on the OCI Web Console
Click on the Luna Lab icon on the Luna desktop.
The login credentials for OCI will display on this page after some time. Once the Ephemeral account username and password display, continue to the next step.
Open the OCI console by clicking on the quick link OCI Console.
Use the ephemeral account username and password to login to the OCI console.
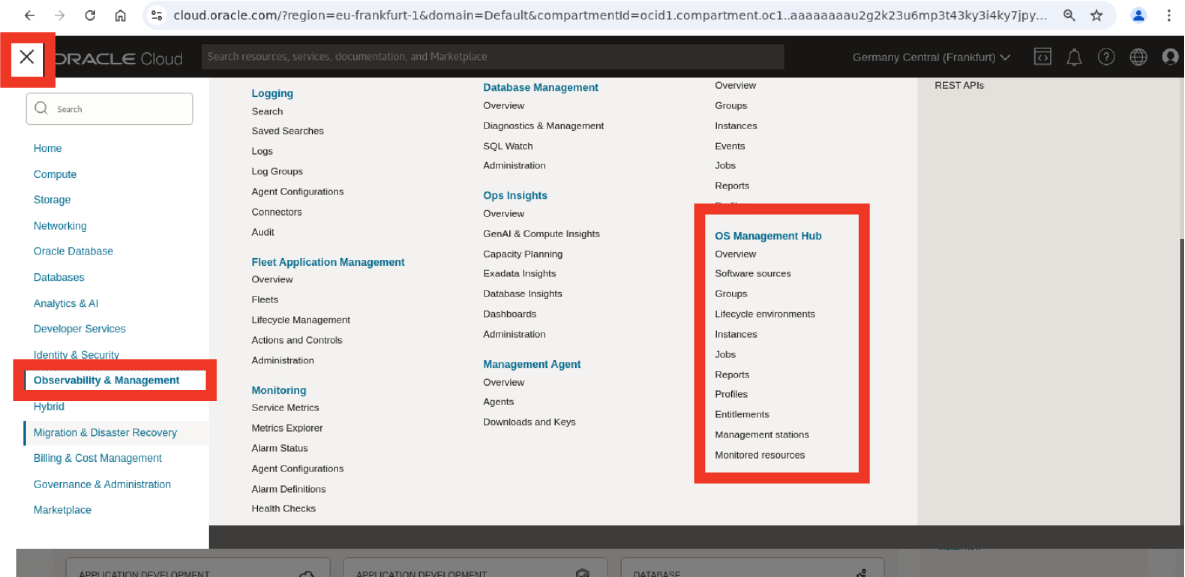
Use the navigation menu in the top left corner of the OCI console landing page to navigate to Observability and Management and click on OS Management Hub.
Create a Registration Profile
You must specify a registration profile to register an OCI instance with OS Management Hub. Profiles provide a way to consistently define how an instance registers with the service. An instance registers with one and only one profile. However, you can use a single profile repeatedly to register multiple instances with the service.
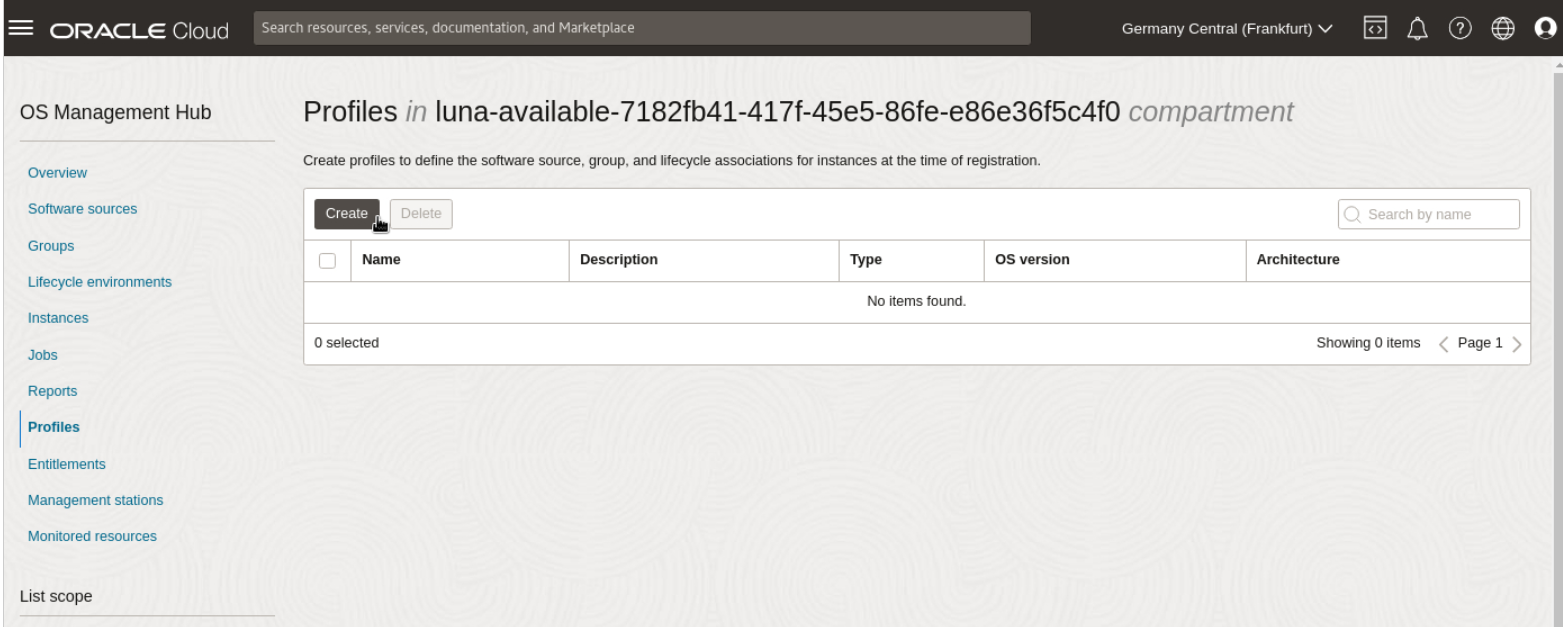
Click on Profiles under the OS Management Hub navigation section.
Click Create.
Enter the identifying information for the profile as the following:
- Name:
Oracle_Linux8 - Description: (Optional) Enter a description for the profile.
- Name:
Set the instance location for the profile as Oracle Cloud Infrastructure.
Specify the OS and architecture information as the following:
- OS vendor: Oracle
- OS version: Oracle Linux 8
- Architecture: x86_64
Note: These software source selections must match the compute instances that you intend to register.
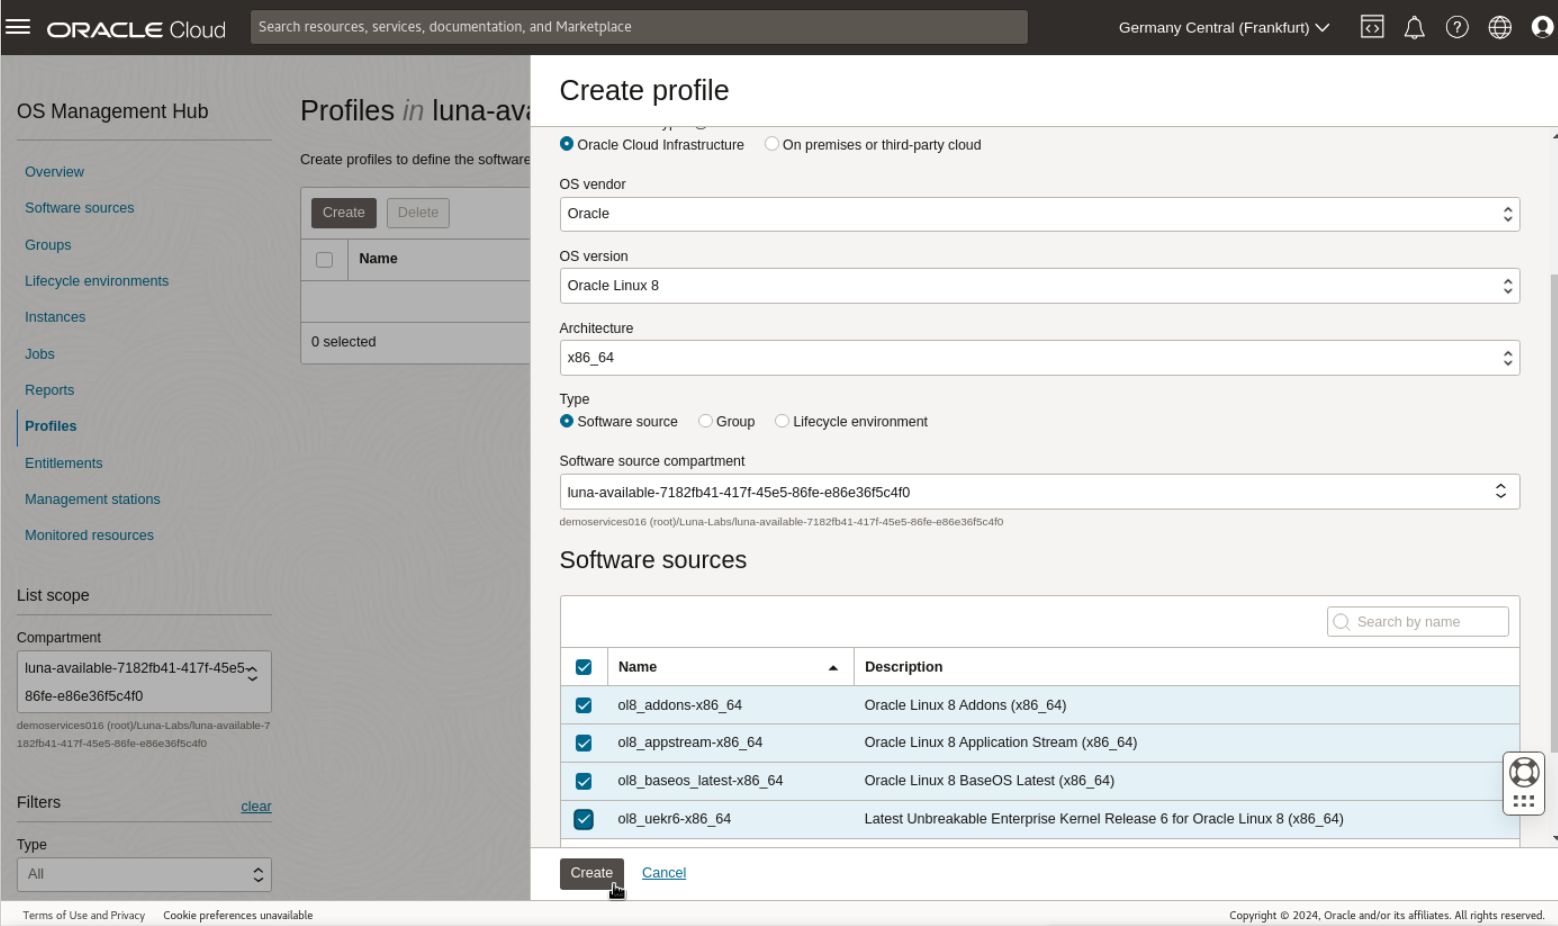
Select Software source for type.
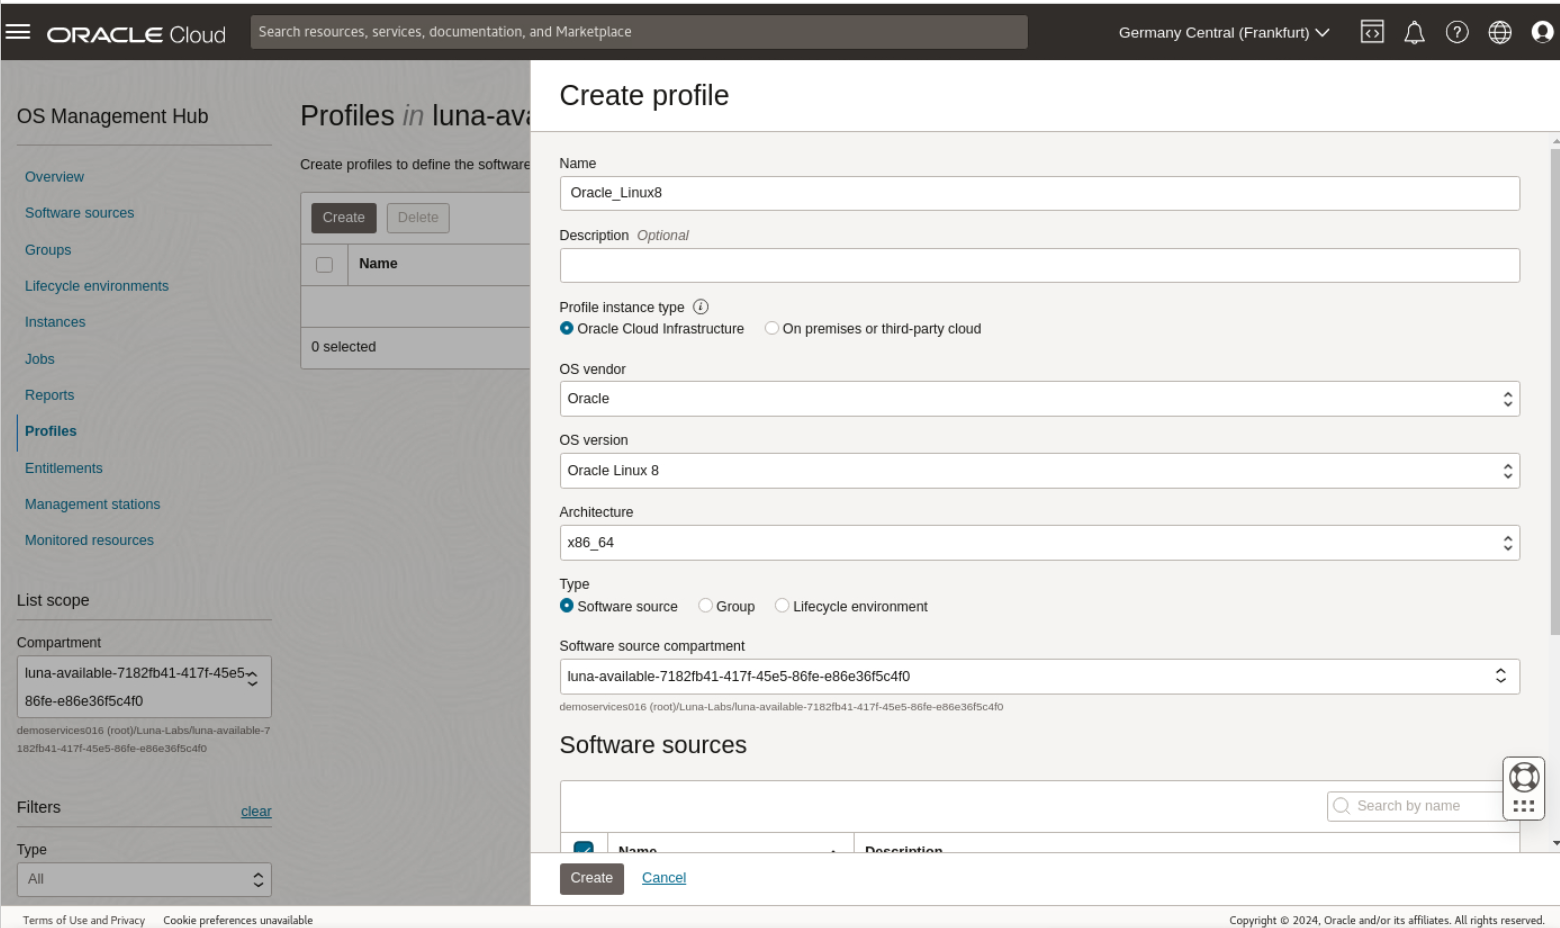
Keep the default compartment selected since it contains vendor software sources.
Select the software sources that the registration profile will assign. Select the following:
- ol8_baseos_latest-x86_64
- ol8_appstream-x86_64
- ol8_addons-x86_64
- ol8_uekr6-x86_64
Click Create.
Register Compute Instances with OS Management Hub
To register OCI compute instances with OS Management Hub; you must enable the Oracle Cloud Agent (OCA) plugin and select a registration profile.
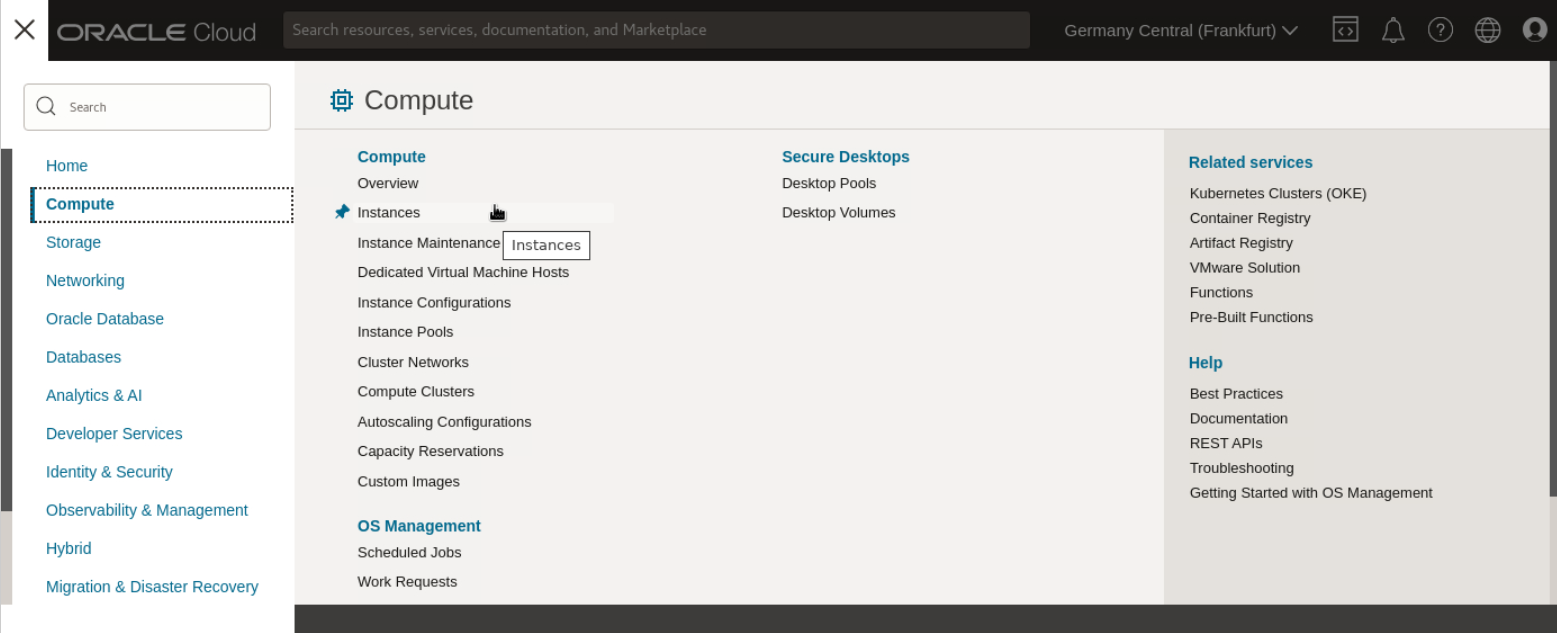
Navigate to the Compute section and select Instances using the main OCI navigation menu.
Register During Compute Instance Creation
During compute instance creation, you must enable the OS Management Hub plugin and the registration profile must be selected from the advanced options under the Oracle Cloud Agent tab.
Click Create instance on the instance page.
Enter
ol-host-01for the compute instance name.Keep the default settings, including compartment, placement, image and shape, primary VNIC information, SSH keys, boot volume, and block volumes.
Note: Remember to click the Save private key in the Add SSH keys section.
Click on Show advanced options at the very bottom.
Click on the Oracle Cloud Agent tab.
Select the OS Management Hub Agent selection.
Select the Oracle_Linux8 registration profile on the dialog box and click Set.
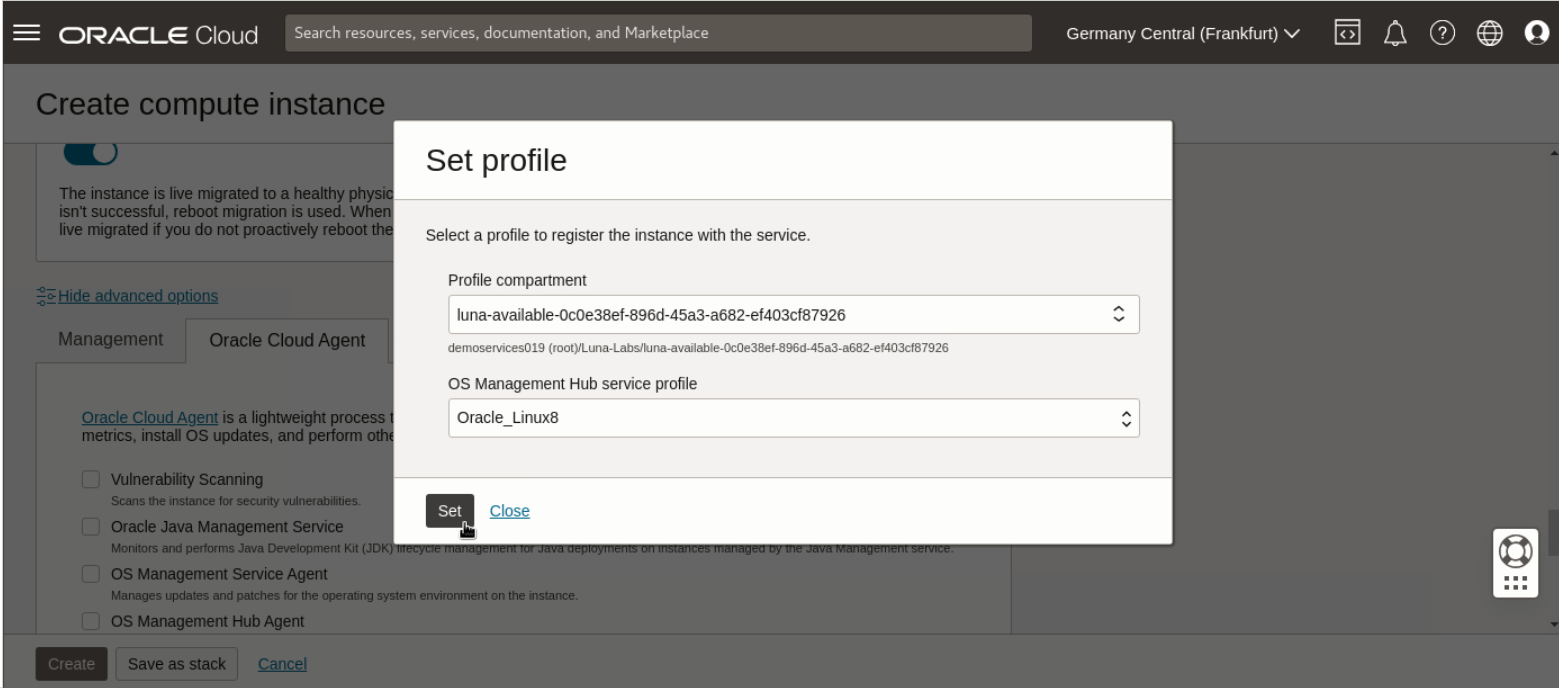
Note: Only profiles that match the instance's OS vendor, OS version, and architecture will be available.
Click Create.
Note: If you did not download the SSH private key, a pop-up window will display instructing you to download it.
Register Existing Compute Instances
To register existing compute instances, you must enable the OS Management Hub plugin, and a registration profile must be set on the instance's details page.
Return to Instances under the Compute section and click on the ol-host-02 instance.
Click on the Oracle Cloud Agent tab on the compute instance's details page.
Enable the OS Management Hub Agent plugin and set the registration profile to Oracle_Linux8.
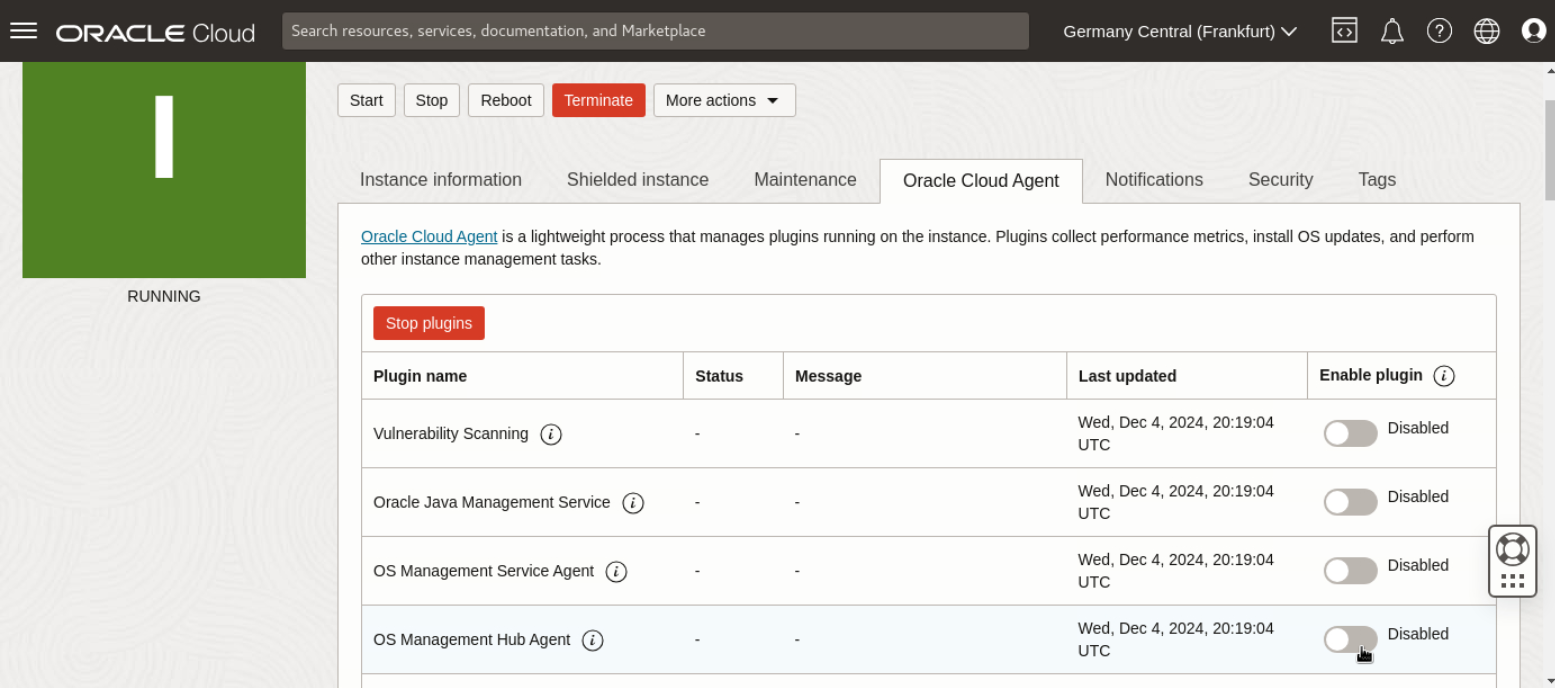
In some situations, the OS Management Hub Agent shows as stopped after being enabled. Ignore this and proceed to the next step.
Note: Registering compute instances with the OS Management Hub service can take up to 10 minutes to complete.
View OS Reports and Monitor Instance Activity
OS Management Hub generates reports in real-time that can summarize all instances and resources in a tenancy, in a specific compartment, in a group, in lifecycle and lifecycle stages, or for an individual instance. Reviewing reports for vulnerabilities and advisories can help to identify available enhancements, security updates, and bug fix updates to run as update jobs.
View Compartment-level Dashboard
The OS Management Hub Overview page has a summary dashboard that you can use to quickly view the statuses of all managed instances and resources in a specific compartment or tenancy.
Use the main navigation menu and click on Overview under the OS Management Hub section of Observability and Management.
Scroll down to the Dashboard to view three compartment-level reports.
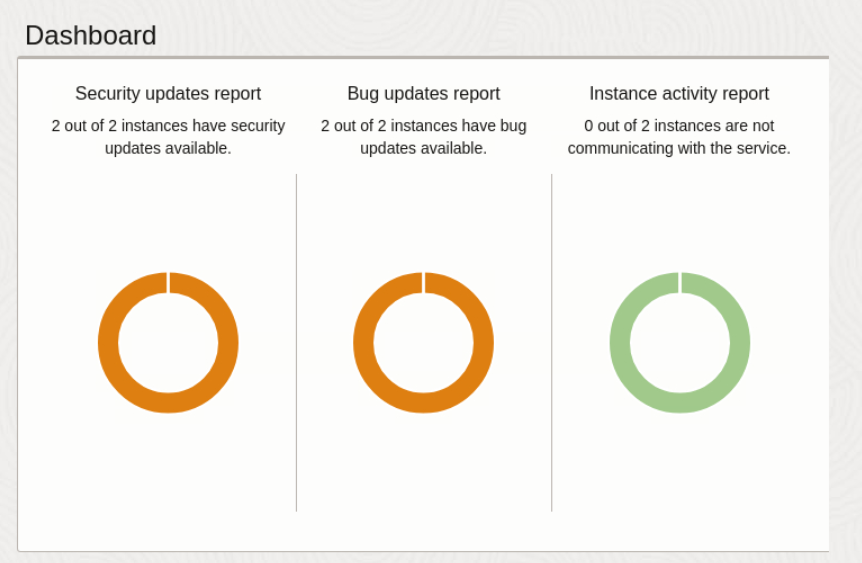
The three reports display the statuses for all instances in the compartment. The reports display the number of instances in the selected compartment that need updates, bug fixes, or instances not communicating with OS Management Hub.
View Compartment-level Reports
The Reports page of the OS Management Hub section contains more details on instance and resource statuses.
Click on Reports under the OS Management Hub navigation section.
This page contains the same three reports as the overview page, except you can click each report to view more details.
Click on the Security updates report to go the the Security updates report details page.
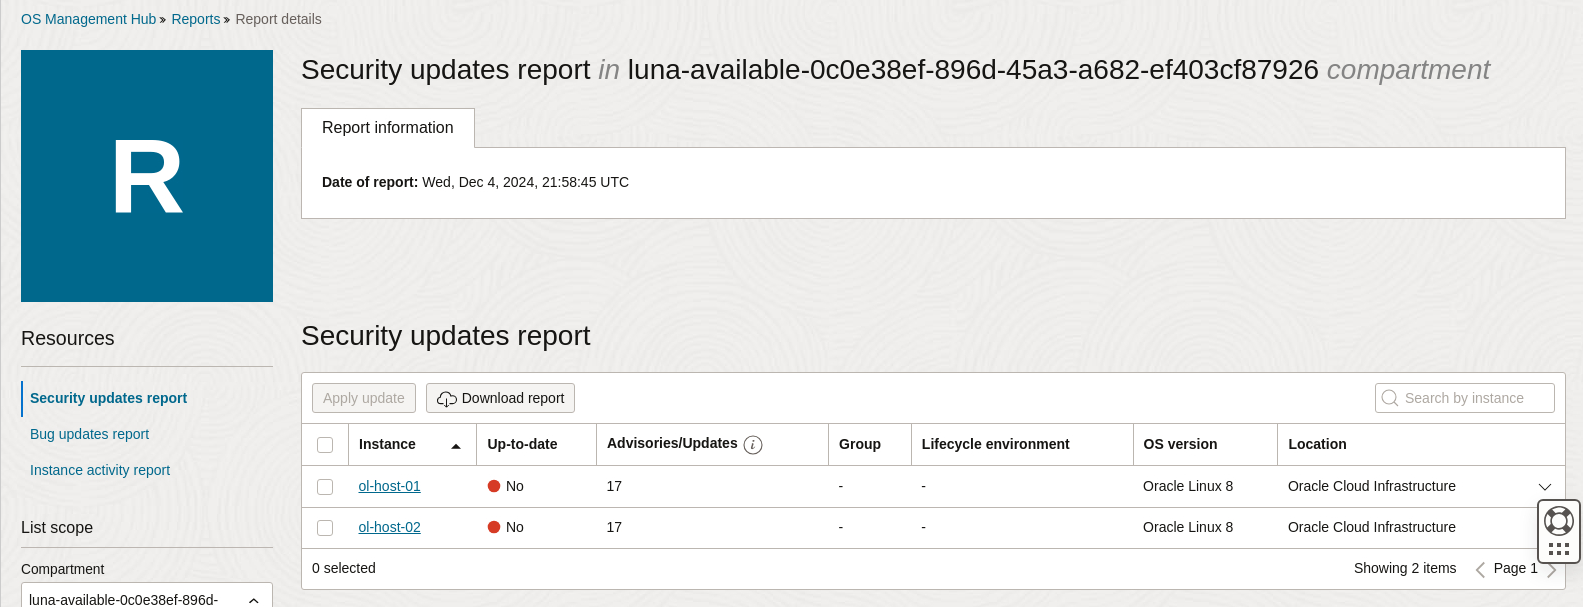
This details page contains details for security update statuses on all managed instances and resources in the compartments. Take note of any advisories or updates listed for the two registered instances on the Security Reports table. You will run update jobs to fix them later in the tutorial.
Click on the Bug updates report resource.
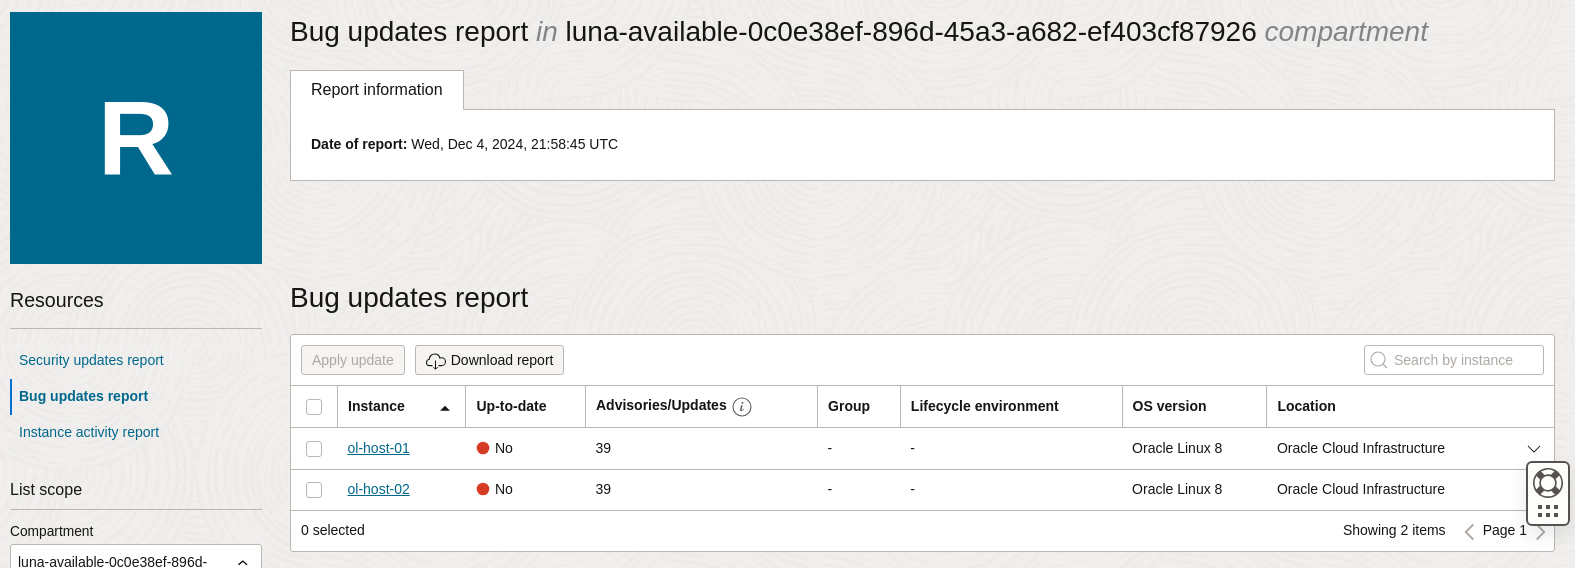
This details page displays bug fixes for each instance connected. Take note of any advisories or updates listed for the two registered instances on the Bug Reports table. You will run update jobs to fix them later in the tutorial.
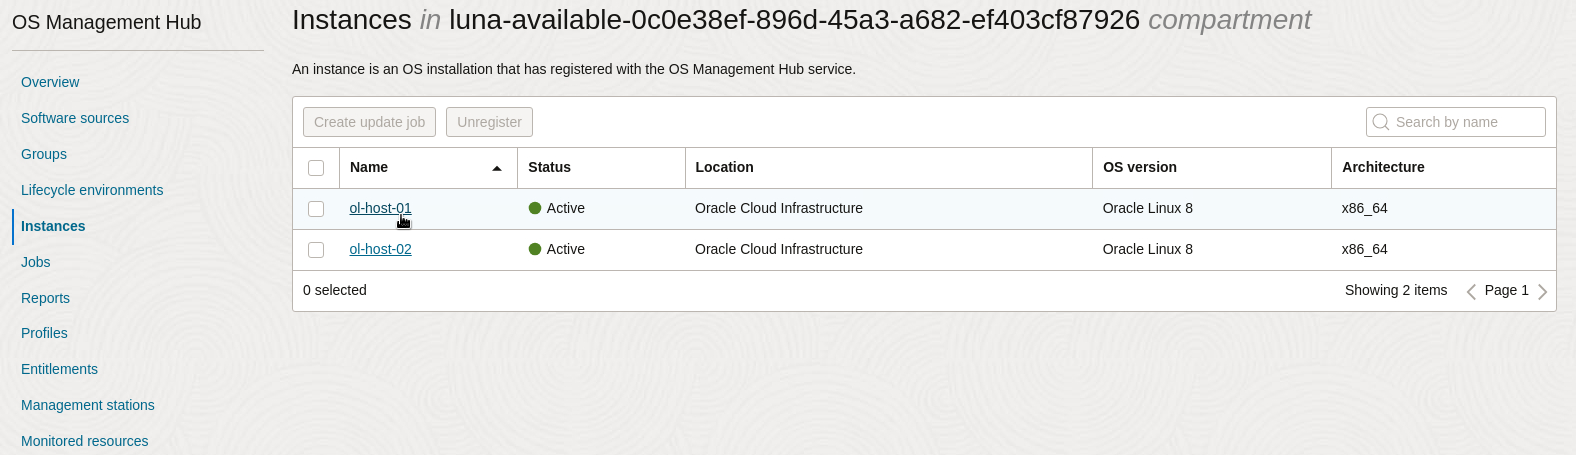
Click on the Instance activity report resource.
This details page displays the connectivity status of managed instances and resources. The two managed instances should display an active status.
View Instance-level Updates and Reports
Reporting for individual instances can be found on the instance's details page on the Reports resource.
Click on Instances under the OS Management Hub navigation section.
Click on the name of an instance to view its details page.
Scroll down to view the Updates resource.
The total amount of available updates for that specific instance is listed. You can select specific updates on the table and then update them individually.
Click Reports under Resources.
The instance's vulnerability report and change history are viewable on the Reports resource.
- Click the name of an advisory on the vulnerability report table to view more advisory details like the type of update required and associated packages.
- Click on the date of a change to the instance to view details on the job work that affected the instance. You can expand log messages to view the work completed by that update job.
Run Update Jobs and Monitor Job Status
Now that you have reviewed reports and identified advisories and available updates for individual instances and instances compartment-wide, let's run update jobs that update these Oracle Linux instances to the latest patches and content. A job is an action that OS Management Hub takes against one or more instances, such as installing updates.
You can run update jobs on all instances in a compartment, group, or individual instance. When a job runs, it performs the work necessary to fulfill it, dispatches work to instances, and reports the results back to the service. Update jobs can take time to apply and display in the service.
Install Individual Updates on a Standalone Instance
Installing individual updates to an instance via the Updates resource only applies to the associated updates listed in the advisory.
Click on instances under the OS Management Hub navigation section.
Select the name of an instance to navigate to the instance's details page.
Scroll down to the Updates resource.
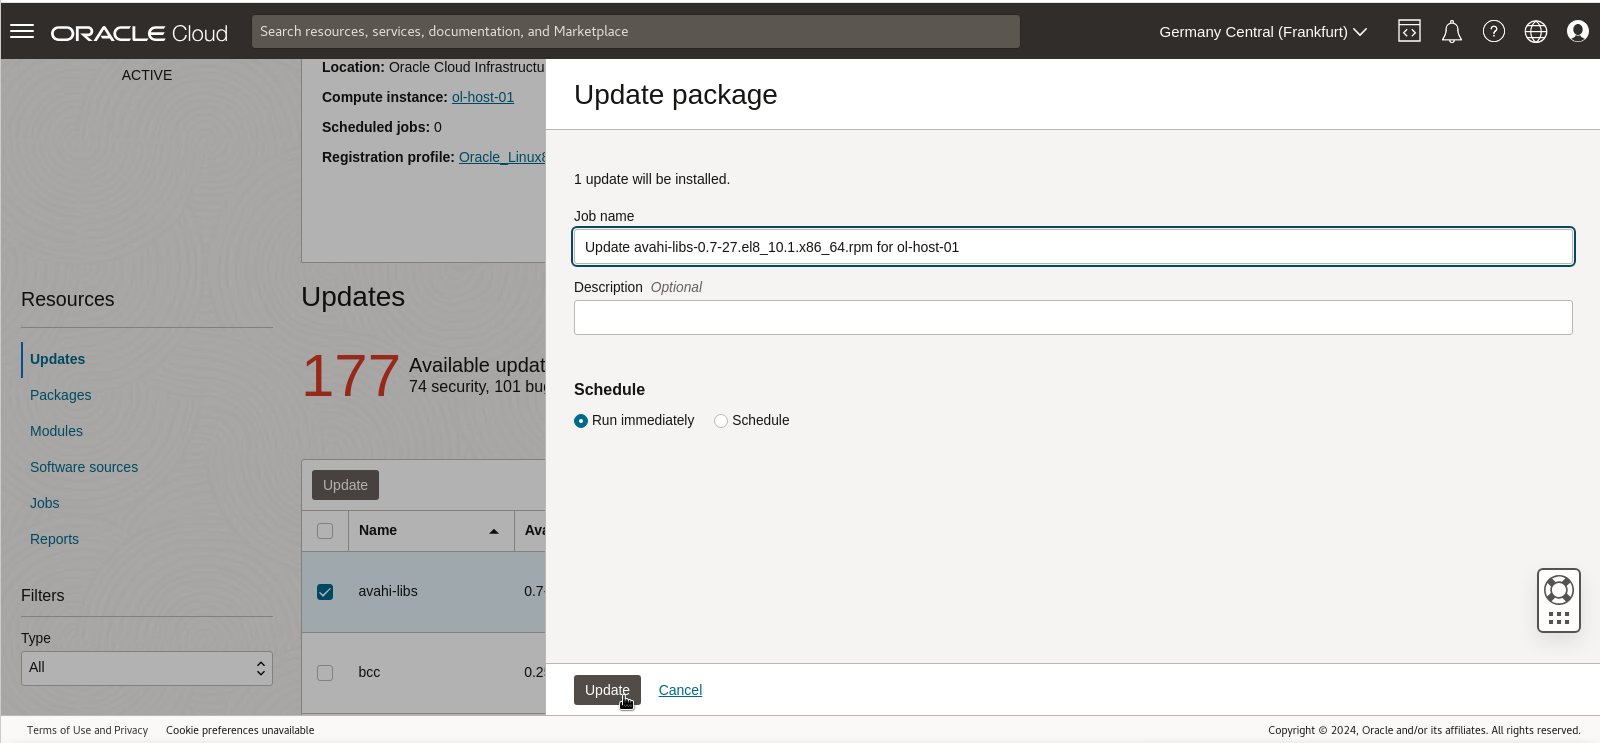
Select the first update on the Updates resource.
Click Update.
Enter the identifying information as the following:
- Name: Keep the default Job name.
- Description: (Optional) Enter a description.
Schedule the job to Run immediately.
Click Update.
View the update job status by clicking on the Jobs resource and selecting the In Progress jobs tab.
When the update is complete, the job will move to the Completed jobs tab.
Note: The console can take a few minutes to display the update job on the In progress jobs tab and the job will take several minutes to complete. If the job does not display, refresh the page.
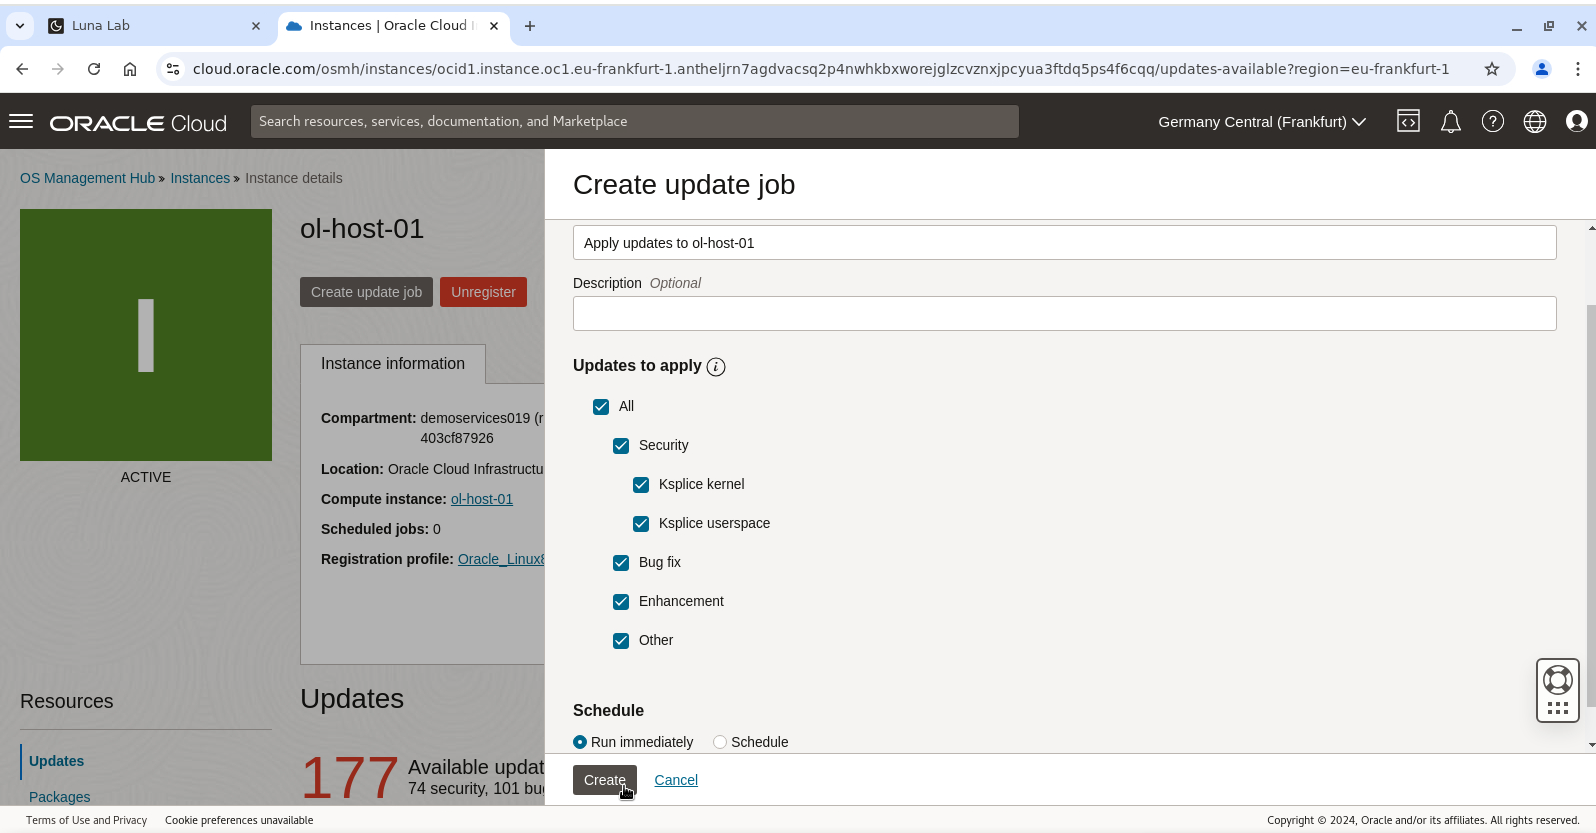
Create an Update Job on a Standalone Instance
To apply all the updates to an instance that match all or certain update types like security, bug fixes, or enhancements then create an update job.
Click on instances under the OS Management Hub navigation section.
Select the name of an instance to navigate to the instance's details page.
Click Create update job.
Enter the identifying information as the following:
- Name: Keep the default Job name.
- Description: (Optional) Enter a description.
Select ALL from the Updates to apply options.
Schedule the job to run immediately.
Click Create.
View the update job status by clicking on the Jobs resource and selecting the In Progress jobs tab.
When the update job is complete, the job will move to the Completed jobs tab.
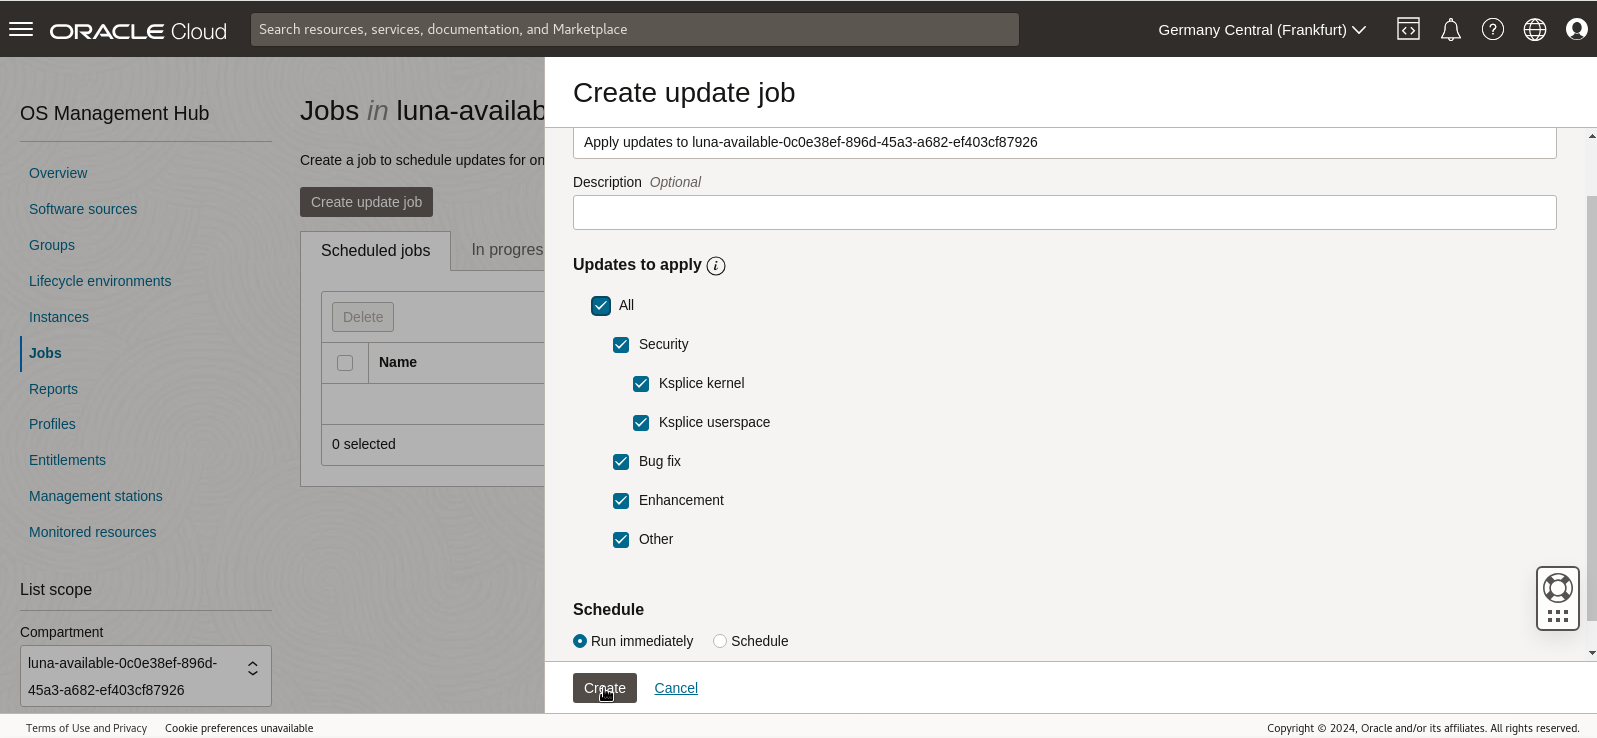
Schedule a Job to Update all Instances in a Compartment
You can make updates to all managed instances in a compartment. The instances can be a mix of OS versions, architectures, and locations.
Click on Jobs under the OS Management Hub navigation section.
Click Create update job.
Enter the identifying information as the following:
- Name: Keep the default Job name.
- Description: (Optional) Enter a description.
Select ALL from the Updates to Apply options.
Select Schedule.
Click the calendar icon, select today's date, and add five minutes from the current time.
Choose Once as the frequency.
Note: You can schedule update jobs to recur. Select Hour, Day, Week, or Month, then enter the interval.
Click Create.
View the update job status on the Scheduled Jobs tab of the Jobs page under the OS Management Hub navigation section.
If the scheduled job does not appear, then refresh the page.
The update job will move to the In progress jobs tab as it commits changes to the instances at the scheduled time. The update job will move to the Completed jobs tab once all updates are complete.
After completing the update job, return to the dashboard of the OS Management Hub Overview page or navigate to the Reports page under OS Management Hub to view the updated reports.
Navigate to the Updates and Reports resources on one of the instance's details page to view the changes to available updates and advisories.
Next Steps
By completing this tutorial, you have learned to use OS Management Hub to run Oracle Linux OS updates and monitor update jobs for compute instances hosted in Oracle Cloud Infrastructure. OS Management Hub can simplify the maintenance of mission critical systems by applying needed updates quickly and efficiently.