Install Oracle Linux Virtualization Manager in Oracle Cloud Infrastructure
Introduction
Oracle Linux Virtualization Manager is a server virtualization management platform that you can deploy to configure, monitor, and manage an Oracle Linux Kernel-based Virtual Machine (KVM) environment with enterprise-grade performance and support from Oracle.
This tutorial provides a guide for installing a working and functional deployment of Oracle Linux Virtualization Manager on Oracle Cloud Infrastructure (OCI).
Note: This tutorial is only for testing and evaluation purposes; Oracle Linux Virtualization Manager support for OCI is under development and is not supported to manage OCI systems.
Objectives
In this tutorial, you'll learn how to:
- Deploy the underlying OCI virtual cloud network (VCN) and instances
- Install Oracle Linux Virtualization Manager engine
- Attach a KVM host
- Attach shared storage
- Import an OVA template
- Create a new virtual machine
Prerequisites
- Access to an OCI tenancy
- A new VCN (10.0.0.0/16) with these resources:
- One public subnet (10.0.0.0/24) for the primary VNIC on the hosted engine and Oracle Linux Kernel-based Virtual Machine (KVM) hosts
- One private subnet (10.0.1.0/24) for the secondary VNIC on the hosted engine and KVM hosts
- One Virtual Local Area Network (VLAN) 1 (10.0.10.0/24) for the KVM hosts virtual machines
- One Internet Gateway
- One Service Gateway
- One public route table (0.0.0.0/0 through Internet Gateway) and associate it with the public subnet and VLAN 1
- One private route table (ALL through Service Gateway) and associate it with the private subnet
- Security lists should allow:
- All egress connections (0.0.0.0/0) all protocols
- All ingress connections from VCN CIDR (10.0.0.0/16)
- Ingress connection for all protocols from client PC


- Two 1TB block storage volumes
- Create one VM instance (recommended configuration: VM.Standard.E5.Flex with 2 OCPUs/32GB RAM) running Oracle Linux for the hosted engine. Attach a secondary VNIC to the VM instance and connect it to the private subnet.
- Create two VM instances (recommended configuration: VM.Standard.E5.Flex with 8 OCPUs/64GB RAM) running Oracle Linux to use as KVM hosts. Attach two secondary VNICs to each VM host and connect them to the private subnet and the VLAN. Attach two block volumes to each as read-write and shareable.

Deploy Oracle Linux Virtualization Manager
Note: If running in your own tenancy, read the linux-virt-labs GitHub project README.md and complete the prerequisites before deploying the lab environment.
Open a terminal on the Luna Desktop.
Clone the
linux-virt-labsGitHub project.git clone https://github.com/oracle-devrel/linux-virt-labs.gitChange into the working directory.
cd linux-virt-labs/olvmInstall the required collections.
ansible-galaxy collection install -r requirements.ymlUpdate the Oracle Linux instance configuration.
cat << EOF | tee instances.yml > /dev/null
compute_instances:
  1:
    instance_name: "olvm"
    type: "engine"
    instance_ocpus: 2
    instance_memory: 32
  2:
    instance_name: "olkvm01"
    type: "kvm"
    instance_ocpus: 8
    instance_memory: 64
  3:
    instance_name: "olkvm02"
    type: "kvm"
    instance_ocpus: 8
    instance_memory: 64
use_vnc_on_engine: true
EOF
Create an inventory file.
cat << EOF | tee hosts > /dev/null
localhost ansible_connection=local ansible_connection=local ansible_python_interpreter=/usr/bin/python3.6
EOF
Deploy the lab environment.
ansible-playbook create_instance.yml -i hosts -e "@instances.yml"The free lab environment requires the extra variable
ansible_python_interpreterfor localhost because it installs the RPM package for the Oracle Cloud Infrastructure SDK for Python. The location for installing this package is under the Python 3.6 modules. Using an inventory variable avoids impacting plays running on hosts other than localhost.The default deployment shape uses the AMD CPU and Oracle Linux 8. To use an Intel CPU or Oracle Linux 9, add
-e instance_shape="VM.Standard3.Flex"or-e os_version="9"to the deployment command.Important: Wait for the playbook to run successfully and reach the pause task. The OCI network and instance creation for the Oracle Linux Virtualization Manager installation is complete at this stage of the playbook, and the instances are ready. Note the previous play, which prints the public and private IP addresses of the nodes it deploys.
Open a VNC Session to the Manager
Open a new terminal and connect to the olvm instance via SSH.
The
-Loption enables local forwarding, which opens a local port to connect through an SSH tunnel to the remote VNC server.ssh -L 5914:localhost:5901 oracle@<ip_address_of_instance>Switch to the Luna Desktop.
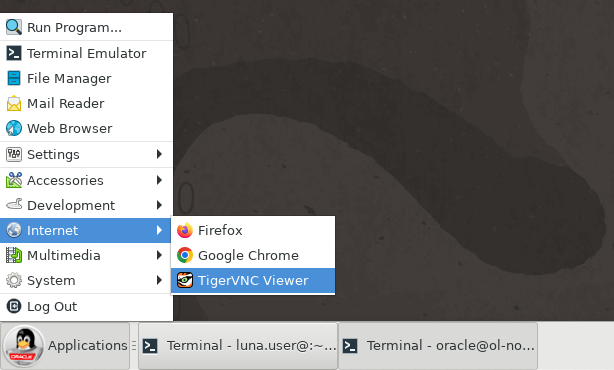
Open the TigerVNC Viewer by clicking the Applications menu, Internet, and then TigerVNC Viewer.
Log on to the deployed server's GUI environment by entering
localhost:5914into the VNC Server text box and pressing the Connect button.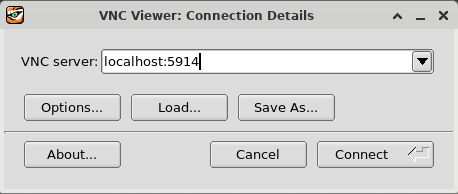
Enter the
oracleuser's password of oracle and press the OK button.
The Server's GUI desktop is displayed with a first-time login setup.

Press the Next button three times, then the Skip button, followed by the Start Using Oracle Linux Server button. Finally, close or minimize the Getting Started window.
Install the Engine
Open a terminal within the VNC session.
Enable copy and paste to the VNC session.
vncconfig -nowin &Install the Oracle Linux Virtualization Manager Release package, which automatically enables/disables the required repositories.
sudo dnf install -y oracle-ovirt-release-45-el8Clear the dnf cache.
sudo dnf clean allList the configured repositories and verify that the required repositories are enabled.
sudo dnf repolistYou must enable the following repositories:
- ol8_baseos_latest
- ol8_appstream
- ol8_kvm_appstream
- ovirt-4.5
- ovirt-4.5-extra
- ol8_gluster_appstream
- ol8_UEKR7
If a required repository is not enabled, use the
dnf config-managercommand to enable it.sudo dnf config-manager --enable <repository_name>Install the Manager package.
sudo dnf install -y ovirt-engineConfigure the Manager.
sudo engine-setup --accept-defaultsThe
--accept-defaultsoption automatically accepts all questions with default answers.When prompted, enter the engine admin password and then confirm it. The password must be at least eight characters long, including uppercase, lowercase, numeric, and special characters.
Login to the Administration Portal
Get the FQDN for the manager host.
hostname -fOpen a browser and access the engine's Web UI.
https://<fqdn of the manager host>/ovirt-engineNote: Approve the security warning based on the browser used. For Chrome, click the
Advancedbutton and then theProceed to localhost (unsafe)link.The Welcome page displays.

Under Downloads, click Engine CA Certificate.
The
pki-resourcecertificate file downloads to the browser's downloads folder on the file system.Import the certificate into the browser.
Open the browser menu and click Settings.
Use the search and enter
cert.Click the View Certificates... button.
The Certificate Manager dialog box opens.
Click the Import... button.
The Select File containing CA certificates(s) to import dialog box opens.
From the Certificate Files drop-down list, select All Files.
Click the
pki-resourcefile from the file selection panel.Click the Open button.
The Download Certificate dialog box opens.
Click the check box next to Trust this CA to identify websites., and click OK.
Click OK.
Close the browser Settings tab.
From the engine's Web UI, click Administration Portal.
The Login page displays.
Enter
admin@ovirtfor the Username and the password you specified when configuring the Manager.The Administration Portal displays after a successful login.
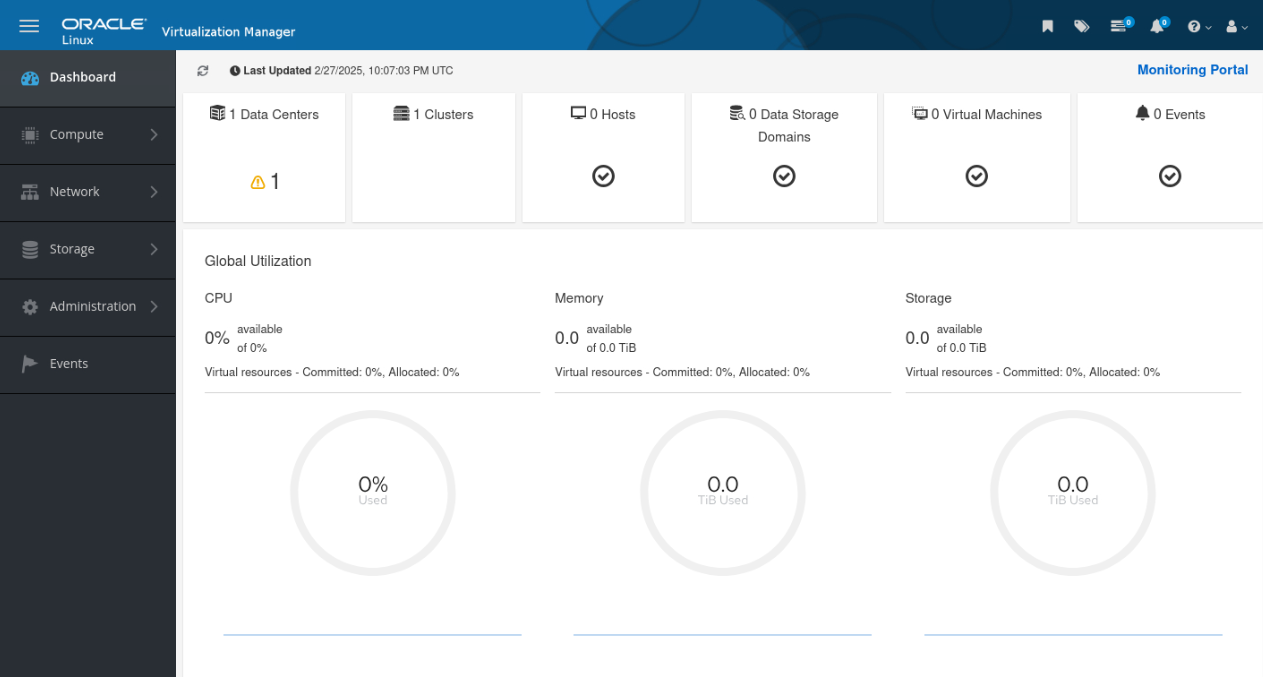
Configure a KVM Host
Switch to the terminal within the VNC session.
Connect via SSH to the olkvm01 instance.
ssh olkvm01Install the Oracle Linux Virtualization Manager Release package, which automatically enables/disables the required repositories.
sudo dnf install -y oracle-ovirt-release-45-el8Clear the dnf cache.
sudo dnf clean allList the configured repositories and verify that the required repositories are enabled.
sudo dnf repolistYou must enable the following repositories:
- ol8_baseos_latest
- ol8_appstream
- ol8_kvm_appstream
- ovirt-4.5
- ovirt-4.5-extra
- ol8_gluster_appstream
- ol8_UEKR7
If a required repository is not enabled, use the dnf config-manager command to enable it.
sudo dnf config-manager --enable <repository_name>Activate the Cockpit web console.
sudo systemctl enable --now cockpit.socketOpen the firewall ports to access the Cockpit web console.
sudo firewall-cmd --permanent --zone=public --add-service=cockpit
sudo firewall-cmd --reload
You can use the Cockpit web interface to monitor the host’s resources and to perform administrative tasks. You can access the host's Cockpit web interface from the Administration Portal or by connecting directly to the host.
Exit the session.
exitYou should now be on the Manager host.
Add KVM Host
Switch to the browser within the VNC session.
Log in to the Administration Portal.
Using the side navigation menu, go to Compute and click Hosts.
On the Hosts pane, click the New button.
The New Host dialog box opens with the General tab selected on the sidebar.
Select the Default data center from the Host Cluster drop-down list.
Installing Oracle Linux Virtualization Manager creates a data center and cluster named Default. You can rename and configure this data center and cluster or add new data centers and clusters to meet your needs.
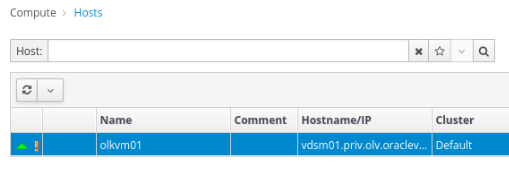
Enter a name for the host in the Name field.
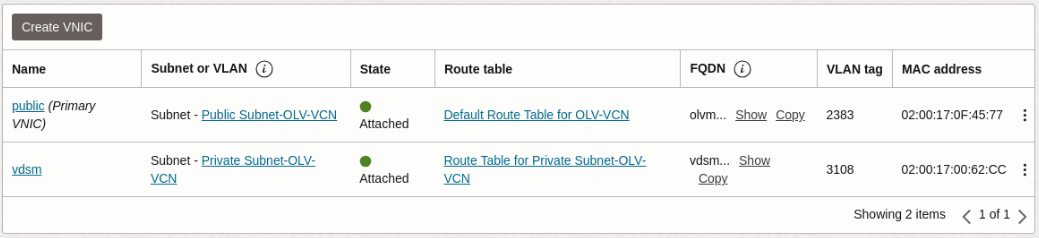
olkvm01In the Hostname field, enter the fully-qualified domain name or IP address of the host.
vdsm01.priv.olv.oraclevcn.comThis entry is the fully-qualified name of the secondary VNIC attached to the KVM host.
Under Authentication, select the SSH Public Key authentication method.
This action displays the engine's SSH public key within the SSH PublicKey field.
Switch to the terminal within the VNC session.
Copy the SSH public key to the
/root/.ssh/authorized_keysfile on the KVM host.sudo ssh-keygen -y -f /etc/pki/ovirt-engine/keys/engine_id_rsa | ssh olkvm01 -T "sudo tee -a /root/.ssh/authorized_keys"The left side of this command displays the engine's SSH private key, while the right side copies it over SSH to the required location. The
-Toption disables pseudo-terminal allocation and stops you from getting an error message.Click OK.
The Power Management Configuration screen displays.
Click OK as OCI instances do not allow configuring power management.
The panel updates and adds the new host to the list of hosts in the Manager. While the Manager is installing the host agent (VDSM) and other required packages on the host, the panel shows the host's status as Installing. You can view the progress of the installation in the Hosts details pane. The host status changes to Up when the installation is complete.
Note: After a KVM host is added to a cluster, it is also crucial to avoid any spontaneous changes to the network configuration in
/etc/sysconfig/network-scripts/, through the NetworkManager (e.g. nmcli), or in OCI.Wait for the host status to show as Up before continuing with the tutorial.
Create a Logical Network
Using the side navigation menu, go to Network and then click Networks.
On the Networks pane, click New.
The New Logical Network dialog box opens with the General tab selected on the sidebar.
The Default data center is pre-selected in the drop-down list.
For the Name field, enter a name for the new network.
l2-vm-networkUnder the Network Parameters section, the VM Network check box is selected by default. Leave the VM Network check box selected to create the new VLAN-based virtual machine network.
Click OK to create the network.
Assign a Logical Network to a KVM Host
Using the side navigation menu, go to Compute and click Hosts.
The Hosts pane opens.
Under the Name column, click the olkvm01 host to add the network.
After clicking the host's name, the General tab opens with details about the host.
Click the Network Interfaces tab on the horizontal menu.
The Network Interfaces tab opens with details about the network interfaces on the available host.
Click the Setup Host Networks button.
The Setup Host Networks dialog box opens for the host. The Interfaces column lists any physical interfaces on the host, and the Assigned Logical Networks column displays any logical networks assigned to the interface. The Unassigned Logical Networks column displays the unassigned logical networks.
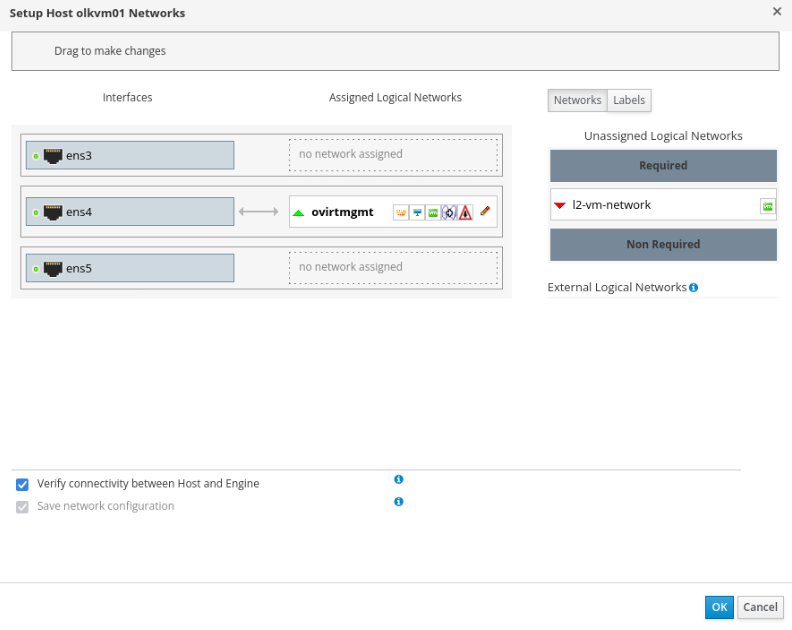
Select the
l2-vm-networkfrom the Unassigned Logical Networks column by left-clicking the network and, while holding down the mouse, drag the network over to the last box to the right to add the network.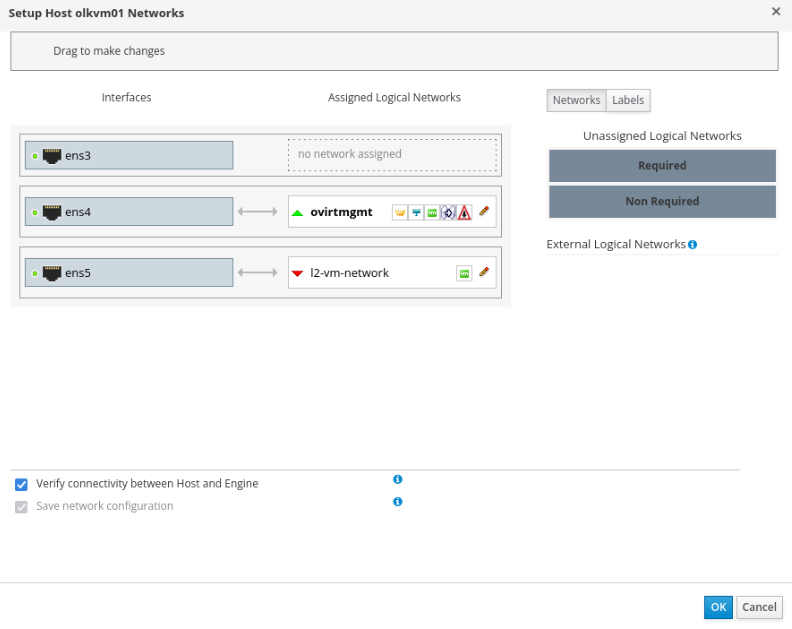
In the example screenshot, the interface labels the box as the
ens5network interface. Your environment may differ depending on your configuration.Click OK to save the settings and add the network.
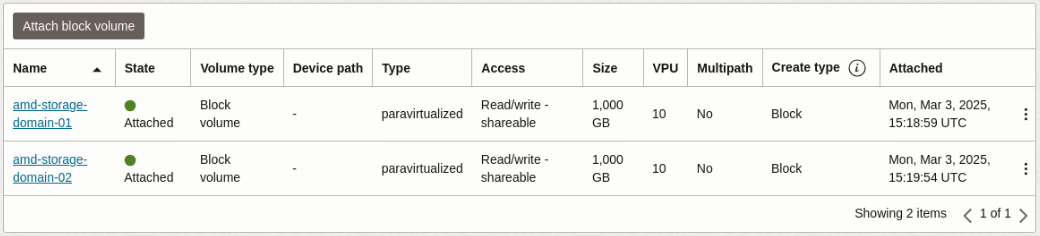
Add a Fibre Channel Data Domain
Oracle Linux Virtualization Manager uses a centralized storage system for virtual machine disk images, ISO files, and snapshots. In this tutorial, two OCI Block Volumes are attached to the KVM Host and appear as Fibre Channel LUNs.
Using the side navigation menu, go to Storage and click Domains.
The Storage Domains pane opens.
On the Storage Domains pane, click the New Domain button.
The New Domain dialog box opens.
For the Name field, enter a name for the data domain.
amd-storage-domain-01From the Data Center drop-down list, select the Default option in the drop-down list.
From the Domain Function drop-down list, select the Data option in the drop-down list.
From the Storage Type drop-down list, select Fibre Channel.
For the Host to Use drop-down list, select the olkvm01 host.
When selecting Fibre Channel as the Storage Type, the New Domain dialog box automatically displays the known targets with unused LUNs.
Click Add next to the first LUN ID.
Click OK.
You can click Tasks in the upper right corner of the UI to monitor the various processing steps that this step completes when attaching the FC data domain to the data center.
Wait for the Cross Data Center Status to show as Active before continuing the tutorial.
Import a Virtual Machine Template
Oracle Linux Virtualization Manager allows the import of existing OVA templates. Oracle provides pre-built OVA templates from the Oracle Linux Cloud Images page.
Using the side navigation menu, go to Compute and click Templates.
The Templates pane opens.
Click the Import button.
The Import Template(s) dialog box opens.
Keep the default selections for the Data Center, Source, and Host drop-down lists.
For the File Path, enter
/tmp.This folder on the olkvm01 host is from where the UI will try to import the OVA template. Therefore, you first need to ensure the template is in that location.
Switch to the terminal within the VNC session.
Download the OVA template.
ssh olkvm01 "curl -L https://yum.oracle.com/templates/OracleLinux/OL9/u5/x86_64/OL9U5_x86_64-olvm-b253.ova -o /tmp/ol95.ova"Switch to the browser within the VNC session.
Click the Load button.
The OVA template appears within the dual list box's Virtual Machines on Source section.
Click the OVA template and then the Right Arrow button to send the OVA template to the Virtual Machines to Import side of the dual list box.
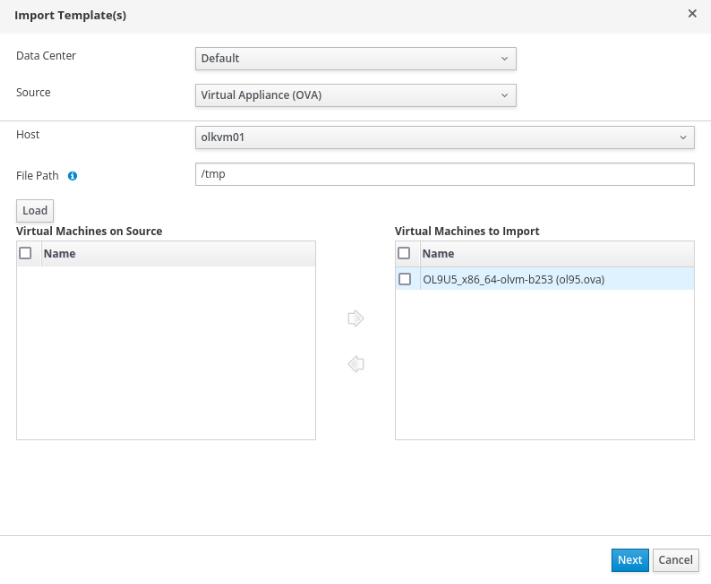
Click Next.
Review the template information, then click OK.
Wait for the status to show as OK.
Create a Virtual Machine
Using the side navigation menu, go to Compute and then click Virtual Machines.
The Virtual Machines pane opens.
Click the New button.
The New Virtual Machine dialog box opens.
Select the OVA template from the Template drop-down list.
OL9U5_x86_64-olvm-b253Select the operating system from the Operating System drop-down list.
Oracle Linux 9.x x64In the Name field, enter a name for the virtual machine.
ol9-vm1Select the VM network interface from the nic1 drop-down list.
l2-vm-network(l2-vm-network)Click the Show Advanced Options button.
The Advanced Options menu opens. This menu enables setting additional options for the virtual machine, such as a password, SSH key, or static network.
Click Initial Run.
Click Authentication.
In the User Name field, enter a user name to log into the virtual machine.
opcIn the Password and Verify Password fields, enter a password for the user.
For production systems, the recommendation is to use SSH Authorized Key.
Click Networks.
Enter the DNS server IP address in the DNS Servers field.
10.0.10.1Click the checkbox next to In-guest Network Interface Name.
Click the Add new button.
In the In-guest Network Interface Name field, enter the name of the network interface.
eth0From the IPv4 Boot Protocol drop-down list, select
Static.Due to linking the virtual machine network to the OCI VLAN network, there is no default DHCP server to assign IP addresses.
In the IPv4 Address field, enter an IP address in the same range as the OCI VLAN network.
10.0.10.253In the IPv4 Netmask field, enter the network netmask.
255.255.255.0In the IPv4 Gateway field, enter the network gateway.
10.0.10.1Click OK.
Wait for the status to change from Importing to Down.
Run the Virtual Machine
Switch to the terminal within the VNC session.
Install the Virtual Machine Viewer package.
This package allows viewing a virtual machine using the Oracle Linux Virtualization Manager console.
sudo dnf install -y virt-viewerSwitch to the browser within the VNC session.
Select the virtual machine and click the Run button.
Click the Console button.
This action downloads a
console.vvfile that you can click to open the virtual machine remote viewer.Click the
console.vvfile from the browser's download list.The virtual machine's remote viewer application opens.
From the virtual machine remote viewer, log into the virtual machine using the user name and password you defined.
Check the virtual machine network settings.
ip aThe output shows the
eth0network interface using an IP address of10.0.10.253.Ping the network gateway.
ping 10.0.10.1The virtual machine successfully pings the gateway.
Ping an address on the internet.
The results show the Name or service not known. This message appears because the VLAN isolates network traffic to packets only within its subnet. To get access outside the VLAN subnet, you must provide VLAN External Access within the OCI Cloud Console to the virtual machine.
Provide Virtual Machine External Access
Open a browser and log into the OCI Console.
From the OCI Console, use the navigation menu and click Networking, and then Virtual cloud networks.
Click the name of the Virtual Cloud Network (VCN) in the table.
From Resources, click VLANs.
On the VLANs pane, click the name of the VLAN in the table.
On the VLAN Details pane, click Add External Access.
The Add External Access pane opens.
Under External Access Type, select Public Access.
Under Private IP Address, enter the virtual machine name in the Name field and the virtual machine IP address in the Private IP Address field.
Under Reserved Public IP Address, select Create New.
Click Add External Access
The VLAN Details pane displays a new entry under External Access containing a Public IP Address. This entry now allows the virtual machine access to the internet, both inbound and outbound.
Test Virtual Machine External Access
Switch to the virtual machine remote viewer within the VNC session.
Ping an address on the internet.
The results show the successful pinging of an internet address. You can now run
sudo dnf upgrade -yto keep the virtual machine patch level current.
Next Steps
A virtual machine's successful creation and access to the internet demonstrates a working and functional Oracle Linux Virtualization Manager installation on OCI. With the environment up and running, expand your skills by adding another KVM host, a virtual machine running a DHCP server, or migrating a virtual machine from one KVM host to another. Check out the available documentation and links below for additional information.