Deploy HAProxy Using Podman on Oracle Linux
Introduction
HAProxy is a well-known and widely used open-source solution that delivers load balancing and proxy services for HTTP (Layer 7) and TCP (Layer 4), achieved by spreading incoming requests across multiple servers. The load balancer can also detect if any servers in its pool become unresponsive and automatically stop forwarding incoming traffic to them. For more details on the services HAProxy does and does not provide, please refer to the upstream documentation . You can install HAProxy locally using packages provided by Oracle or run as a container. This tutorial covers the latter using Podman.
Objectives
In this tutorial, you'll learn how to:
- Use HAProxy as a Podman-based container
- Configure a simple deployment using three backend servers
- Confirm the deployment runs as expected
Note: The steps do not include configuring HAProxy to use certificates, which we recommend for production environments.
Prerequisites
Minimum of 4 Oracle Linux systems
- HAProxy node
- 3 Web Application nodes
Each system should have Oracle Linux installed and configured with:
- A non-root user account with sudo access
- Key-based SSH, also known as password-less SSH, between the hosts
- Podman and cURL packages
- Access to the Internet
Deploy Oracle Linux
Note: If running in your own tenancy, read the linux-virt-labs GitHub project README.md and complete the prerequisites before deploying the lab environment.
Open a terminal on the Luna Desktop.
Clone the
linux-virt-labsGitHub project.git clone https://github.com/oracle-devrel/linux-virt-labs.gitChange into the working directory.
cd linux-virt-labs/olInstall the required collections.
ansible-galaxy collection install -r requirements.ymlUpdate the Oracle Linux instance configuration.
cat << EOF | tee instances.yml > /dev/null
compute_instances:
  1:
    instance_name: "ol-node-01"
    type: "server"
  2:
    instance_name: "web-01"
    type: "server"
  3:
    instance_name: "web-02"
    type: "server"
  4:
    instance_name: "web-03"
    type: "server"

use_podman: true
update_all: true
passwordless_ssh: true
use_haproxy: true

EOF
Deploy the lab environment.
ansible-playbook create_instance.yml -e localhost_python_interpreter="/usr/bin/python3.6" -e "@instances.yml"The free lab environment requires the extra variable
local_python_interpreter, which setsansible_python_interpreterfor plays running on localhost. This variable is needed because the environment installs the RPM package for the Oracle Cloud Infrastructure SDK for Python, located under the python3.6 modules.The default deployment shape uses the AMD CPU and Oracle Linux 8. To use an Intel CPU or Oracle Linux 9, add
-e instance_shape="VM.Standard3.Flex"or-e os_version="9"to the deployment command.Important: Wait for the playbook to run successfully and reach the pause task. At this stage of the playbook, the installation of Oracle Linux is complete, and the instances are ready. Take note of the previous play, which prints the public and private IP addresses of the nodes it deploys and any other deployment information needed while running the lab.
Confirm Podman Works
Open a terminal and connect via SSH to the ol-node-01 instance.
ssh oracle@<ip_address_of_instance>Confirm the Podman CLI is working.
podman run quay.io/podman/helloExample Output:
[oracle@ol-server ~]$ podman run quay.io/podman/hello
Trying to pull quay.io/podman/hello:latest...
Getting image source signatures
Copying blob f82b04e85914 done
Copying config dbd85e09a1 done
Writing manifest to image destination
Storing signatures
!... Hello Podman World ...!

         .--"--.
       / -     - \
      / (O)   (O) \
   ~~~| -=(,Y,)=- |
    .---. /`  \   |~~
 ~/  o  o \~~~~.----. ~~
  | =(X)= |~  / (O (O) \
   ~~~~~~~  ~| =(Y_)=-  |
  ~~~~    ~~~|   U      |~~

Project:   https://github.com/containers/podman
Website:   https://podman.io
Documents: https://docs.podman.io
Twitter:   @Podman_io
Configure the Backend Servers
Open the firewall ports on each backend server to allow HAProxy to communicate with the web application.
Open the web application port on the firewall.
for host in web-01 web-02 web-03
do
  printf "======= $host =======\n\n"
  ssh $host \
   "sudo firewall-cmd --permanent --add-port=8080/tcp; \
  sudo firewall-cmd --reload"
done
Enable Lingering.
If you want the container to keep running even after the user logs out or closes their SSH session, you must enable lingering for that user. This requirement is because Oracle Linux ties the user session to the rootless Podman containers and stops them when the user logs out unless lingering is enabled.
for host in web-01 web-02 web-03
do
  printf "======= $host =======\n\n"
  ssh $host \
   "loginctl enable-linger"
done
Start the web application on each backend server.
This application provides an HTTP response to confirm that the HAProxy service works as expected.
for host in web-01 web-02 web-03
do
  printf "======= $host =======\n\n"
  ssh $host \
   "podman run -d \
   --name $host \
   -p 8080:8080 \
   docker.io/jmalloc/echo-server:latest"
done
Verify all the web application containers are running.
for host in web-01 web-02 web-03
do
  printf "======= $host =======\n\n"
  ssh $host \
   "podman ps -a"
done
Create the HAProxy Configuration File
HAProxy is very versatile in how you can configure it. The haproxy.conf file that ships with Oracle Linux creates a frontend listener on TCP port 5000. Since we want to listen on TCP port 80, we must change the default configuration to meet our requirements.
Create a new directory for the HAProxy configuration.
mkdir ~/haproxyCreate the configuration file and enter the details required for this tutorial.
cat << EOF | tee ~/haproxy/haproxy.cfg > /dev/null
global
# Bind the Runtime API to a UNIX domain socket, and/or an IP address
   stats socket /var/run/api.sock user haproxy group haproxy mode 660 level admin expose-fd listeners
   log stdout format raw local0 info

defaults
   # Set the Proxy mode to http (Layer 7) or tcp (Layer 4)
   mode http
   option redispatch
   option contstats
   retries 3
   timeout connect 10s
   timeout server 1m
   timeout client 1m
   option forwardfor
   timeout http-request 10s
   log global

frontend stats
   bind *:8404
   stats enable
   stats uri /
   stats refresh 10s

frontend myfrontend
   # Receive HTTP traffic on all IP addresses assigned to the server on Port 80
   bind :80

   # Choose the default pool of backend servers (important if several pools are defined)
   default_backend webservers

backend webservers
   # By default requests are sent to the server pool using round-robin load-balancing
   balance   roundrobin

   # Enable HTTP health checks (see 'check' at the end of each server definition)
   option httpchk
   http-check send meth GET uri /nginx-health

   # Define the servers where HTTP traffic will be forwarded. Note that the format used is:
   #
   # server <name> <hostname>:<listening port> check
   # Note:  is only required if the directive is enabled.
   #
   server web-01 web-01:8080 check
   server web-02 web-02:8080 check
   server web-03 web-03:8080 check
EOF
Start the HAProxy Server
Open the firewall ports that HAProxy requires.
sudo firewall-cmd --permanent --add-port=8080/tcp sudo firewall-cmd --permanent --add-port=8404/tcp sudo firewall-cmd --reload- Port
8080is the container's external listening port for the HAProxy listener - Port
8404is the container's external listening port for the HAProxy statistics
- Port
Start the HAProxy container.
podman run -d --name haproxy -v ~/haproxy:/etc/haproxy:Z -p 8080:80 -p 8404:8404 ghcr.io/oracle/oraclelinux9-haproxy:2.4-d: instructs Podman to run the container in the background--name: assigns the given name to the container-v: performs a bind mount between the directory on the $HOST and the directory within the container-p: publishes a port from the hostPORT to the containerPORT
We use port
8080as the hostPort to avoid the requirement of usingsudoor root for ports under 1024.
Test the HAProxy Server
Access the HAProxy frontend to confirm it is working.
curl http://ol-node-01:8080Example Output:
Request served by 56cd8ee13f60

GET / HTTP/1.1

Host: ol-server
Accept: */*
User-Agent: curl/7.61.1
Confirm the HAProxy round-robin load-balancing algorithm works.
You can confirm this by watching the
Request served byhex value cycle through three different values before returning to the initial value.for i in {1..8}; do curl http://ol-node-01:8080; done
(Optional) Check the HAProxy Dashboard
Open a new terminal and configure an SSH tunnel to the ol-node-01 instance.
The -L option enables local forwarding, which opens a local port to connect through an SSH tunnel to the remote HAProxy dashboard port.
ssh -L 9000:localhost:8404 oracle@<ip_address_of_instance>Open a new browser and enter the URL http://localhost:9000 to open the HAProxy dashboard.
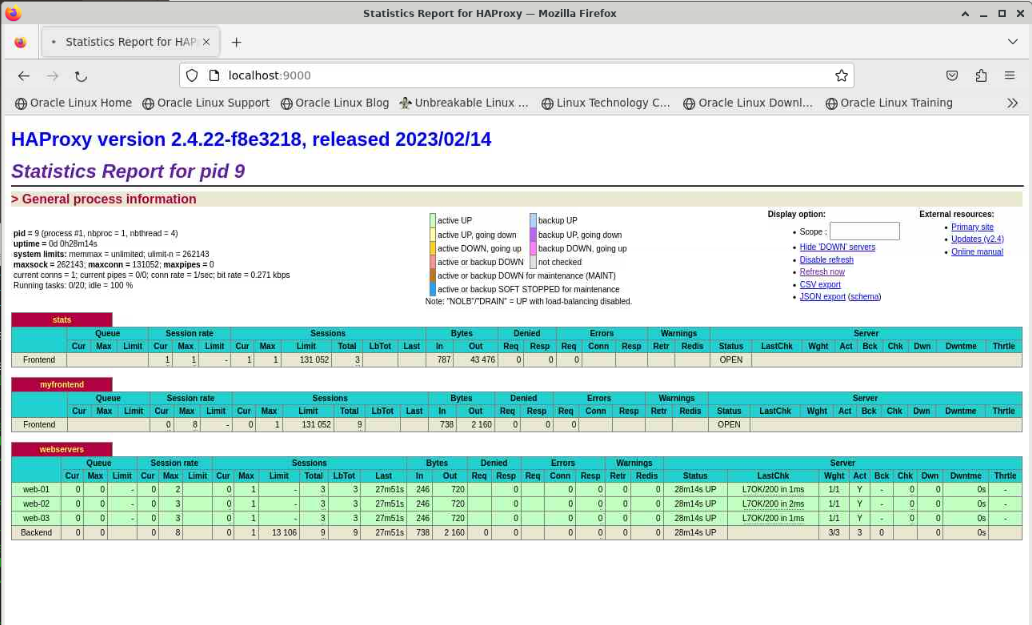
There are three sections shown in the dashboard:
stats: is information about the HAProxy process's performancemyfrontend: is information related to received HTTP requestswebservers: is information for each backend node defined in thehaproxy.cfgfile as representing the webservers section.
Notice the three nodes listed with a green background indicating that they are all live. The statistics for each node are listed separately, and the last row shows the aggregate total.
Test Node Notifications
The dashboard will show when a backend goes offline and then returns. It reports the backend as DOWN when the node is offline and UP when running and responding to its health checks.
Switch to a terminal connected to ol-node-01.
Take a node offline and bring it up again.
ssh web-01 "podman stop web-01; sleep 60; podman start web-01"HAProxy dashboard showing node down:
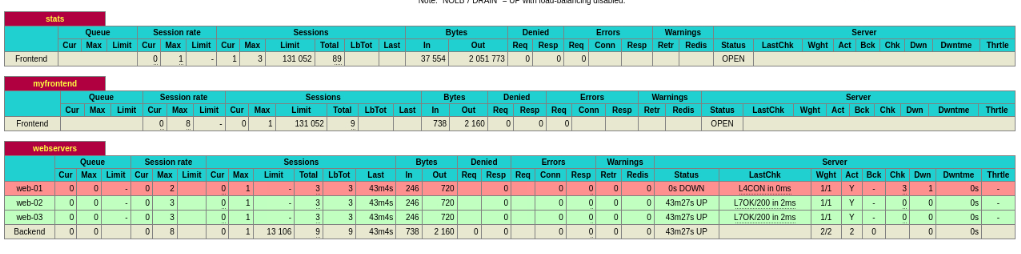
HAProxy dashboard showing node up:

Next Steps
You have completed this tutorial and demonstrated how to install and run a HAProxy server using Podman. However, HAProxy has many more features and abilities that were outside the scope of this lab, such as those shown below.
- Layer 4 (TCP) and 7 (HTTP) load balancing
- PROXY protocol support
- SSL/TLS termination
- Content switching/inspection
- Detailed logging
- URL rewriting
- Caching
- Debugging and tracing facilities
In the meantime, many thanks for taking the time to try this lab.