Deploy a High Availability Project Quay Using Podman on Oracle Linux
Introduction
Project Quay is an open-source repository that stores and manages artifacts such as containers for use on cloud-native platforms. It offers these and many other features:
- High availability registry
- Vulnerability scanning, logging, auditing, notifications, and alerts
- Role-based access control (RBAC)
- Integration with OAuth support
- Build automation integration with Git/GitHub/GitLab
As a container, it can be deployed on a Kubernetes cluster using an Operator or on Podman, providing a standalone or high-availability deployment.
Objectives
In this tutorial, you'll learn how to:
- Access a 3-node Project Quay deployment
- Verify basic Project Quay functionality works
- Use the HAProxy Console to monitor Project Quay nodes
Note: The steps provided do not include configuring the registry using certificates. Therefore, configuring Project Quay in this specific way is recommended for non-production purposes or an internal/air-gapped environment only.
Prerequisites
Four Oracle Linux systems
Each system should have Oracle Linux installed and configured with:
- A non-root user account with sudo access
- Access to the Internet
- Firewall and ingress rules to allow TCP and/or HTTP traffic for the services
| Server Name | Role/Purpose |
|---|---|
| ol-node-01 | Hosts the HAProxy load balancer and the Postgres database |
| quay-01, quay-02, quay-03 | Hosts the Project Quay and Redis servers |
Deploy Oracle Linux
Note: If running in your own tenancy, read the linux-virt-labs GitHub project README.md and complete the prerequisites before deploying the lab environment.
Open a terminal on the Luna Desktop.
Clone the
linux-virt-labsGitHub project.git clone https://github.com/oracle-devrel/linux-virt-labs.gitChange into the working directory.
cd linux-virt-labs/olInstall the required collections.
ansible-galaxy collection install -r requirements.ymlUpdate the Oracle Linux instance configuration.
cat << EOF | tee instances.yml > /dev/null
compute_instances:
  1:
    instance_name: "ol-node-01"
    type: "server"
  2:
    instance_name: "quay-01"
    type: "server"
  3:
    instance_name: "quay-02"
    type: "server"
  4:
    instance_name: "quay-03"
    type: "server"
passwordless_ssh: true
EOF
Deploy the lab environment.
ansible-playbook create_instance.yml -e localhost_python_interpreter="/usr/bin/python3.6" -e "@instances.yml" -e use_quay_ha="true"The free lab environment requires the extra variable
local_python_interpreter, which setsansible_python_interpreterfor plays running on localhost. This variable is needed because the environment installs the RPM package for the Oracle Cloud Infrastructure SDK for Python, located under the python3.6 modules.The default deployment shape uses the AMD CPU and Oracle Linux 8. To use an Intel CPU or Oracle Linux 9, add
-e instance_shape="VM.Standard3.Flex"or-e os_version="9"to the deployment command.Important: Wait for the playbook to run successfully and reach the pause task. At this stage of the playbook, the installation of Oracle Linux is complete, and the instances are ready. Take note of the previous play, which prints the public and private IP addresses of the nodes it deploys and any other deployment information needed while running the lab.
Install a NFS Server
Open a terminal and connect via SSH to the ol-node-01 instance.
ssh oracle@<ip_address_of_instance>Install the Ansible package and dependencies.
sudo dnf install -y ansible-coreCreate a requirements file for collections.
cat << EOF | tee ~/requirements.yml > /dev/null
---
collections:
- ansible.posix
- community.postgresql
- containers.podman
EOF
Install the collections.
ansible-galaxy install -r requirements.ymlCreate an Ansible configuration file.
cat << EOF | tee ~/ansible.cfg > /dev/null
[defaults]
nocows = 1
host_key_checking = false
interpreter_python = auto_silent
inventory = host
EOF
Create an inventory file.
cat << EOF | tee ~/host > /dev/null
---
nfsserver:
  hosts:
    ol-node-01:
haproxyserver:
  hosts:
    ol-node-01:
postgreserver:
  hosts:
    ol-node-01:
quayservers:
  hosts:
    quay-01:
    quay-02:
    quay-03:
EOF
Verify you can connect to each host in the inventory.
ansible all -m pingThe output should list each host with a SUCCESS ping: pong response.
Make a template directory.
mkdir ~/templatesCreate a playbook to deploy and configure an NFS server.
cat << EOF | tee ~/deploy_nfs.yml > /dev/null
- name: Gather host facts
  hosts: all

  tasks:

    - name: Run facts module
      ansible.builtin.setup:

- name: Deploy and configure nfs server
  hosts: nfsserver
  become: true

  tasks:

    - name: Install nfs-utils package
      ansible.builtin.dnf:
        name: nfs-utils
        state: present

    - name: Make a directory for share
      ansible.builtin.file:
        path: /nfs-share
        state: directory
        owner: "{{ username }}"
        group: "{{ username }}"
        mode: '0775'

    - name: Add share to nfs exports
      ansible.builtin.template:
        src: templates/exports.j2
        dest: /etc/exports
        owner: root
        group: root
        mode: '0644'

    - name: Enable and start nfs service
      ansible.builtin.systemd:
        name: nfs-server
        enabled: true
        state: started

    - name: Set firewalld rules for nfs
      ansible.posix.firewalld:
        zone: public
        service: "nfs"
        permanent: true
        state: enabled
        immediate: true
      vars:
        ansible_python_interpreter: "/usr/libexec/platform-python"
EOF
Create the NFS export template.
cat << EOF | tee ~/templates/exports.j2 > /dev/null
{% for h in groups['quayservers'] %}
/nfs-share  {{ hostvars[h]['ansible_default_ipv4']['address'] }}(rw,sync,no_subtree_check,no_root_squash,no_all_squash,insecure)
{% endfor %}
EOF
Run the deploy_nfs playbook.
ansible-playbook deploy_nfs.yml -e username="oracle"
Install HAProxy
Create a playbook to deploy and configure a HAProxy server.
cat << EOF | tee ~/deploy_haproxy.yml > /dev/null
- name: Gather host facts
  hosts: all

  tasks:

    - name: Run facts module
      ansible.builtin.setup:

- name: Deploy and configure haproxy server
  hosts: haproxyserver
  become: true

  tasks:

    - name: Set haproxy_connect_any flag on and keep it persistent across reboots
      ansible.posix.seboolean:
        name: haproxy_connect_any
        state: true
        persistent: true
      vars:
        ansible_python_interpreter: "/usr/libexec/platform-python"

    - name: Set firewalld rules for haproxy stats
      ansible.posix.firewalld:
        port: "{{ item }}"
        permanent: yes
        state: enabled
        immediate: yes
      with_items:
        - 8080/tcp
        - 8404/tcp
      vars:
        ansible_python_interpreter: "/usr/libexec/platform-python"

    - name: Make a directory for haproxy
      ansible.builtin.file:
        path: /home/{{ username }}/haproxy
        state: directory
        owner: "{{ username }}"
        group: "{{ username }}"
        mode: '0775'

    - name: Add quay configuration details to config.yaml file
      ansible.builtin.template:
        src: templates/haproxy-config.j2
        dest: /home/{{ username }}/haproxy/haproxy.cfg
        owner: "{{ username }}"
        group: "{{ username }}"
        mode: '0775'

    - name: Install Oracle Linux 8 container tools packages
      ansible.builtin.dnf:
        name:
         - "@container-tools:ol8"
         - conntrack
         - curl
        state: present
      when: ansible_distribution == 'OracleLinux' and ansible_distribution_major_version == '8'

    - name: Install Oracle Linux 9 container tools packages
      ansible.builtin.dnf:
        name:
         - podman
         - podman-docker
         - conntrack
         - curl
        state: present
      when: ansible_distribution == 'OracleLinux' and ansible_distribution_major_version == '9'

    - name: Check if the podman user is lingering
      ansible.builtin.stat:
        path: "/var/lib/systemd/linger/{{ username }}"
      register: user_lingering

    - name: Enable lingering for user
      ansible.builtin.command: "loginctl enable-linger {{ username }}"
      when: not user_lingering.stat.exists

    - name: Start the haproxy container
      containers.podman.podman_container:
        name: haproxy
        image: ghcr.io/oracle/oraclelinux9-haproxy:2.4
        detach: true
        state: started
        restart: yes
        privileged: true
        publish:
          - "8080:80"
          - "8404:8404"
        volume:
          - "/home/{{ username }}/haproxy:/etc/haproxy:Z"
      become: true
      become_user: "{{ username }}"
      register: podman_haproxy
EOF
Create the HAProxy configuration template.
cat << EOF | tee ~/templates/haproxy-config.j2 > /dev/null
#---------------------------------------------------------------------
# The global section defines process-level directives, such as the maximum
# number of connections to accept, where to forward logs, and the
# path from which to load HAProxy Enterprise modules.
#---------------------------------------------------------------------
global
   # Bind the Runtime API to a UNIX domain socket, and/or an IP address
   stats socket /var/run/api.sock user haproxy group haproxy mode 660 level admin expose-fd listeners
   log stdout format raw local0 info

#---------------------------------------------------------------------
# common defaults that all the 'listen' and 'backend' sections will
# use if not designated in their block
#---------------------------------------------------------------------
defaults
   mode http
   option redispatch
   option contstats
   retries 3
   timeout connect 10s
   timeout server 1m
   timeout client 1m
   option forwardfor
   timeout http-request 10s
   log global

#---------------------------------------------------------------------
# stats frontend to monitor haproxy
#---------------------------------------------------------------------

frontend stats
   bind *:8404
   stats enable
   stats uri /
   stats refresh 10s

#---------------------------------------------------------------------
# main frontend which proxys to the backends
#---------------------------------------------------------------------

frontend  fe_http
   bind            *:80
   default_backend be_http
frontend  fe_https
   bind            *:443
   default_backend be_https
frontend fe_redis
   bind            *:6379
   default_backend be_redis
backend be_http
   balance     roundrobin
   server quay01 quay-01:8080 check
   server quay02 quay-02:8080 check
   server quay03 quay-03:8080 check
backend be_https
   balance     roundrobin
   server quay01 quay-01:8443 check
   server quay02 quay-02:8443 check
   server quay03 quay-03:8443 check
backend be_redis
   server quay01 quay-01:6379 check inter 1s
   server quay02 quay-02:6379 check inter 1s
   server quay03 quay-03:6379 check inter 1s
EOF
Run the deploy_haproxy playbook.
ansible-playbook deploy_haproxy.yml -e username="oracle"
Install PostgreSQL
Create a playbook to deploy and configure a PostgreSQL server.
cat << EOF | tee ~/deploy_postgres.yml > /dev/null
- name: Gather host facts
  hosts: all

  tasks:

    - name: Run facts module
      ansible.builtin.setup:

- name: Deploy and configure postgresql server
  hosts: postgreserver
  become: true

  tasks:

    - name: Install the postgresql client
      ansible.builtin.dnf:
        name:
          - postgresql
          - python3-psycopg2
        state: latest

    - name: Create the postgresql directory
      ansible.builtin.file:
        path: /home/{{ username }}/pgsql/data
        state: directory
        owner: "{{ username }}"
        group: "{{ username }}"
        mode: '0755'

    - name: Start the postgresql container
      containers.podman.podman_container:
        name: postgres
        image: docker.io/library/postgres:latest
        detach: true
        state: started
        restart: yes
        env:
          POSTGRES_DB: "quay"
          POSTGRES_USER: "quayuser"
          POSTGRES_PASSWORD: "quay-test"
        publish:
          - "5432:5432"
        volume:
          - "/home/{{ username }}/pgsql/data:/var/lib/postgresql/data:Z"
      become: true
      become_user: "{{ username }}"
      register: podman_postgres

    - name: Print postgresql container start
      ansible.builtin.debug:
        var: podman_postgres.stdout_lines

    - name: Ping postgresql
      community.postgresql.postgresql_ping:
        login_host: "{{ inventory_hostname }}"
        db: 'quay'
        login_user: "quayuser"
        login_password: "quay-test"
      register: postgres_ping
      until: postgres_ping.is_available
      retries: 5
      delay: 10
      vars:
        ansible_python_interpreter: "/usr/libexec/platform-python"

    - name: Add the trigram module to postgresql
      community.postgresql.postgresql_query:
        login_host: "{{ inventory_hostname }}"
        db: 'quay'
        login_user: "quayuser"
        login_password: "quay-test"
        query: CREATE EXTENSION IF NOT EXISTS pg_trgm
      vars:
        ansible_python_interpreter: "/usr/libexec/platform-python"

    - name: Alter user to superuser for trigram module in postgresql
      community.postgresql.postgresql_query:
        login_host: "{{ inventory_hostname }}"
        db: 'quay'
        login_user: "quayuser"
        login_password: "quay-test"
        query: ALTER USER quayuser WITH SUPERUSER
      vars:
        ansible_python_interpreter: "/usr/libexec/platform-python"

    - name: Set firewalld rules for postgresql
      ansible.posix.firewalld:
        zone: public
        service: "{{ item }}"
        permanent: yes
        state: enabled
        immediate: yes
      with_items:
        - postgresql
      vars:
        ansible_python_interpreter: "/usr/libexec/platform-python"
EOF
Run the deploy_postgres playbook.
ansible-playbook deploy_postgres.yml -e username="oracle"
Install Quay and Redis
Create a playbook to deploy and configure Quay and Redis servers.
cat << EOF | tee ~/deploy_quay_redis.yml > /dev/null
- name: Gather host facts
  hosts: all

  tasks:

    - name: Run facts module
      ansible.builtin.setup:

- name: Configure Quay nodes and mount NFS shares
  hosts: quayservers
  become: true

  tasks:

    - name: Set firewalld rules for quay
      ansible.posix.firewalld:
        port: "{{ item }}"
        permanent: yes
        state: enabled
        immediate: yes
      with_items:
        - 8080/tcp
      vars:
        ansible_python_interpreter: "/usr/libexec/platform-python"

    - name: Set firewalld rules for redis
      ansible.posix.firewalld:
        zone: public
        service: "{{ item }}"
        permanent: yes
        state: enabled
        immediate: yes
      with_items:
        - redis
      vars:
        ansible_python_interpreter: "/usr/libexec/platform-python"

    - name: Create the redis directory
      ansible.builtin.file:
        path: /home/{{ username }}/redis
        state: directory
        owner: "{{ username }}"
        group: "{{ username }}"
        mode: '0755'

    - name: Install Oracle Linux 8 container tools packages
      ansible.builtin.dnf:
        name:
         - "@container-tools:ol8"
         - conntrack
         - curl
        state: present
      when: ansible_distribution == 'OracleLinux' and ansible_distribution_major_version == '8'

    - name: Install Oracle Linux 9 container tools packages
      ansible.builtin.dnf:
        name:
         - podman
         - podman-docker
         - conntrack
         - curl
        state: present
      when: ansible_distribution == 'OracleLinux' and ansible_distribution_major_version == '9'

    - name: Check if the podman user is lingering
      ansible.builtin.stat:
        path: "/var/lib/systemd/linger/{{ username }}"
      register: user_lingering

    - name: Enable lingering for user
      ansible.builtin.command: "loginctl enable-linger {{ username }}"
      when: not user_lingering.stat.exists

    - name: Start the redis container
      containers.podman.podman_container:
        name: redis
        image: docker.io/library/redis:latest
        detach: true
        state: started
        restart: yes
        privileged: true
        publish:
          - "6379:6379"
        volume:
          - "/home/{{ username }}/redis:/var/lib/redis:Z"
      become: true
      become_user: "{{ username }}"
      register: podman_redis

    - name: Install the nfs-utils package
      ansible.builtin.dnf:
        name:
          - nfs-utils
        state: latest

    - name: Make a nfs directory for quay storage
      ansible.posix.mount:
        src: "{{ nfs_server }}:/nfs-share"
        path: /nfs-mount
        opts: rw
        state: ephemeral
        fstype: nfs4
      vars:
        nfs_server: "{{ hostvars[groups['nfsserver'][0]]['ansible_nodename'] }}"
        ansible_python_interpreter: "/usr/libexec/platform-python"

    - name: Make a directory for quay configuration
      ansible.builtin.file:
        path: "/home/{{ username }}/quay/config"
        state: directory
        owner: "{{ username }}"
        group: "{{ username }}"
        mode: '0775'

    - name: Make a directory for quay configuration ssl-certs
      ansible.builtin.file:
        path: "/home/{{ username }}/quay/config/extra_ca_certs"
        state: directory
        owner: "{{ username }}"
        group: "{{ username }}"
        mode: '0775'

    - name: Add quay configuration file
      ansible.builtin.template:
        src: templates/quay-config.j2
        dest: "/home/{{ username }}/quay/config/config.yaml"
        owner: "{{ username }}"
        group: "{{ username }}"
        mode: '0775'

    - name: Start the project quay container on each of the quay nodes
      containers.podman.podman_container:
        name: quay
        image: quay.io/projectquay/quay:latest
        detach: true
        state: started
        restart: yes
        publish:
          - "8080:8080"
          - "8443:8443"
        volume:
          - "/nfs-mount:/datastorage"
          - "/home/{{ username }}/quay/config:/conf/stack:Z"
      become: true
      become_user: "{{ username }}"
      register: podman_quay
      when: inventory_hostname in groups['quayservers'][0]

    - name: Start the project quay container on each of the quay nodes
      containers.podman.podman_container:
        name: quay
        image: quay.io/projectquay/quay:latest
        detach: true
        state: started
        restart: yes
        env:
          IGNORE_VALIDATION: "true"
        publish:
          - "8080:8080"
          - "8443:8443"
        volume:
          - "/nfs-mount:/datastorage"
          - "/home/{{ username }}/quay/config:/conf/stack:Z"
      become: true
      become_user: "{{ username }}"
      register: podman_quay
      when: inventory_hostname not in groups['quayservers'][0]
EOF
Create the Quay configuration template.
cat << EOF | tee ~/templates/quay-config.j2 > /dev/null
ALLOWED_OCI_ARTIFACT_TYPES:
   application/vnd.oci.image.config.v1+json:
      - application/vnd.oci.image.layer.v1.tar+zstd
   application/vnd.sylabs.sif.config.v1+json:
      - application/vnd.sylabs.sif.layer.v1+tar
AUTHENTICATION_TYPE: Database
AVATAR_KIND: local
BUILDLOGS_REDIS:
   host: {{ inventory_hostname }}
   port: 6379
DATABASE_SECRET_KEY: f5f57487-2a60-4399-9471-d2ae6cfbf410
DB_CONNECTION_ARGS: {}
DB_URI: postgresql://quayuser:quay-test@{{ groups['postgreserver'][0] }}/quay
DEFAULT_TAG_EXPIRATION: 2w
DISTRIBUTED_STORAGE_CONFIG:
   default:
      - LocalStorage
      - storage_path: /datastorage
DISTRIBUTED_STORAGE_DEFAULT_LOCATIONS: []
DISTRIBUTED_STORAGE_PREFERENCE:
   - default
FEATURE_ACI_CONVERSION: false
FEATURE_ACTION_LOG_ROTATION: false
FEATURE_ANONYMOUS_ACCESS: true
FEATURE_APP_REGISTRY: false
FEATURE_APP_SPECIFIC_TOKENS: true
FEATURE_BITBUCKET_BUILD: false
FEATURE_BLACKLISTED_EMAILS: false
FEATURE_BUILD_SUPPORT: false
FEATURE_CHANGE_TAG_EXPIRATION: true
FEATURE_DIRECT_LOGIN: true
FEATURE_EXTENDED_REPOSITORY_NAMES: true
FEATURE_FIPS: false
FEATURE_GITHUB_BUILD: false
FEATURE_GITHUB_LOGIN: false
FEATURE_GITLAB_BUILD: false
FEATURE_GOOGLE_LOGIN: false
FEATURE_INVITE_ONLY_USER_CREATION: false
FEATURE_MAILING: false
FEATURE_NONSUPERUSER_TEAM_SYNCING_SETUP: false
FEATURE_PARTIAL_USER_AUTOCOMPLETE: true
FEATURE_PROXY_STORAGE: false
FEATURE_REPO_MIRROR: false
FEATURE_REQUIRE_TEAM_INVITE: true
FEATURE_RESTRICTED_V1_PUSH: true
FEATURE_SECURITY_NOTIFICATIONS: false
FEATURE_SECURITY_SCANNER: false
FEATURE_STORAGE_REPLICATION: false
FEATURE_TEAM_SYNCING: false
FEATURE_USER_CREATION: true
FEATURE_USER_LAST_ACCESSED: true
FEATURE_USER_LOG_ACCESS: false
FEATURE_USER_METADATA: false
FEATURE_USER_RENAME: false
FEATURE_USERNAME_CONFIRMATION: true
FRESH_LOGIN_TIMEOUT: 10m
GITHUB_LOGIN_CONFIG: {}
GITHUB_TRIGGER_CONFIG: {}
GITLAB_TRIGGER_KIND: {}
LDAP_ALLOW_INSECURE_FALLBACK: false
LDAP_EMAIL_ATTR: mail
LDAP_UID_ATTR: uid
LDAP_URI: ldap://localhost
LOG_ARCHIVE_LOCATION: default
LOGS_MODEL: database
LOGS_MODEL_CONFIG: {}
MAIL_DEFAULT_SENDER: support@quay.io
MAIL_PORT: 587
MAIL_USE_AUTH: false
MAIL_USE_TLS: false
PREFERRED_URL_SCHEME: http
REGISTRY_TITLE: Project Quay
REGISTRY_TITLE_SHORT: Project Quay
REPO_MIRROR_INTERVAL: 30
REPO_MIRROR_TLS_VERIFY: true
SEARCH_MAX_RESULT_PAGE_COUNT: 10
SEARCH_RESULTS_PER_PAGE: 10
SECRET_KEY: 182cc4e2-3916-47a2-a528-caa2bc7d69a5
SECURITY_SCANNER_INDEXING_INTERVAL: 30
SERVER_HOSTNAME: {{ groups['haproxyserver'][0] }}.{{ ansible_domain }}:8080
SUPER_USERS:
   - defaultuser
SETUP_COMPLETE: true
TAG_EXPIRATION_OPTIONS:
   - 0s
   - 1d
   - 1w
   - 2w
   - 4w
TEAM_RESYNC_STALE_TIME: 30m
TESTING: false
USE_CDN: false
USER_EVENTS_REDIS:
   host: {{ inventory_hostname }}
   port: 6379
USER_RECOVERY_TOKEN_LIFETIME: 30m
USERFILES_LOCATION: default
EOF
Run the deploy_quay_redis playbook.
ansible-playbook deploy_quay_redis.yml -e username="oracle"
Access the HAProxy Statistics Report Console
The HAProxy statistics console provides an overview of the current status of HAProxy itself and the nodes it balances traffic between by providing almost real-time information.
Open a terminal and connect via SSH to the ol-node-01 instance.
ssh -L 8404:localhost:8404 -L 8080:localhost:8080 oracle@<ip_address_of_instance>The
-LSSH option creates a tunnel to the specific ports to allow local browser access without opening the firewall.Open a new browser session and enter the URL to display the HAProxy statistics page.
http://localhost:8404
Review the HAProxy Console
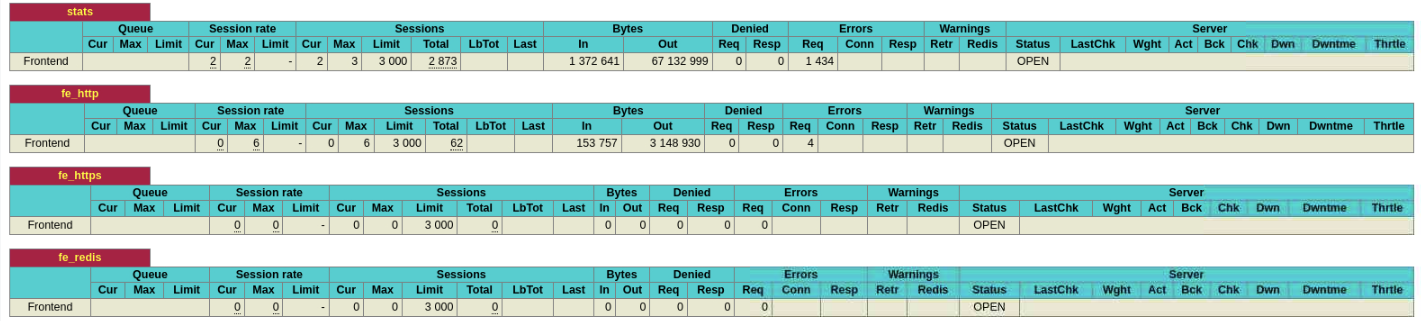
The console lists several grouped blocks of information, each containing a set of metrics.

The frontend or fe section represents HAProxy itself and the incoming traffic from the client users as it passes to the backend or be servers. The labels for these sections match the HAProxy configuration values for the frontend and backends.
These headings represent (from left to right across the screen):
- Session Rate: The rate clients are connecting to HAProxy
- Sessions: The number of sessions on the load balancer
- Bytes: The number of bytes sent both to and from HAProxy and its backend servers
- Denied: How many requests were stopped as a result of HAProxy server configuration directives set for the frontend
- Errors: The number of requests unable to complete
- Server: The only field relevant to the frontend is Status; when it reports OPEN, this means that HAProxy is working normally and processing traffic
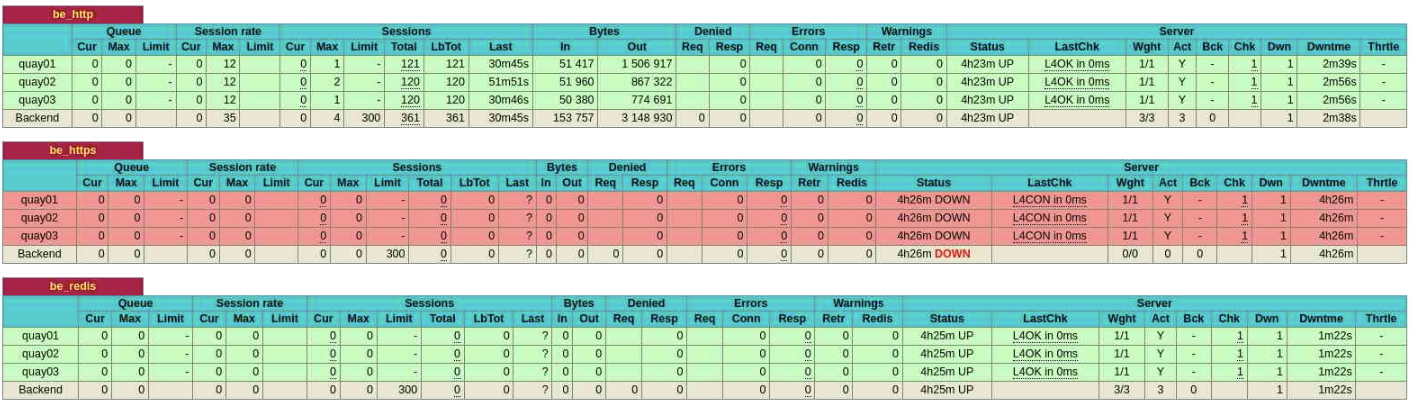
The backend or be section represents traffic passed to the backend servers from HAPRoxy, processed, and returned to the end user.
These headings represent (from left to right across the screen):
- Queue: This only applies to backends and reports if any incoming requests are being delayed while waiting for a backend server to become available
- Session Rate: The rate connections are being made to a server
- Sessions: The numbers of current connections to any of the active backend servers
- Bytes: The number of bytes sent both to and from HAProxy and its backend servers
- Denied: How many requests were stopped as a result of HAProxy server configuration directives set for the backend
- Errors: The number of errors communicating to a backend server
- Warnings: Reports the number of retries and re-dispatches attempted
- Server: Presents information about the status and health of each backend server
Access Project Quay Through the HAProxy Server
Open a new browser tab or window and enter the URL to access the Project Quay login screen.
http://localhost:8080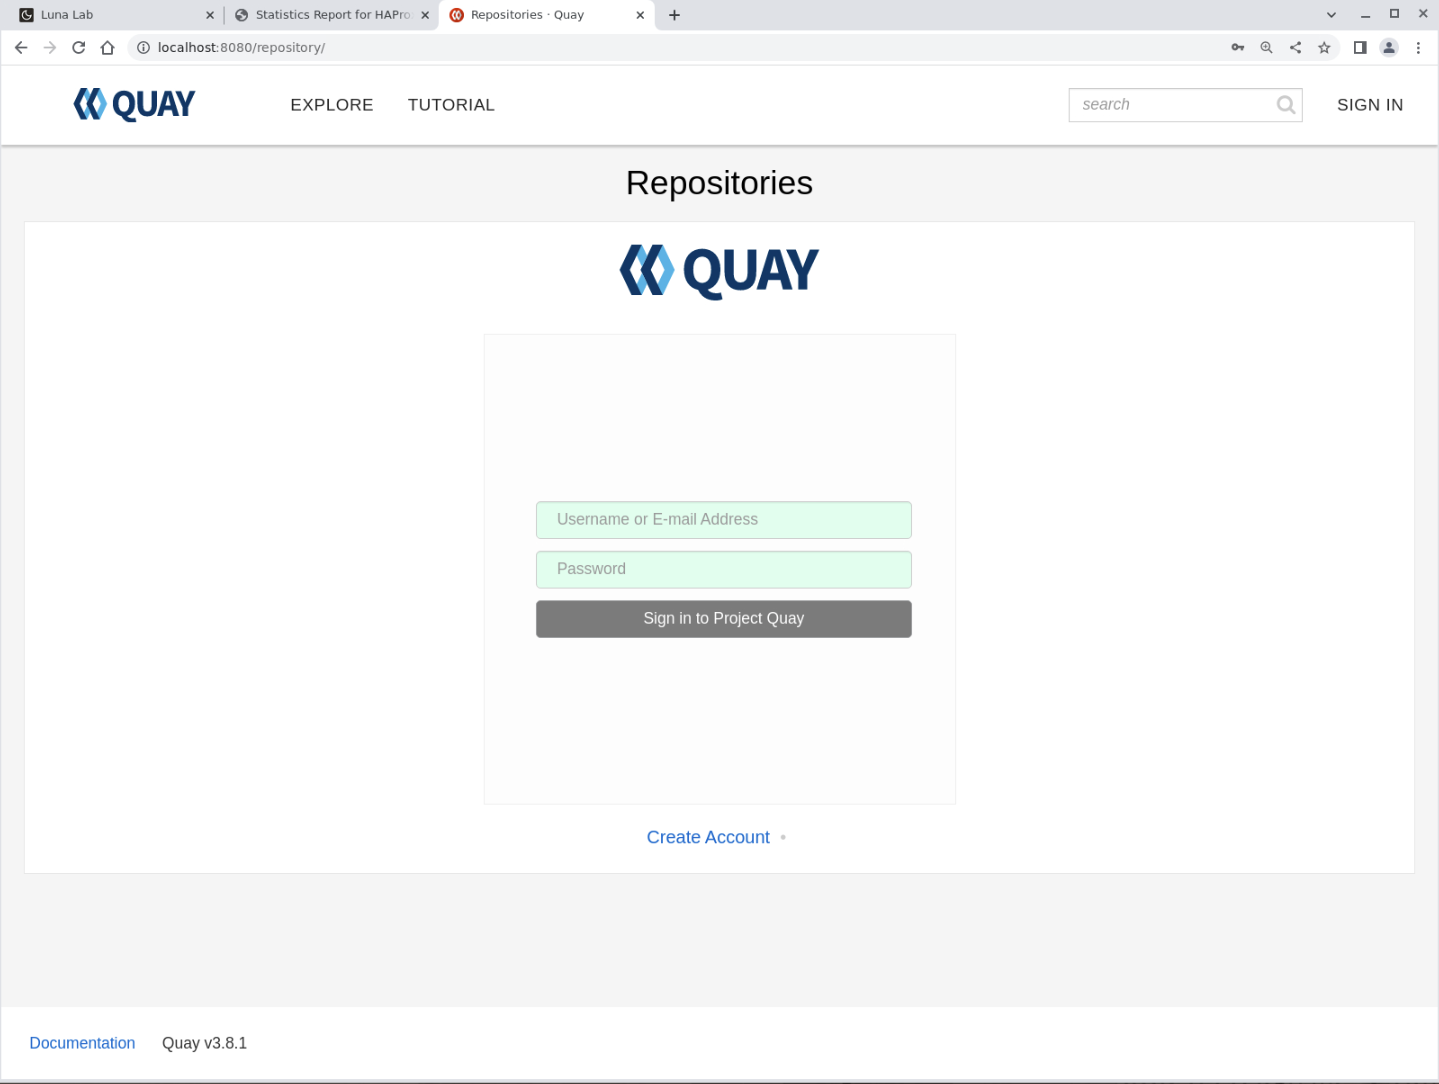
Create a New Account in Project Quay
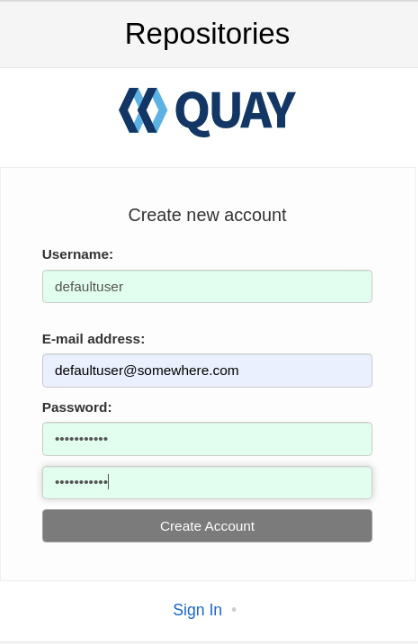
New installations of Project Quay first require you to create a new account, which enables you to log into the instance.
Click on the Create Account link.
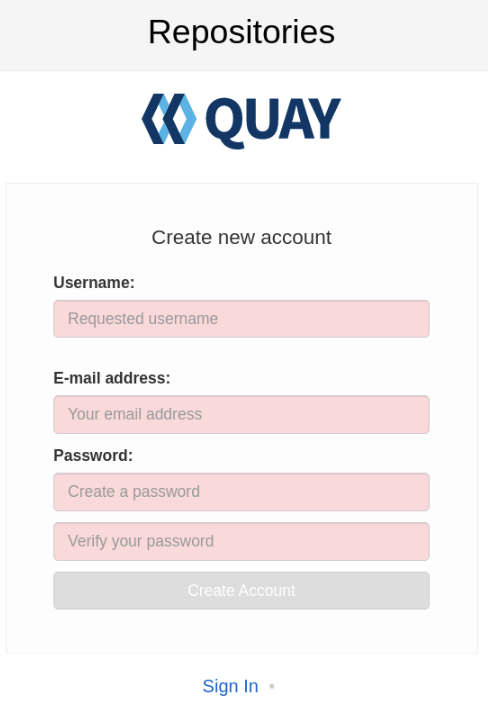
Enter the following sample information to create a new user.
- Username: defaultuser
- E-mail address: defaultuser@example.com
- Password: defaultuser (enter twice)
Click on the Create Account button.
Project Quay creates the new account and automatically logs you in as the new defaultuser user.
If the browser displays any pop-ups, you can close them.
Confirm the New User is an Administrator User
As you'll see shortly, the reason for using the sample information when creating the user in this tutorial is Project Quay assigns that user as an Administrator user for the entire Project Quay Registry.
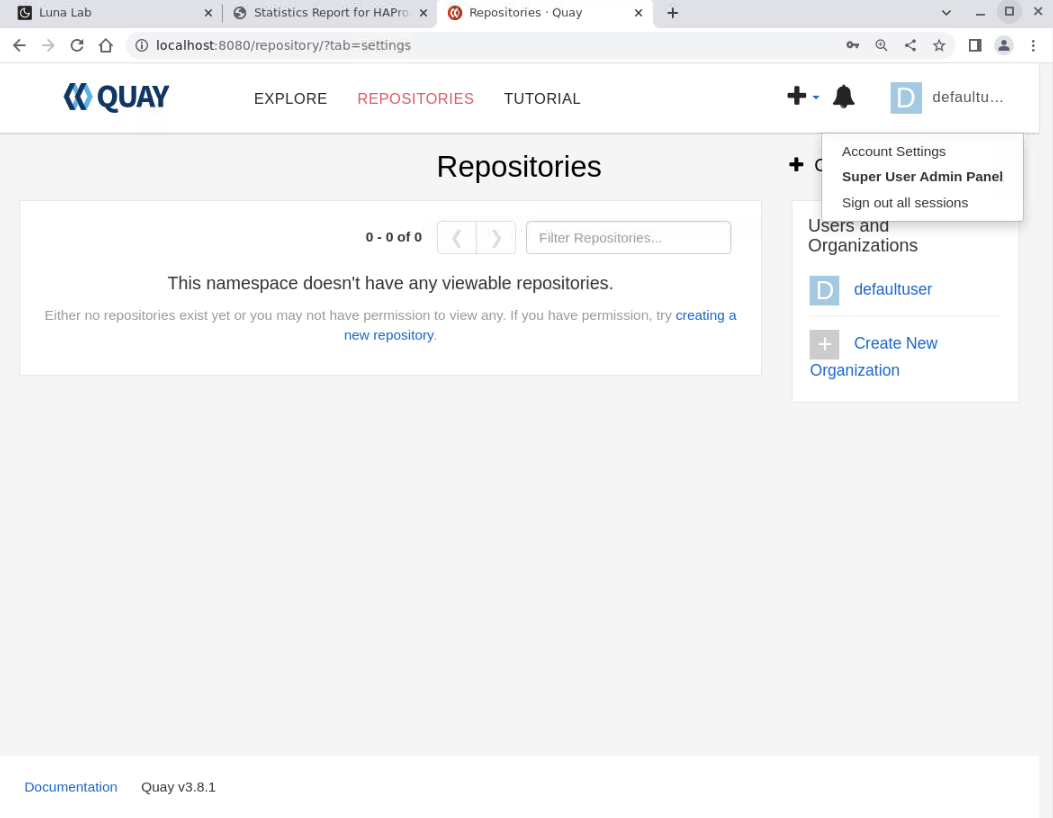
Click on the user name in the upper right-hand corner of the Project Quay browser window.
A drop-down menu showing the Super User Admin Panel as the middle choice should appear.
Click the Super User Admin Panel menu option.
The Super User section manages Project Quay Users, Organizations, and Repositories. More information about using and managing Project Quay can be located here .
For details about creating a superuser are documented here . A superuser within Project Quay is a regular user with extended privileges that include the ability to perform the following actions:
- Manage Users
- Manage Organizations
- Query Usage logs
- View the Change log
Create a New Project Quay Repository
A Project Quay repository is usually named the same as the container image you store or push to it once set up. This naming convention makes locating container images from the locally hosted container registry much easier. However, there is no requirement to comply with this convention, which we'll demonstrate in this tutorial using the repository name test01.
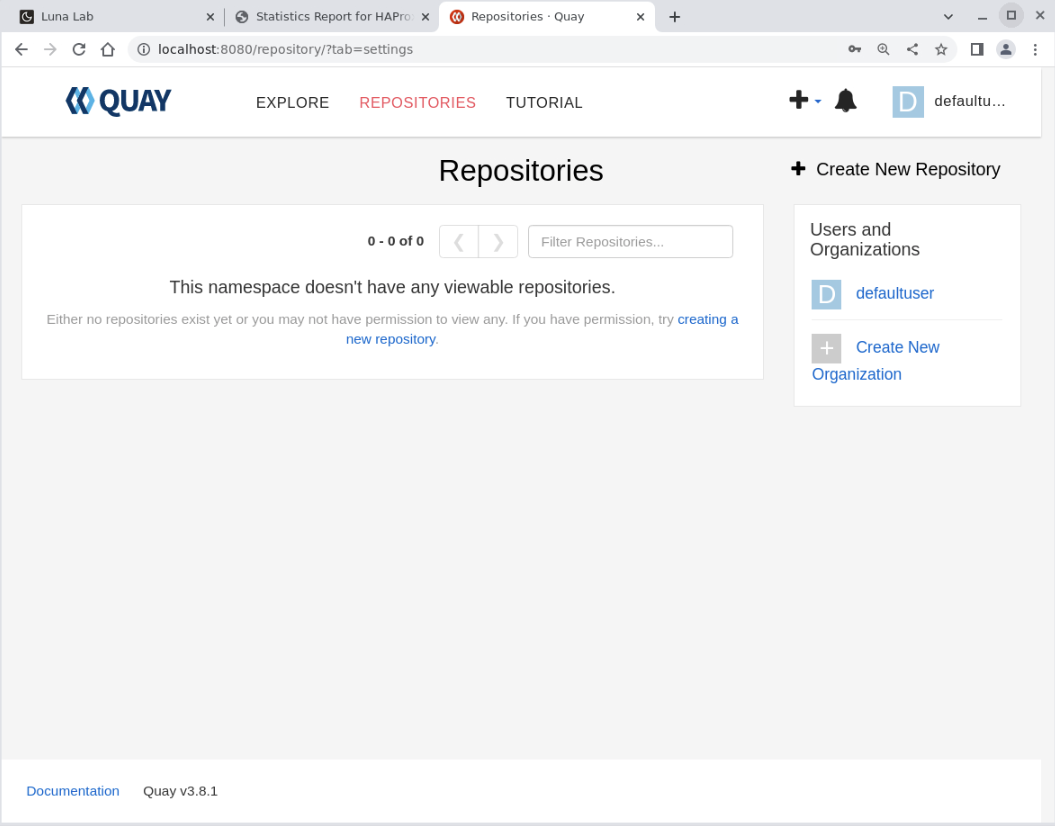
Click on the Quay icon in the upper left corner of the screen to take you to the default Repositories page.
Click on the Create New Repository link on the upper right corner of the Repositories page.
This action displays the Create New Repository panel.
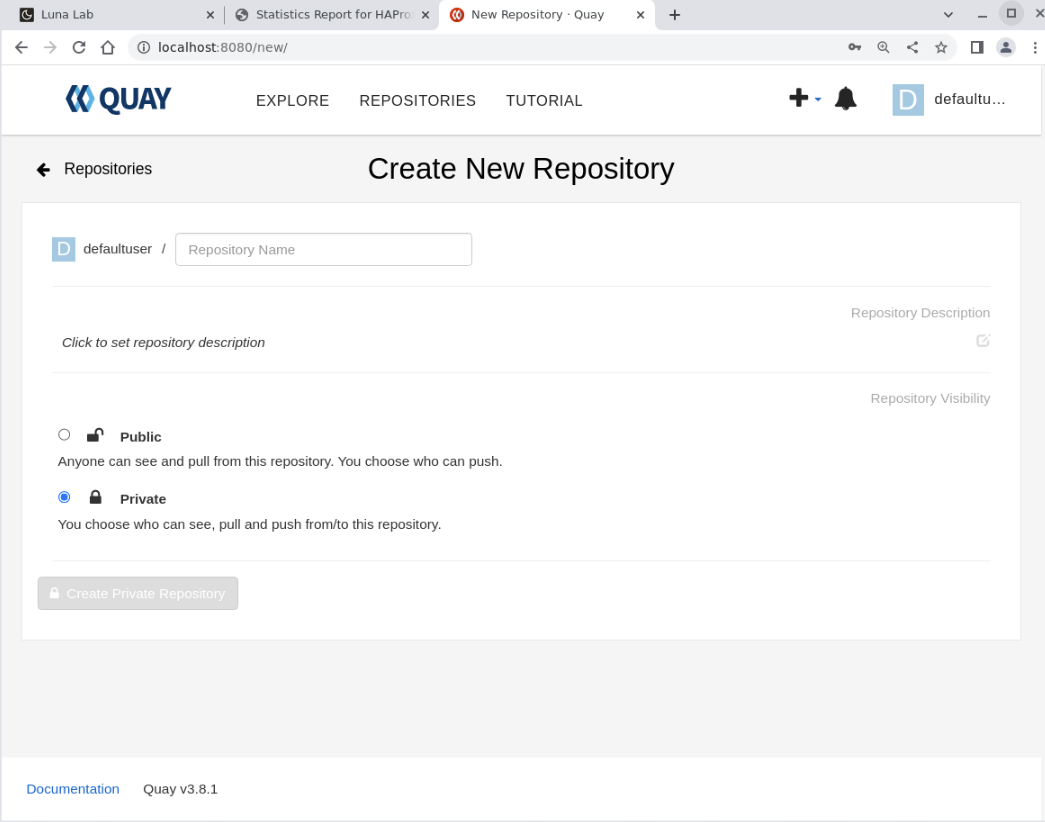
Enter test01 for the Repository Name field.
The repository name must consist of only lowercase letters and digits. You can also enter an optional description for the repository.
Click the Public radio button.
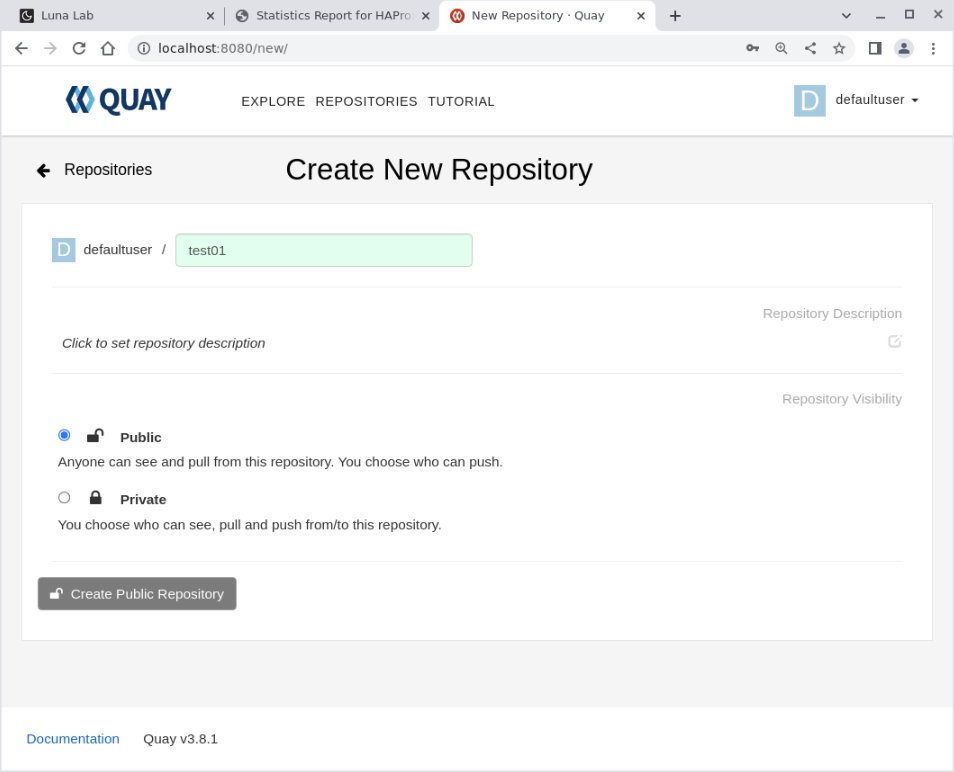
Project Quay allows you to alter the repository description and the public/private settings after the repository creation.
Click on the Create Public Repository button.
The button displays differently depending on whether you select a private or public repository.
At this point in the tutorial, we installed Project Quay, created a new user, and logged in. Finally, we created a new repository within the container registry. The next step is to return to the command line and upload a container to the container registry. But first, let's check on the status of HAProxy.
Confirm Load Balancing is Working
The default HAProxy load balancing configuration is round-robin, which we expect to see the incoming requests spread evenly across all three of the Quay backend nodes.
Switch to the browser window showing the HAProxy statistics report.
Check the status of the backend Quay nodes.
The backend Quay nodes are under the be_http group. The load balancing appears under the Sessions column, specifically these sub-columns:
- Total: Shows how often a node got an incoming request. Hover your mouse pointer over each of the numbers for each node. A read-only dialog box will display more detailed information.
- LbTot: Shows the total number of times HAProxy chose the backend server to service the incoming request.
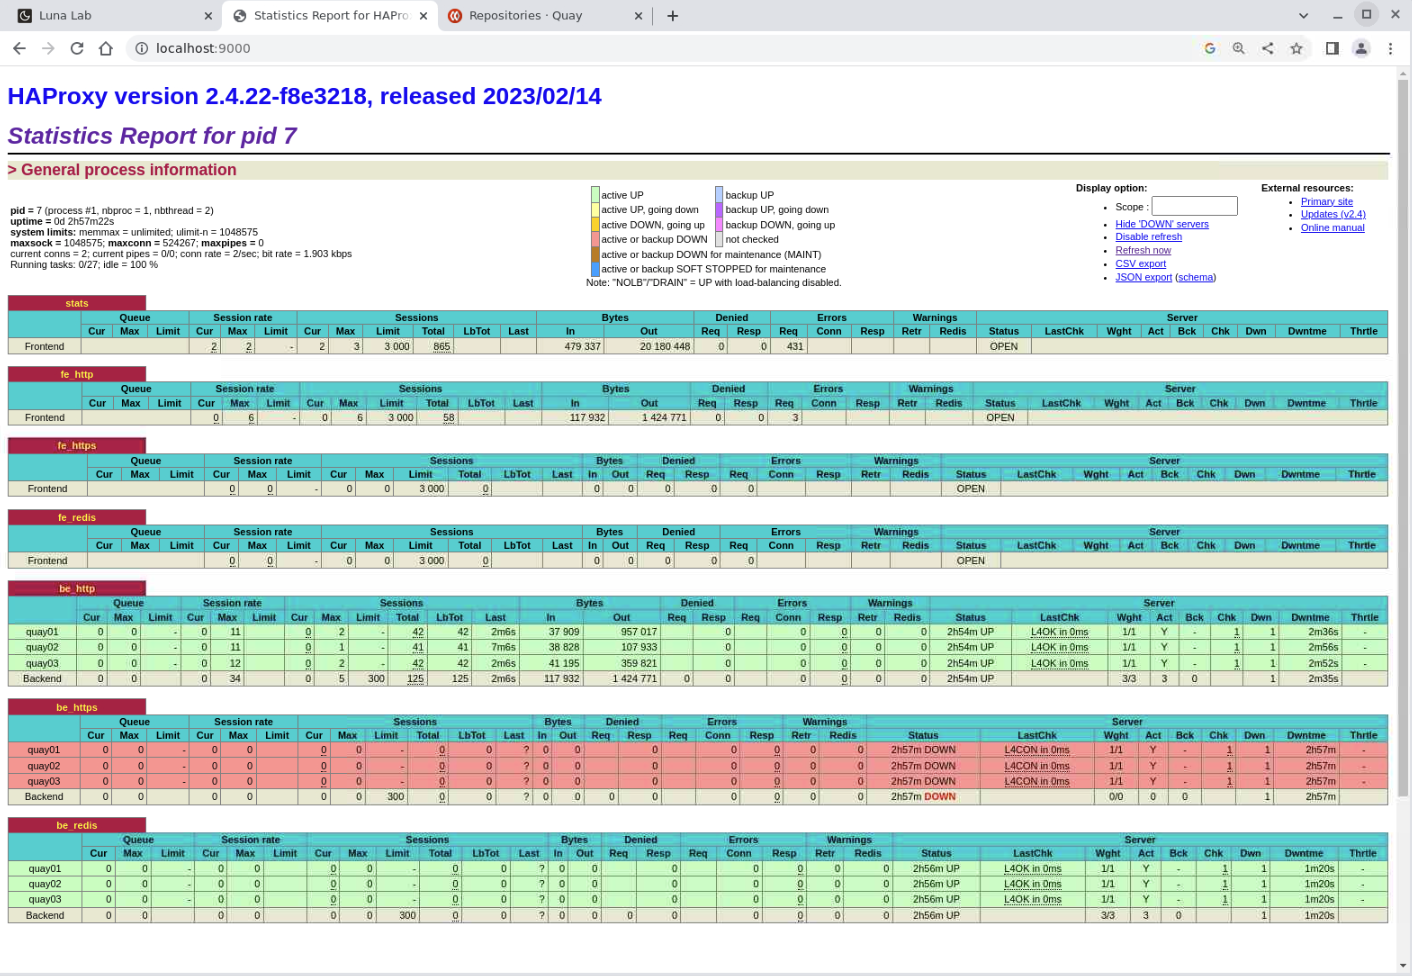
Why does HAProxy show the be_https block in red, indicating the nodes are DOWN, despite Project Quay running and accepting requests? The block is red because HAProxy's health check for this group inspects the HTTPS port for the Project Quay nodes. Given we did not configure Project Quay to use SSL certificates, the HTTPS listener is offline and not responding. In a production deployment, you should configure Project Quay to use SSL and thus enable it for HTTPS traffic as part of best practices. If we configured it for HTTPS, HAProxy would display those backend nodes as green or UP.
While your results may differ, you should see a similar spread of incoming client requests from HAProxy to each Quay backend. This equal distribution of requests confirms that all three Quay server instances are working together as expected.
Using Project Quay
These steps demonstrate pulling an image from an external registry, then tagging it, logging on to the Project Quay registry, and finally pushing the image into the test01 repository.
Switch to a terminal with an SSH connection to ol-node-01.
Pull an image you want to store on the Project Quay registry.
podman pull ghcr.io/oracle/oraclelinux:8Tag the image.
The tag you use can be any value, such as a release or version.
podman tag ghcr.io/oracle/oraclelinux:8 testlinux:latestWe use testlinux as the new name for the oraclelinux container and latest as the tag. The tag defaults to latest if not explicitly set.
List the local images.
podman imagesThe output shows the original image we pulled and the new tagged image.
Login to the Project Quay registry.
podman login --tls-verify=false -u defaultuser -p defaultuser ol-node-01:8080 --verboseUse the same Username (
-u) and Password (-p) values you use to log into the WebUI. Since we did not enable SSL when configuring the Project Quay registry, we must pass the--tls-verify=falseto turn off the SSL checks.If the command succeeds, you'll get a Login Succeeded! message.
Push the tagged image to the registry.
podman push --tls-verify=false localhost/testlinux:latest ol-node-01:8080/defaultuser/test01Confirm the upload shows in the Project Quay browser screen.
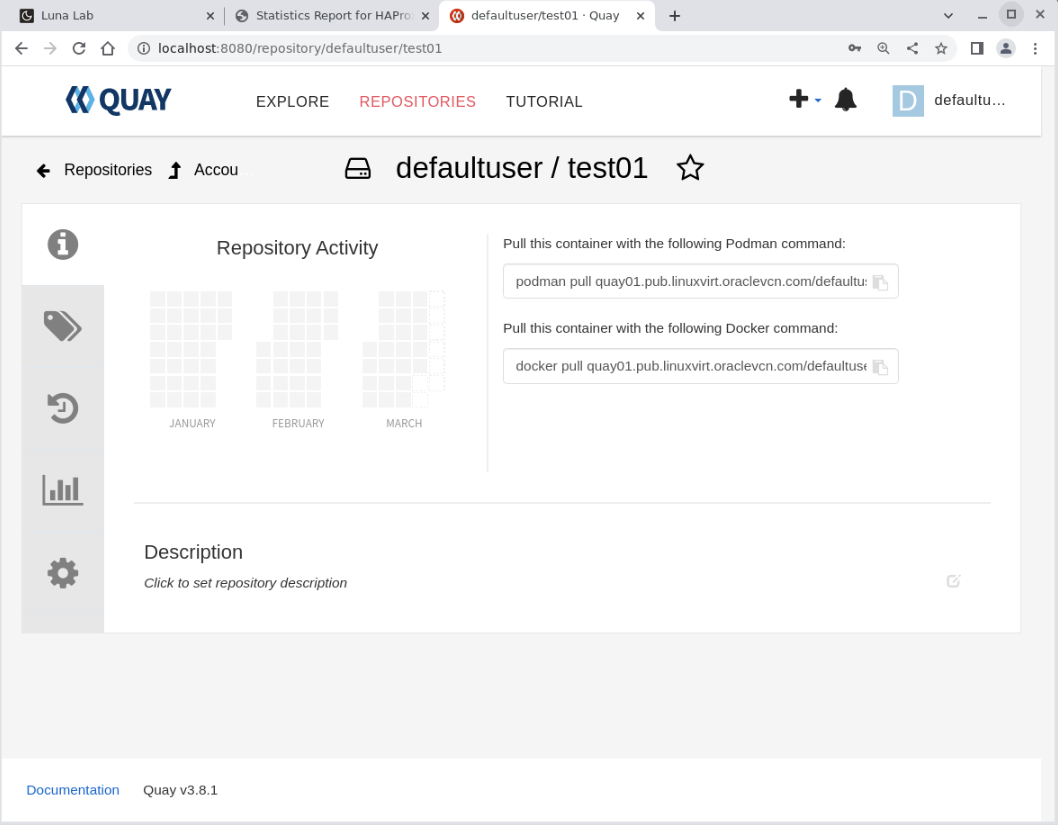
Switch to the browser window showing the Project Quay WebUI.
Navigate to the test01 repository.
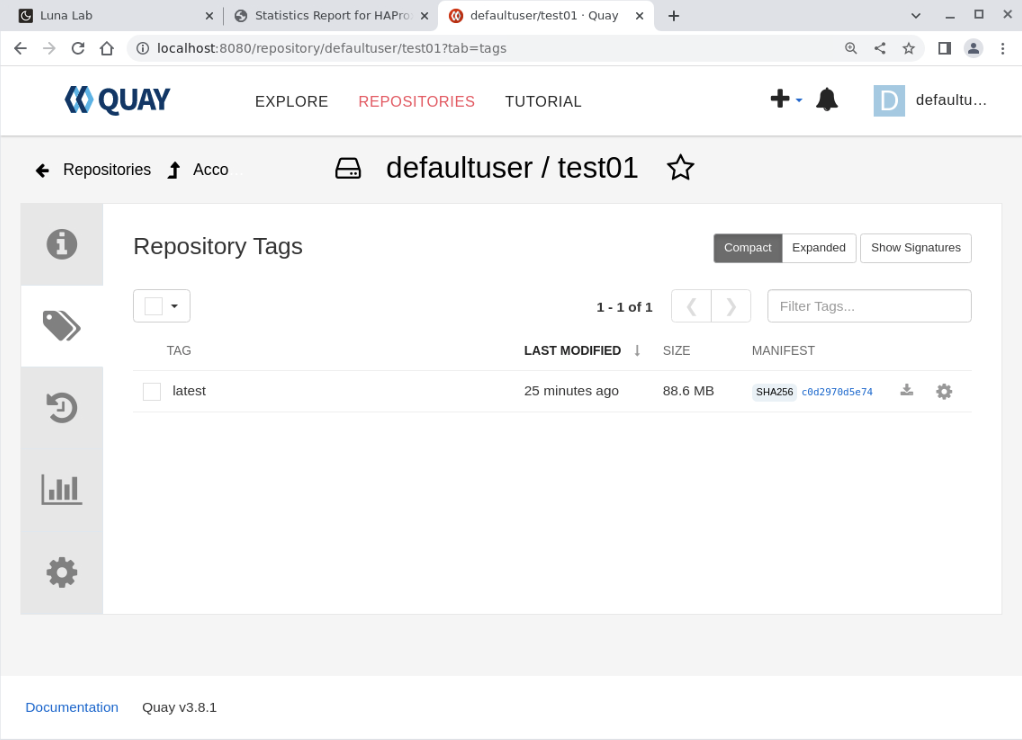
Click the tags icon in the left-hand menu bar.
The panel shows the tag of the uploaded image. If the tag latest does not appear, try refreshing the browser, as the page may be cached.
Switch to a terminal with an SSH connection to ol-node-01.
Delete the local tagged copy.
podman rmi testlinux:latestConfirm the testlinux image is no longer present locally.
podman images testlinuxThe output should display no images with the requested name.
Pull the test01 image from the Project Quay registry.
podman pull --tls-verify=false ol-node-01:8080/defaultuser/test01:latestConfirm the test01 image exists locally.
podman images test01
These results confirm that the highly available Project Quay Registry can store and then serve container images stored within its repositories.
Important: This tutorial demonstrates that you can configure Project Quay to deploy into a high-availability setup. However, the tutorial only partially illustrates an enterprise-quality environment because we did not configure the NFS storage or the database for high availability.
Next Steps
The tutorial successfully demonstrates installing and running a highly available Project Quay Registry installation on Podman. But that just scratches the surface. Project Quay has many more features and abilities which you can investigate:
- Deploy for high availability using Kubernetes
- Install in Kubernetes via an Operator or Helm
- Integrate with OAuth & email systems
- Configure for repository mirroring
- Add Clair-based image security scanning
- Support for Dockerfile builds