Use autoscaling to adjust compute resources
Introduction
In this tutorial, you'll build a load-balanced web application that can automatically scale out/in based on CPU utilization.
In this tutorial, you'll create a load balancer, compute instance, instance configuration, and then configure autoscaling. You'll then verify the autoscaling feature as a configured threshold on CPU is crossed.
Autoscaling enables you to automatically adjust the number of compute instances in an instance pool based on performance metrics, such as CPU utilization. This helps you provide consistent performance for your end-users during periods of high demand, and helps you reduce your costs during periods of low demand.
You select a performance metric to monitor and set thresholds that the performance metric must reach to trigger an autoscaling event. When system usage meets a threshold, autoscaling dynamically allocates resources in near-real time. As load increases, instances are automatically provisioned: the instance pool scales out. As load decreases, instances are automatically removed: the instance pool scales in.
Autoscaling relies on performance metrics that are collected by the monitoring service. These performance metrics are aggregated into one-minute time periods and then averaged across the instance pool. When three consecutive values (that is, the average metrics for three consecutive minutes) meet the threshold, an autoscaling event is triggered.
A cooldown period between autoscaling events lets the system stabilize at the updated level. The cooldown period starts when the instance pool reaches a steady state. Autoscaling continues to evaluate performance metrics during the cooldown period. When the cooldown period ends, autoscaling adjusts the instance pool's size again if needed.
Note: Oracle Cloud Infrastructure (OCI) user interface is being updated, thus some screenshots in the instructions may be different than the actual UI
Create your VCN and Subnets
Set up a VCN to connect your Linux instance to the internet. You will configure all the components needed to create your virtual network.
Open the navigation menu. Under Core Infrastructure, go to Networking and click Virtual Cloud Networks.
In the Compartment list on the left, select your desired or designated compartment.
Click Start VCN Wizard.
Select VCN with Internet Connectivity then click Start VCN Wizard.
Enter the following (descriptions are italicized. replace with the values for your scenario):
- Name: Enter a name for your cloud network
- COMPARTMENT: Select the desired compartment
- VCN CIDR BLOCK: 10.0.0.0/16
- DNS RESOLUTION: Checked
- PUBLIC SUBNET CIDR BLOCK: 10.0.0.0/24
- PRIVATE SUBNET CIDR BLOCK: 10.0.1.0/24
Note: The public and private subnets have different CIDR blocks.
Click Next.
The Create a VCN with Internet Connection configuration dialog will be displayed, confirming all the values you just entered and listing additional components that will be created.
Click Create to start the workflow.
This will create a VCN with the following components:
VCN, Public subnet, Private subnet, Internet gateway (IG), NAT gateway (NAT), Service gateway (SG)
After the workflow completes, click View VCN to be directed to the details page of the VCN you created.
Create Load Balancer and Update Security List
Open the navigation menu. Under Core Infrastructure, go to Networking and click Load Balancers.
Click Create Load Balancer and fill out the dialog box.
Under Add Details
LOAD BALANCER NAME: Enter a name for your load balancer.
CHOOSE VISIBILITY TYPE: Public
CHOOSE THE MAXIMUM TOTAL BANDWIDTH: Select Flexible shapes and the default minimum bandwidth of 10 Mbps. (This specifies the minimum bandwidth of the load balancer.)
VIRTUAL CLOUD NETWORK: Choose your VCN
SUBNET: Choose a public subnet
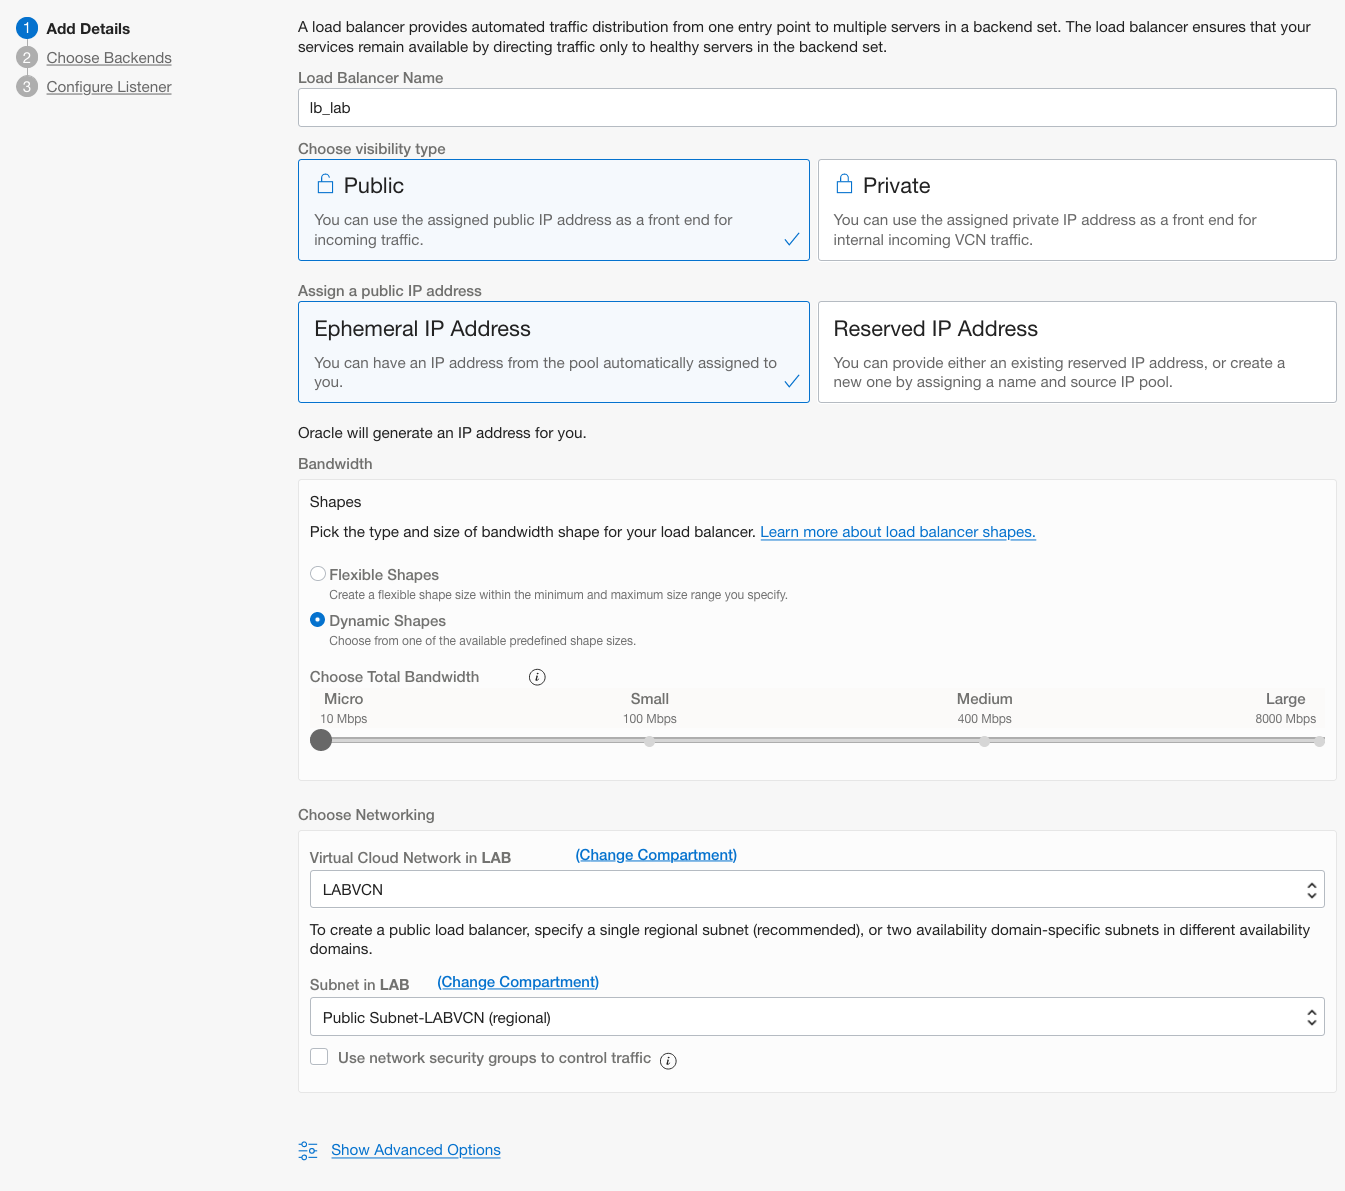
Click Next.
Under Choose Backends:
- Select the Weighted Round Robin load balancing policy.
- Don't add any backend. This will be managed by the instance pool.
Under SPECIFY HEALTH CHECK POLICY
PROTOCOL: HTTP
Port: 80
URL PATH (URI): /
Leave other options as default
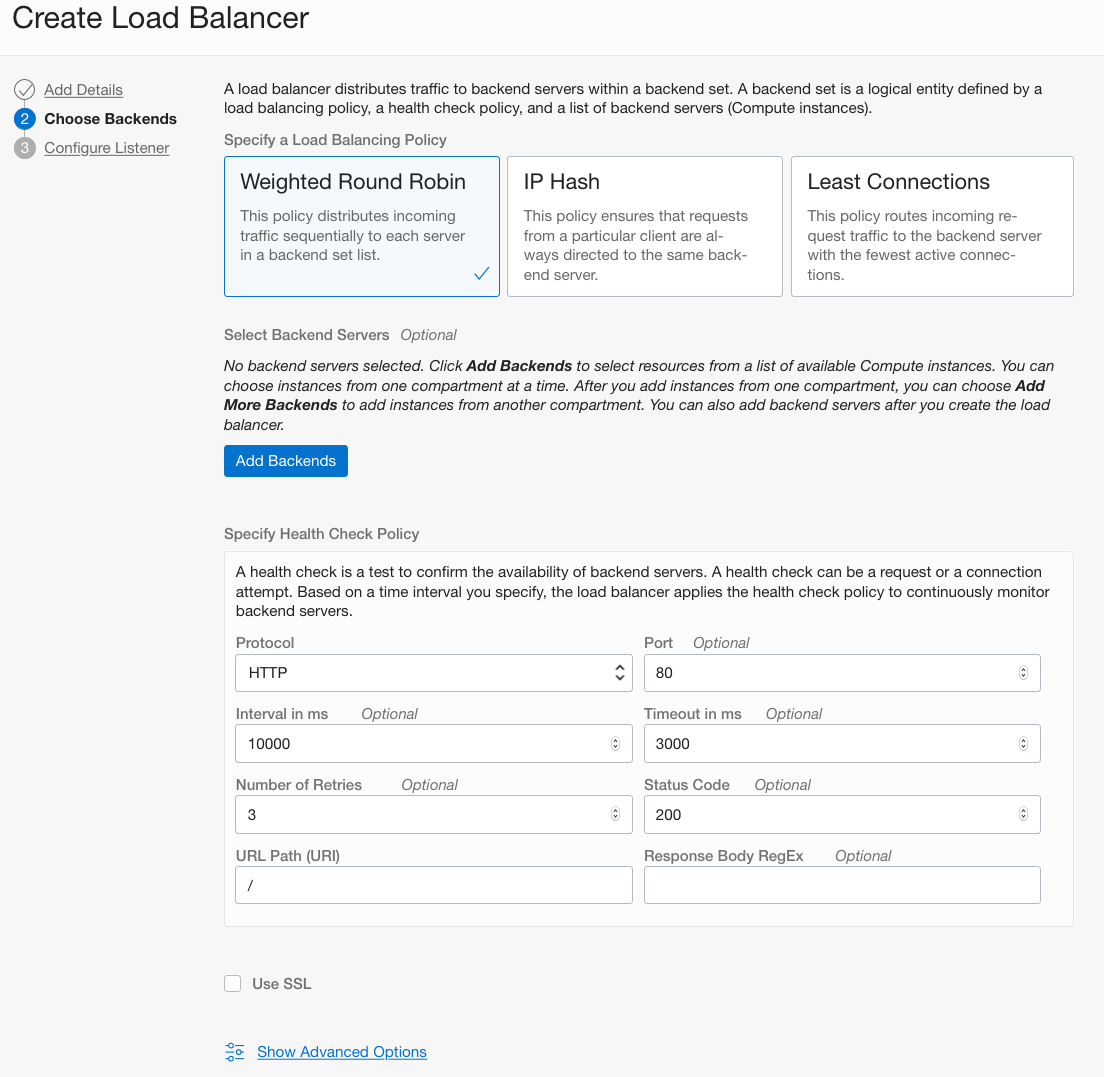
Click Next.
Under Configure Listener
SPECIFY THE TYPE OF TRAFFIC YOUR LISTENER HANDLES: HTTP
SPECIFY THE PORT YOUR LISTENER MONITORS FOR INGRESS TRAFFIC: 80
Leave other options as default
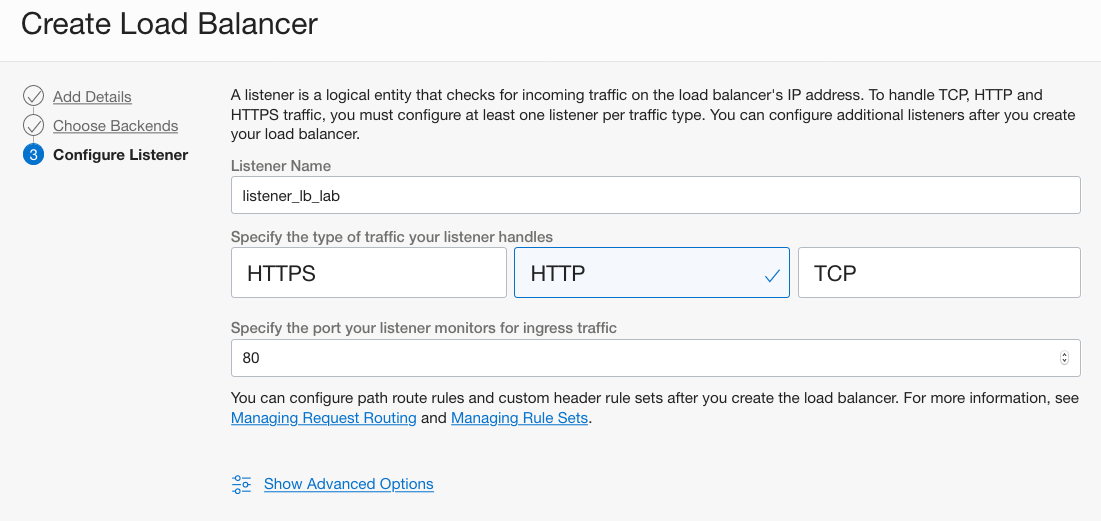
Click Next then Submit .
Wait for the load balancer to become active and then note down it’s public IP address.
Open the navigation menu. Under Core Infrastructure, go to Networking* and click Virtual Cloud Networks . Locate the VCN you created earlier.
Click VCN name to display VCN Details page.
Click Security Lists on the left, and click the Default Security List for your VCN.
Click Add Ingress Rules.
Click Add Ingress Rules.
An Add Ingress Rules dialog is displayed.
Enter the following:
- Leave the STATELESS checkbox unchecked
- Source Type: CIDR
- Source CIDR: Enter 0.0.0.0/0
- IP Protocol: Select TCP
- Source Port Range: All
- Destination Port Range: Enter 80 (the listener port)
- Description: Allow incoming HTTP connections

Click Add Ingress Rules.
Create Instance Pool and Configure Autoscaling
Create Web Server and Configure an Instance
Create Oracle Linux instance with Apache web server and configure an instance based on webserver. This will be the foundation for the autoscaling configuration.
Open the Oracle Cloud Infrastructure main menu.
Select Compute then Instances.
From the list of instances screen click Create Instance.
Enter a name for the instance.
Select the compartment to create the instance in.
In the Configure placement and hardware section, make the following selections:
- Availability domain: Select the Availability domain that you want to create the instance in
- Image: Latest Oracle Linux (by default the latest supported version will be already selected)
- Shape: Select VM.Standard.E4.Flex
In the Networking section, make the following selections:
- Network: Select an existing virtual cloud network
- Virtual cloud network in: Choose the compartent that has the desired VCN
- Network: Select the Virtual Network Cloud Network
- Subnet in: Choose the compartent that has the desired VCN
- Subnet: Select a public subnet
- Public IP Address: Select Assign a public IPv4 address
In the Add SSH keys section:
If you don't have an SSH key pair:
- Select Generate a key pair for me.
- Click on Save Private Key and follow the browser propmpt to save the private key.
- Click on Save Public Key and follow the browser propmpt to save the public key.
If you have a public key, you can:
- Select Upload public key files (.pub)
- Drag and drop the public key files over or browse to a location, find the location, and select the files.
or
- Select Paste public keys.
- Paste the Public Key Value into SSH keys (multiple keys can be added by clicking on Anotehr key).
In the Boot volume section, leave all options unchecked.
Click Show Advanced Options.
Under Management
- Initialization Script: Choose Paste cloud-init script and paste the below script. Cloud-init script will be executed at the first boot only to configure the instance.
#cloud-config
yum_repos:
    epel-testing:
        baseurl: https://yum.oracle.com/repo/OracleLinux/OL8/developer/EPEL/$basearch/
        enabled: true
        failovermethod: priority
        gpgcheck: true
        gpgkey: file:///etc/pki/rpm-gpg/RPM-GPG-KEY-oracle
        name: EPEL ($basearch)

packages:
- httpd
- stress

runcmd:
- [sh, -c, echo "<html>Web Server IP `hostname --ip-address`</html>" > /var/www/html/index.html]
- [firewall-offline-cmd, --add-port=80/tcp]
- [systemctl, start, httpd]
- [systemctl, restart, firewalld]
Click Create.
You will be taken to the instance's details page. Once the yellow square turns green, your instance will be provisioned, up and running.
Wait for Instance to be in Running state. You can scroll down to Work Requests to check the process of provisioning.
Click the instance's details page, click More Actions then select Create Instance Configuration. Enter the following then click Create instance configuration.
- Create in Compartment: Choose your compartment.
- Name: Provide a name.
On the instance configuration page, click Create Instance Pool and enter the following:

- Create in Compartment: Choose your compartment
- Name: Provide a name.
- Instance configuration in COMPARTMENT_NAME: Choose your compartment if diferent from the current selected compartment
- Instance Configuration Name: it should come already populated with the Instance Pool created on step 14.
- Number of Instances: 0
Click Next.
On the Configure Pool Placement page, enter the following:
- Availability domain: Choose the AD where you want to place instances (you can choose the AD 1 if in Multi AD region).
- Primary VNIC: Choose VCN's compartment if diferent from the current selected compartment then choose your VCN.
- Subnet: Choose subnet's compartment if diferent from the current selected compartment then choose your subnet.
- Attach a load balancer: Select this option.
- **Load Balancer: Choose LB's compartment if diferent from the current selected compartment then choose your Load Balancer
- Backend set: Choose the first backend set
- Port: 80
- VNIC: Leave the default
Click Next, review the information, then click Create.
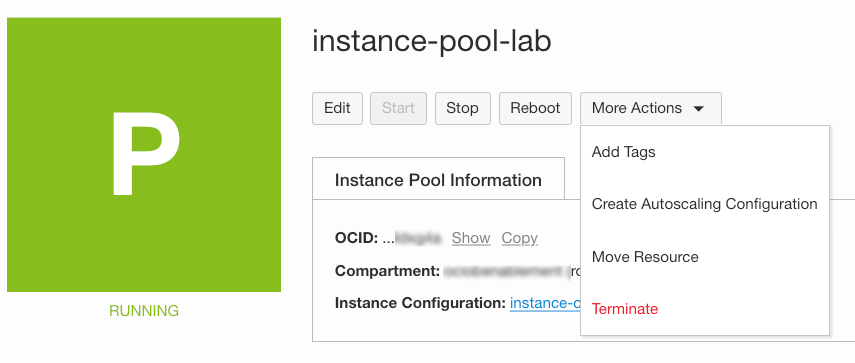
Open the navigation menu. Under Core Infrastructure, select Instance Pools and click on the Instance Pool name.
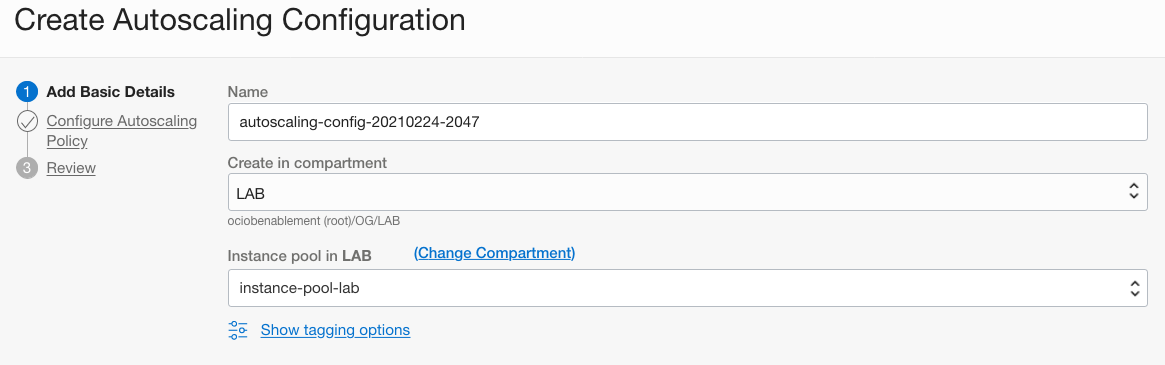
In the Instance Pool details screen, click More Actions, select Create Autoscaling Configuration and enter the following:
- Name: Define a name
- Create in Compartment: Choose your compartment
- Instance pool in COMPARTMENT_NAME: Choose your compartment if diferent from the current selected compartment and then select the Instance Pool (if the pool is not visible, refresh the browser and try again)
Click Next and on the Configure Autoscaling Policy page, enter the following:
- Select Metric-based Autoscaling.
- AUTOSCALING POLICY NAME : Provide a name
- COOLDOWN IN SECONDS : 300 (This is he minimum period of time between scaling actions.)
- PERFORMANCE METRIC : CPU utilization (This is the Metric to use for triggering scaling actions.)
- SCALE-OUT OPERATOR : Greater than (>)
- THRESHOLD PERCENTAGE : 80
- NUMBER OF INSTANCES TO ADD : 1
- SCALE-IN OPERATOR : Less than (<)
- THRESHOLD PERCENTAGE : 20
- NUMBER OF INSTANCES TO REMOVE : 1
- MINIMUM NUMBER OF INSTANCES : 1 (this is the minimum number of instances that the pool will always have)
- MAXIMUM NUMBER OF INSTANCES : 2 (this is the maximum number of instances that the pool will always have)
- INITIAL NUMBER OF INSTANCES : 1 (this is how many instances will be created in the instance pool initially)
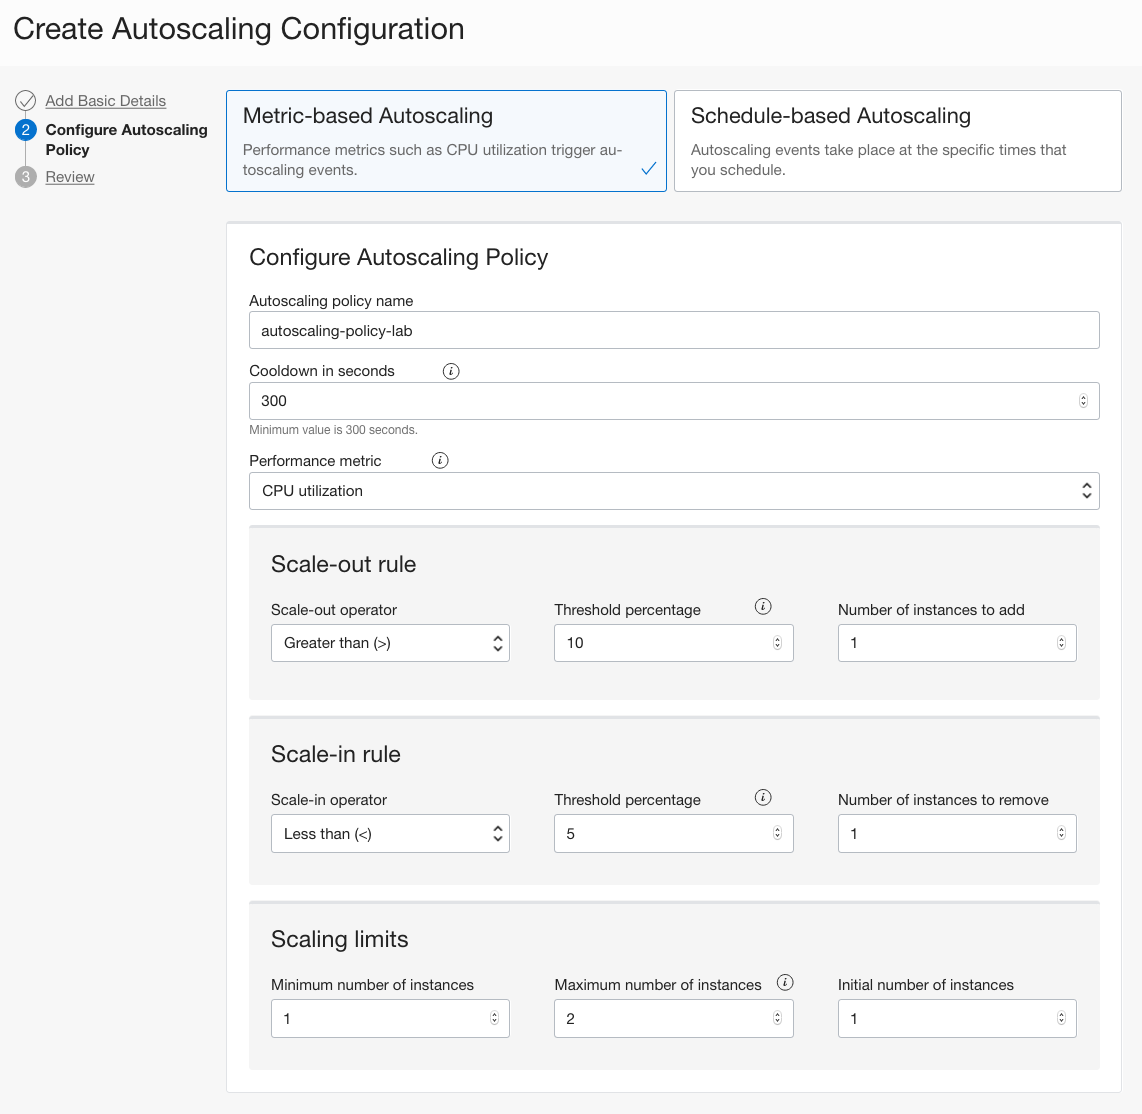
Click Next, review the information and click Create.
Test the Setup
In the load balancer details, look at the Public IP of the Load Balancer and open in the web browser.
Back in the OCI console, Under Compute, click Instance Pools, and then your pool name. Click Created Instances, you should see a compute instance created. Click the Compute Instance name.
In the terminal where you saved you private key, ssh to the instance
ssh -i <private_key> opc@<PUBLIC_IP_OF_COMPUTE>Now start CPU stress, Enter command:
sudo stress --cpu 4 --timeout 350Spawn 4 workers spinning with a timeout of 350 seconds.
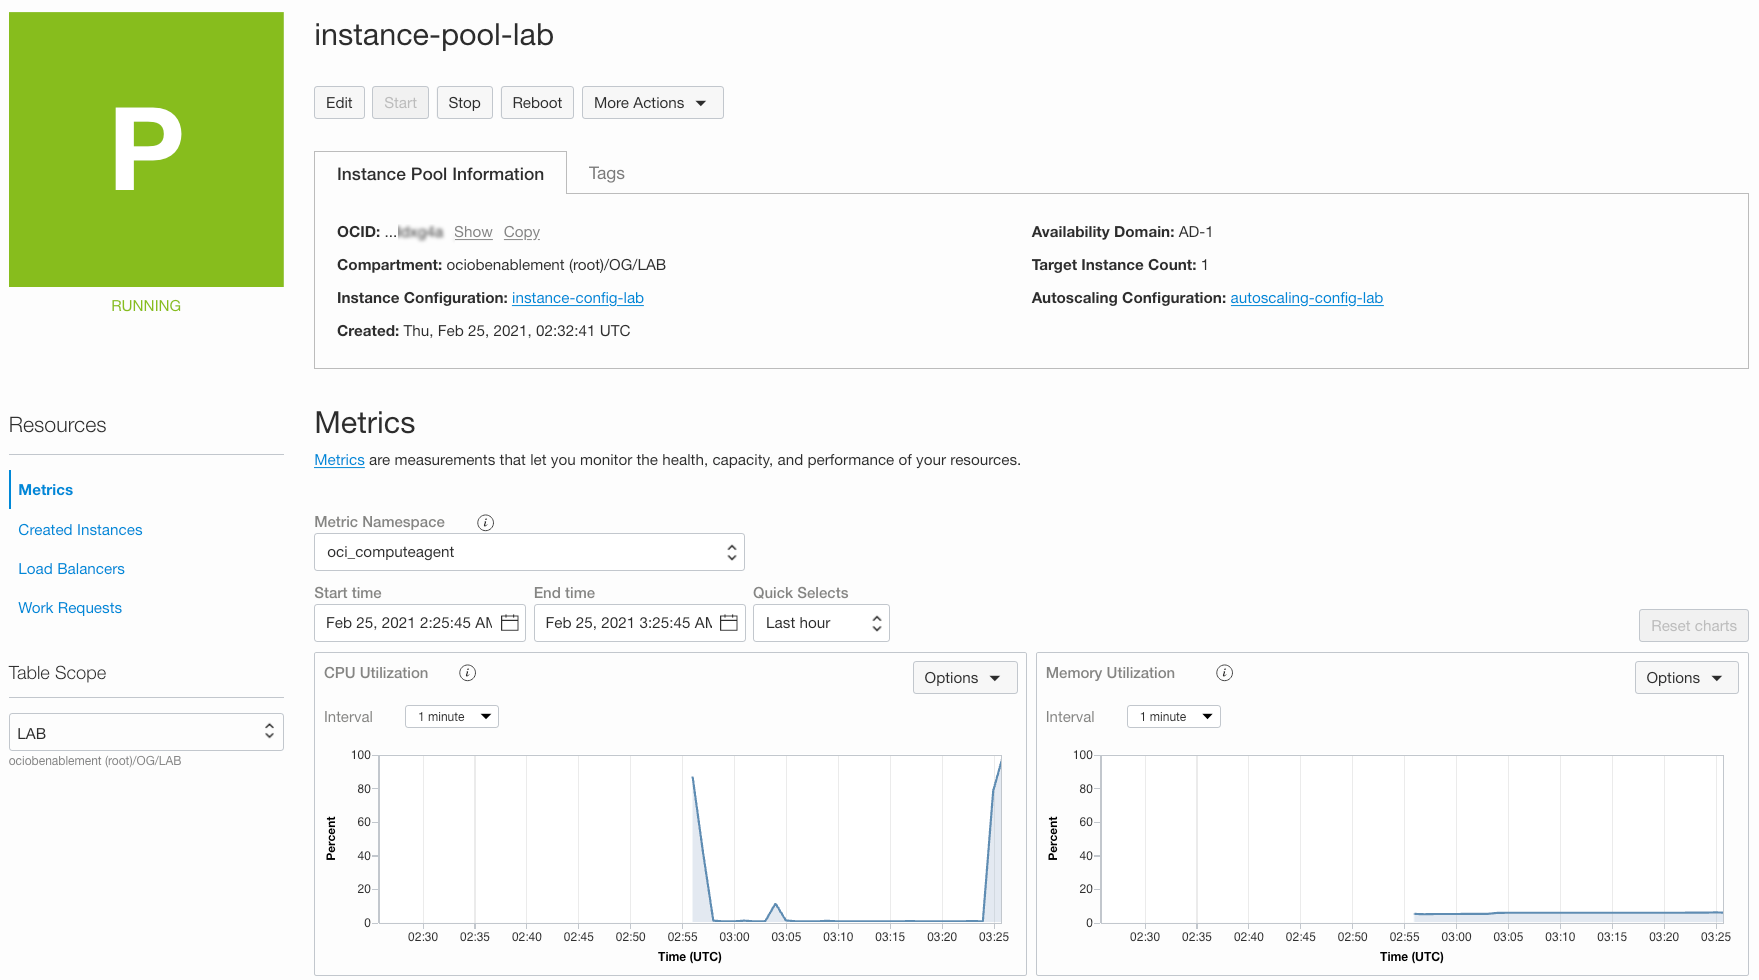
Switch back to OCI console and navigate to Instance Pool Details page. Scroll down to Metric screen, you should see CPU spiking up after a minute or so.
In about 3-5 minutes (time configured when we created auto scale configuration), status of Pool should change to Scaling and a second compute instance should launch. Click on **Work Requests and you will see the work request that will create a new instance.
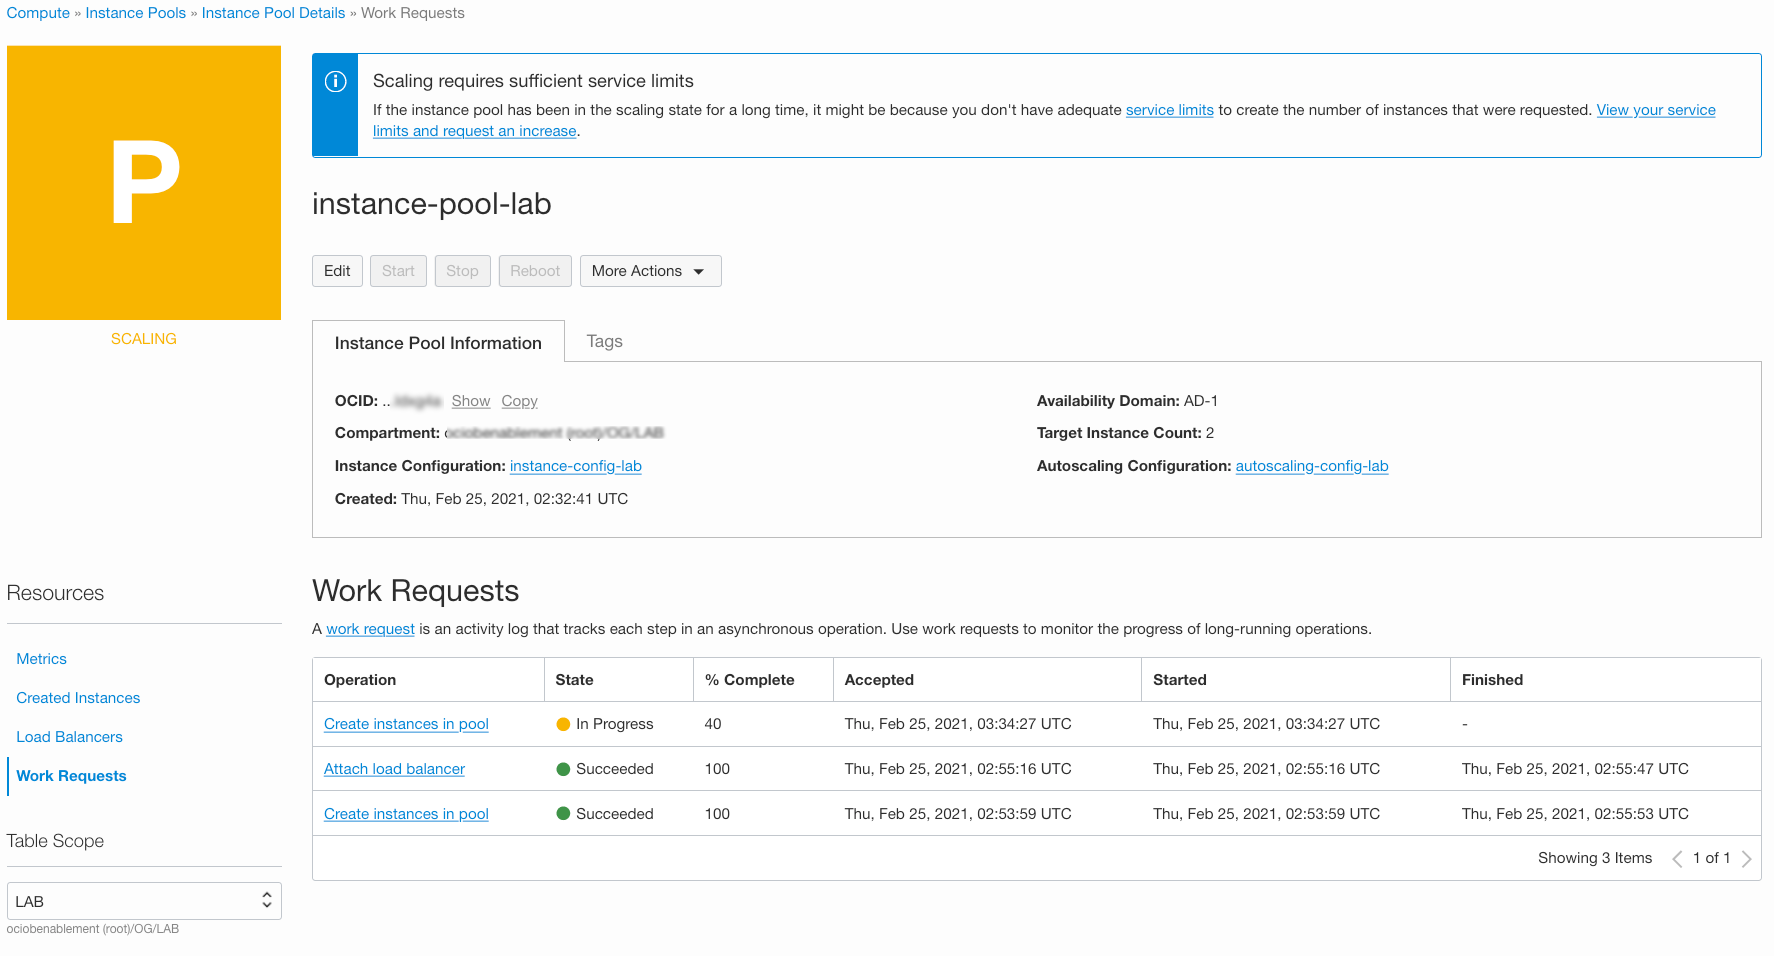
This is since our criteria of CPU utilization > 10 was met.
When the second instance is up and running and the instance pool status is 'Running', switch to the web browser and refresh the page multiple times and observe the load balancer balancing traffic between the two web servers.
Switch back to the terminal and if the stress tool is still running, click Ctrl + C to stop the script.
Switch back to OCI console window and navigate to your compute instance details page. Verify CPU utilization goes down after a minute.
Navigate to Instance pool details page and after 3-4 minute Instance pool status will change to Scaling . Additional compute instance will be deleted.
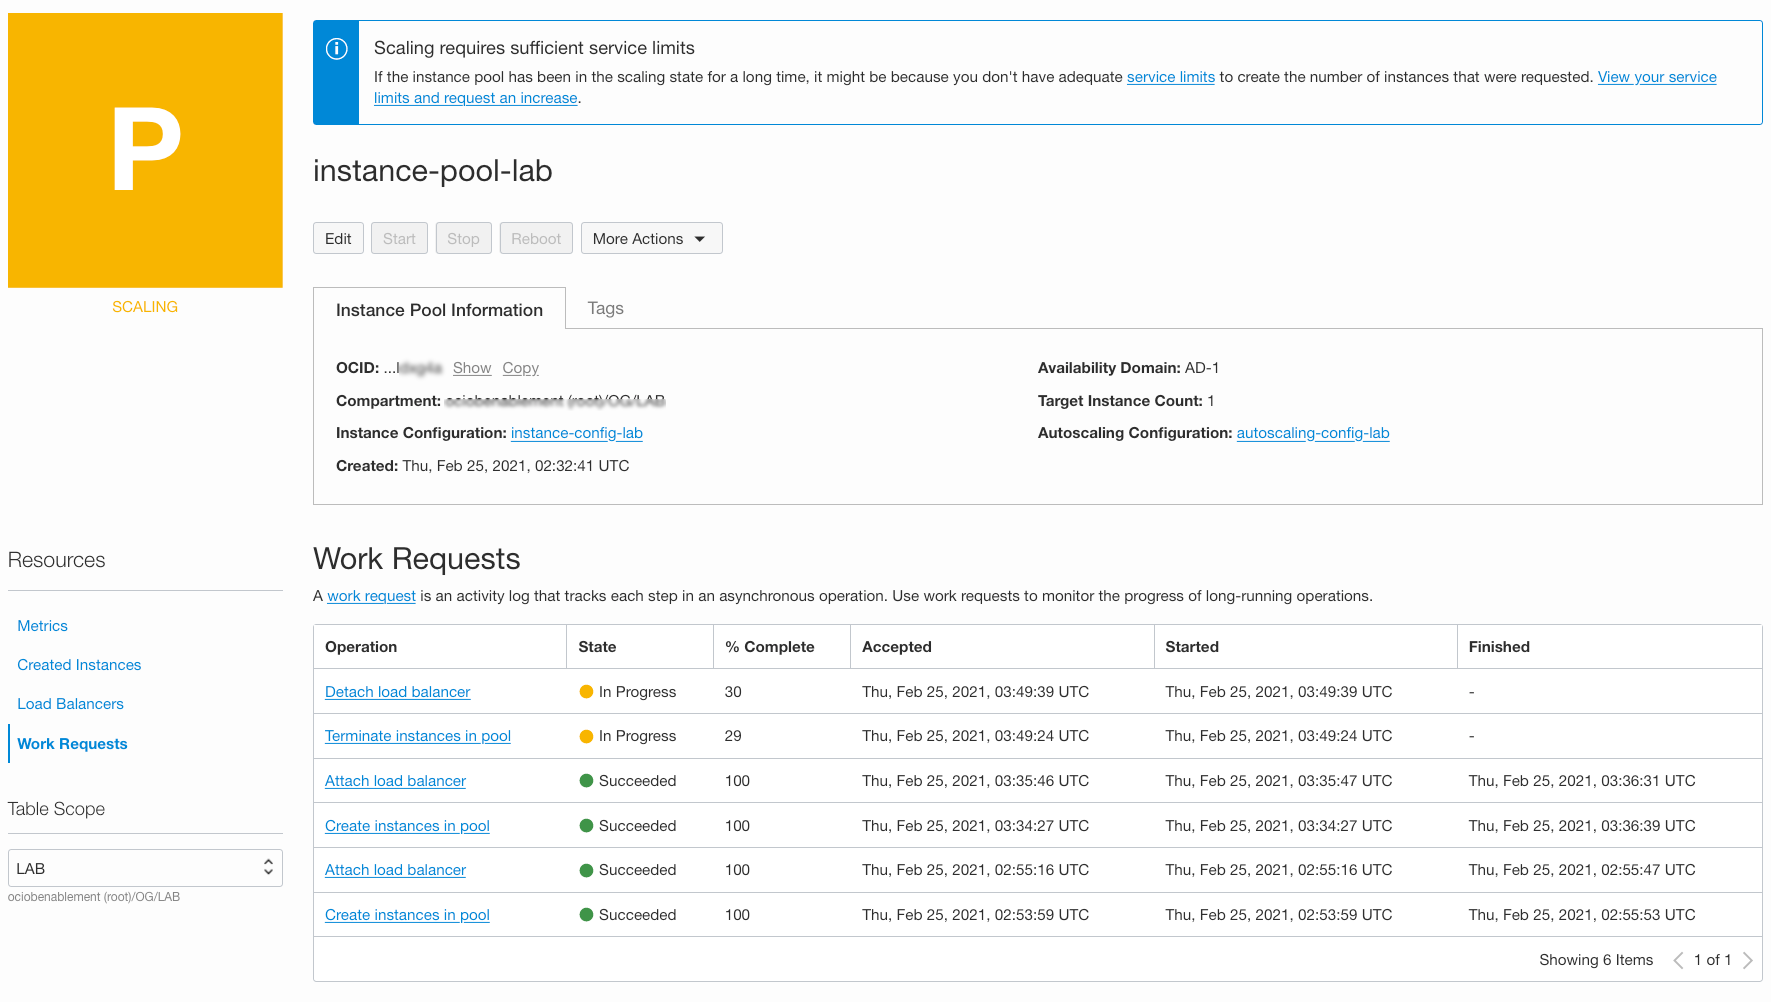
This is because our criteria of CPU utilization < 5 is met.
Delete Resources
Switch to OCI console window.
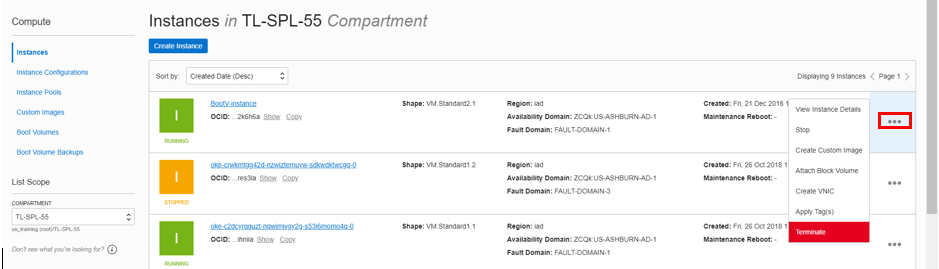
Open the navigation menu. Under Core Infrastructure, select Instaces Pools. At the far right, click in the three dots
 and select Terminate. Confirm when prompted.
Open the navigation menu. Under Core Infrastructure, select Instaces Configurations. At the far right, click in the three dots
and select TerminateOpen the navigation menu. Under Core Infrastructure, select Instaces. At the far right, click in the three dots
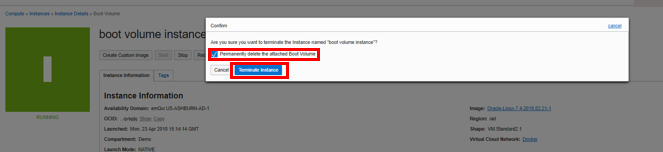
and select Terminate. Cehck the box Permanently delete the attached boot volume and click on Terminate Instance.Open the navigation menu. Under Networking, select Load Balancers. At the far right, click in the three dots
and select Terminate. Confirm when prompted.Open the navigation menu. Under Networking, select Virtual Cloud Networks. At the far right, click in the three dots
and select Terminate. Confirm when prompted.Open the navigation menu. Under Core Infrastructure, select Instaces Pools. At the far right, click in the three dots
and select Terminate. Once it finish listing the resources, click Terminat AllLocate first compute instance, Click Action icon and then Terminate.
Make sure Permanently delete the attached Boot Volume is checked, Click Terminate Instance. Wait for instance to fully Terminate.
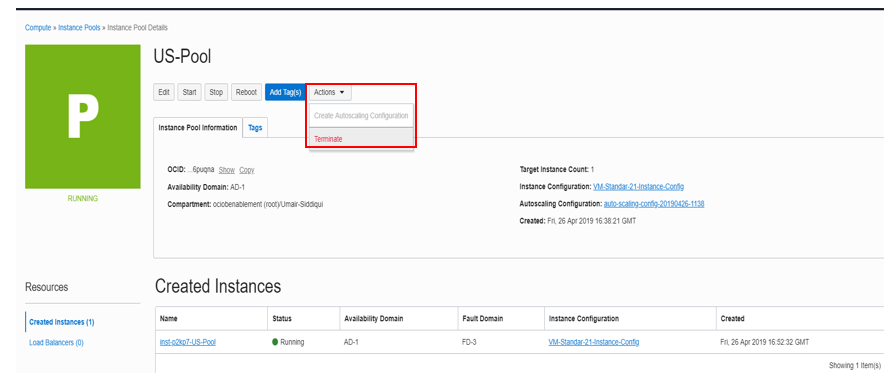
In OCI console window from Instance Pool Details page, Click Terminate under Action. Provide Instance Pool name in the pop up dialog box and Click Terminate. This will delete the pool along with the compute instance and auto scale configuration.
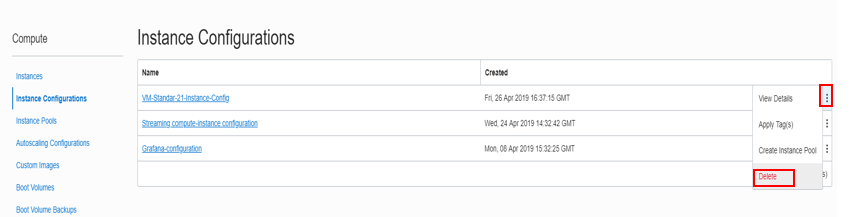
Navigate to Instance Configurations Under Compute. For your Instance Configuration, Click Delete under the three Vertical dots.
Navigate to AutoScaling Configurations Under Compute. For your Instance Configuration, click Delete.
From OCI services menu Click Load Balancers under Networking, locate your Load Balancer and click Terminate under the three Vertical dots.
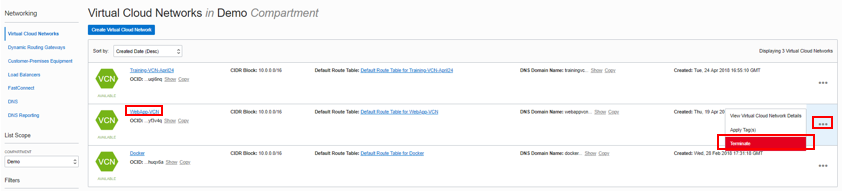
From OCI services menu Click Virtual Cloud Networks under Networking, Locate your VCN , click the Action icon and then Terminate. Click Delete All in the Confirmation window. Click Close once VCN is deleted.
Congratulations! You have successfully completed the lab.
Acknowledgements
- Authors - Flavio Pereira, Larry Beausoleil
- Contributor - Orlando Gentil