Provision PersistentVolumes Using File Storage Service on Oracle Cloud Native Environment
Introduction
Oracle Cloud Native Environment ships with the ability to install the Oracle Cloud Infrastructure (OCI) Cloud Controller Manager (CCM). The CCM is OCI's implementation of the Kubernetes control plane component that links your Kubernetes cluster to OCI.
The OCI CCM project implements a Container Storage Interface (CSI) plugin for Kubernetes clusters that implements both OCI Block Volume Storage and OCI File Storage Service to store persistent data.
This tutorial will focus on OCI File System service to provide nfs-style cloud storage.
Objectives
In this lab, you'll learn how to:
- Create an OCI File System service
- Create a PersistentVolume based on the OCI File System service
- Claim the PersistentVolume
- Use the PersistentVolume
Prerequisites
Minimum of a 3-node Oracle Cloud Native Environment cluster:
- Operator node
- Kubernetes control plane node
- Kubernetes worker node
Each system should have Oracle Linux installed and configured with:
- An Oracle user account (used during the installation) with sudo access
- Key-based SSH, also known as password-less SSH, between the hosts
- Installation of Oracle Cloud Native Environment with the CCM module installed
An Oracle Cloud Infrastructure (OCI) account
A user in the OCI account with permission to work with resources in a compartment
Access to that accounts credentials and OCID information
A Virtual Cloud Network (VCN) with the following security rules to allow network traffic to and from the mount target:
- Stateful ingress to TCP ports 111, 2048, 2049, and 2050, and UDP ports 111 and 2048.
- Stateful egress for TCP source ports 111, 2048, 2049, and 2050, and UDP source port 111.
Deploy Oracle Cloud Native Environment
Note: If running in your own tenancy, read the linux-virt-labs GitHub project README.md and complete the prerequisites before deploying the lab environment.
Open a terminal on the Luna Desktop.
Clone the
linux-virt-labsGitHub project.git clone https://github.com/oracle-devrel/linux-virt-labs.gitChange into the working directory.
cd linux-virt-labs/ocneInstall the required collections.
ansible-galaxy collection install -r requirements.ymlDeploy the lab environment.
ansible-playbook create_instance.yml -e localhost_python_interpreter="/usr/bin/python3.6" -e use_fss=true -e use_oci_ccm=trueThe free lab environment requires the extra variable
local_python_interpreter, which setsansible_python_interpreterfor plays running on localhost. This variable is needed because the environment installs the RPM package for the Oracle Cloud Infrastructure SDK for Python, located under the python3.6 modules.Important: Wait for the playbook to run successfully and reach the pause task. At this stage of the playbook, the installation of Oracle Cloud Native Environment is complete, and the instances are ready. Take note of the previous play, which prints the public and private IP addresses of the nodes it deploys and any other deployment information needed while running the lab.
Create the File Storage Service
The playbook deploys a ready-to-use File System service named fss-ocne. We'll connect to the Cloud Console and create a second one to show you how fss-ocne was made.
Connect to the Cloud Console
Dismiss any pop-up dialogs that appear.
Click
Storage, thenFile Systemsin the navigation menu.The table displays the
fss-ocneFile System service.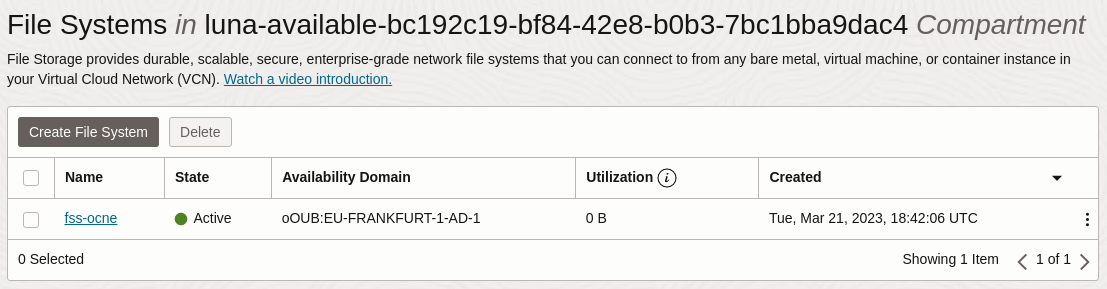
Note: Select the available
Compartmentfrom the list of values in the left panel if the list of File Systems is empty.Click the
Create File Systembutton.This action opens the
Create File Systemwizard.Enter or select the following values in the specific fields.
- File System for NFS
- File System Information - Name:
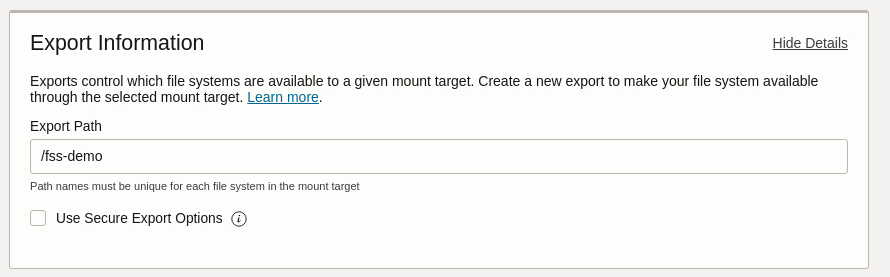
fss-demo - Export Information - Export Path:
/fss-demo - Mount Target Information - Mount Target:
mt-demo
For the
Mount Target, you can select an existing target if a previous one exists or create a new target by selecting the desired option. In the free lab environment, the opportunity to choose only exists because themt-ocnemount target deploys at the lab startup as part of thefss-ocneFile System. If creating a newMount Target, that step also requires selecting a Virtual Cloud Network (VCN) and Subnet, which the free lab environment only has one to choose from.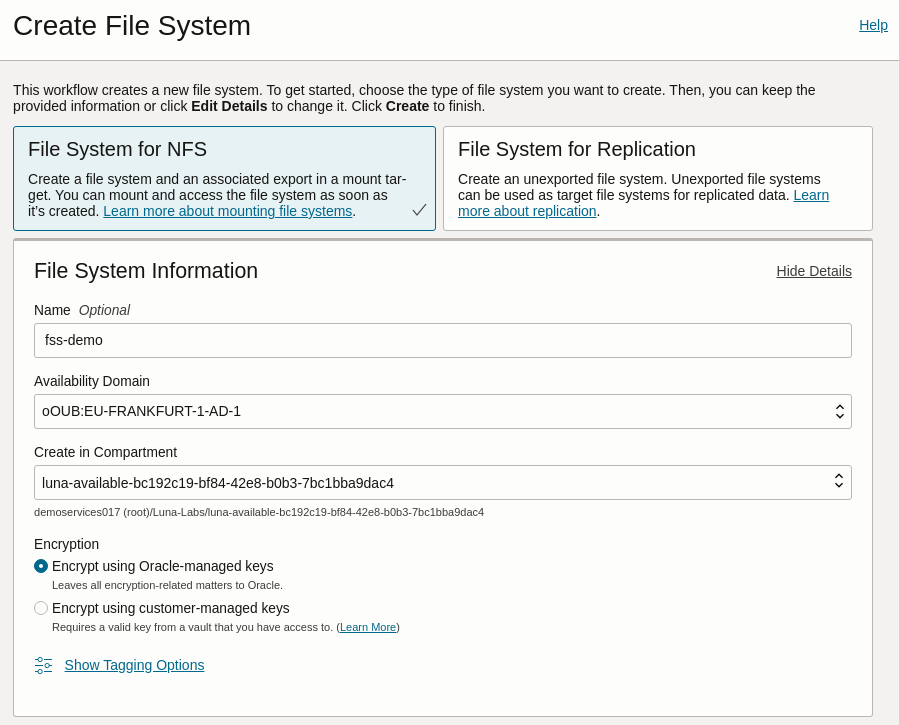
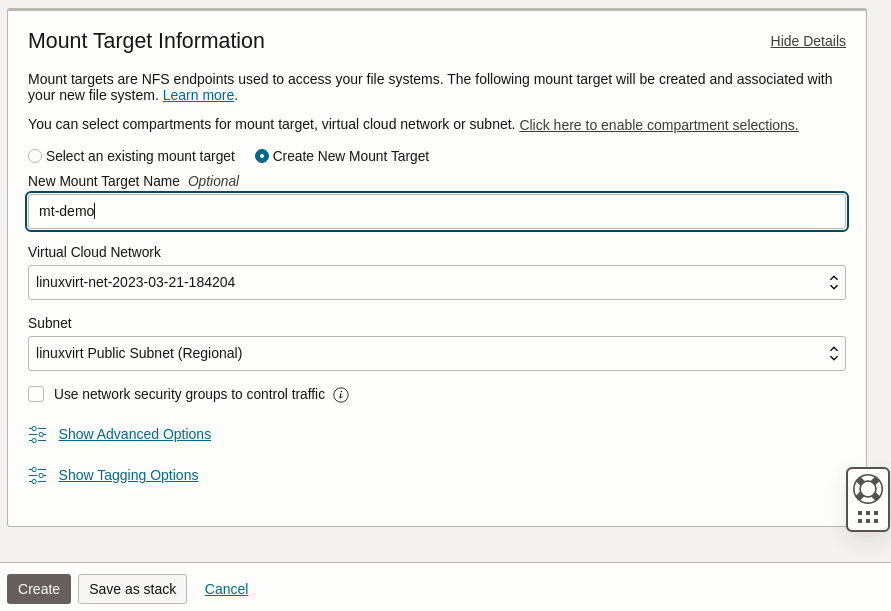
Review the entries and click the
Createbutton.The page refreshes and displays the
fss-demodetails page. The available exports for this File System appear at the bottom of the page. The export includes theExport Pathand theMount Target.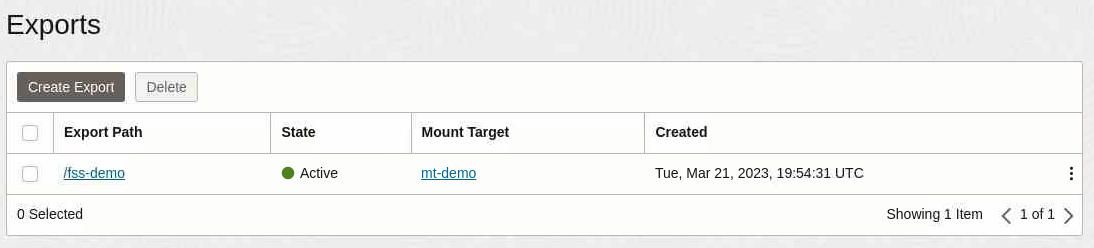
Click the vertical three-dot menu to the right of the export listing.
Select
Mount Commandsfrom the pop-up menu.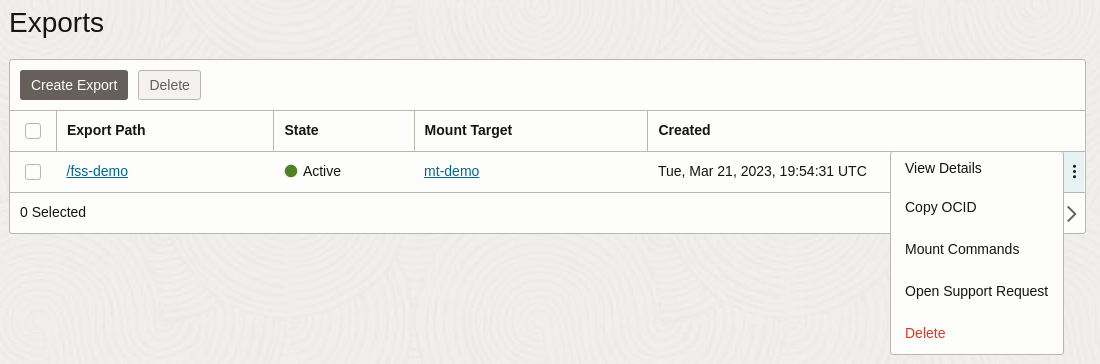
The
Mount Commandsdialog displays a list of commands to mount this File System on an Oracle Linux image. Take note of theIP address:pathin the last command. These values map to the file system'sMount Target's IP addressandExport Path, which we'll use along with the File System's OCID in the Kubernetes PersistentVolume manifest.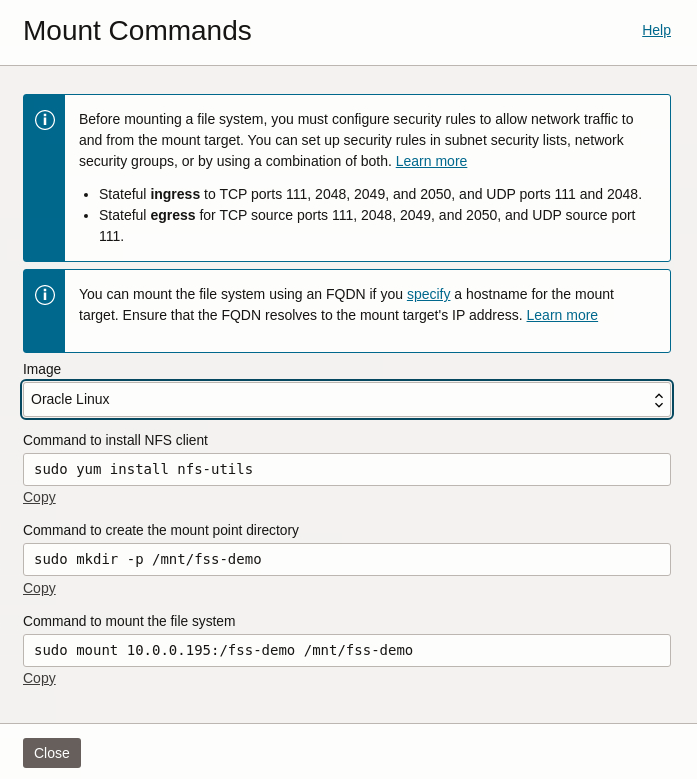
Click the
Closebutton.
Create a PersistentVolume (PV)
A PersistentVolume (PV) is a piece of storage provided by an administrator or dynamically provisioned using Storage Classes within a Kubernetes cluster. The lifecycle of a PV is independent of any individual Pod that uses the PV.
Open a terminal and connect via ssh to the ocne-control-01 node.
ssh oracle@<ip_address_of_node>Confirm the following files exist in the user's home directory.
- fss-pv.yaml
- fss-pvc.yaml
- fss-pod.yaml
The lab uses these files to create the PersistentVolume, the PersistentVolumeClaim, and the Pod. The Pod runs an Oracle Linux container that leverages the PersistentVolume.
View the contents of the PersistentVolume manifest file.
cat ~/fss-pv.yaml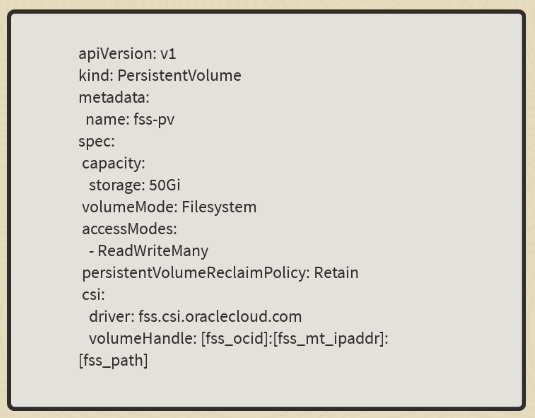
The following values appear in the image above as placeholders and get automatically set in the
fss-pv.yamlfile during deployment time in the free lab environment.As an optional step, update the
fss-pv.yamlfile and replace the set values for thevolumeHandle:line to match those of thefss-demoFile System we created above in the Cloud Console.- [fss_ocid]: The File System OCID
- [fss_mt_ipaddr]: The Mount Target IP Address
- [fss_path]: The Export Path, including the forward slash
You'll find the values for these items in the Cloud Console on the File System and Mount Target details page.
Create the PersistentVolume.
kubectl create -f ~/fss-pv.yamlGet a list of PersistentVolumes.
kubectl get pv
Create PersistentVolumeClaim (PVC)
A PersistentVolume Claim (PVC) is a request for storage, which is met by binding the PVC to a PersistentVolume (PV). A PVC provides an abstraction layer to the underlying storage. The CCM CSI drivers implement the Block Volume Service and the File Storage Service within OCI.
View the contents of the PersistentVolumeClaim manifest file.
cat ~/fss-pvc.yaml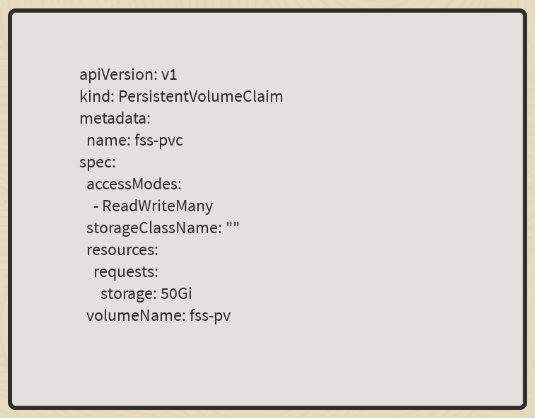
The
storageClassNamegets set to"", while thevolumeNameuses the name of the PV.Create the PersistentVolumeClaim.
kubectl create -f ~/fss-pvc.yamlGet a list of PersistentVolumeClaims.
kubectl get pvc
Create a Pod
A Pod within Kubernetes is a group of one or more containers, shared storage, network resources, and a specification defining how to run the containers.
View the contents of the pod manifest file.
cat ~/fss-pod.yaml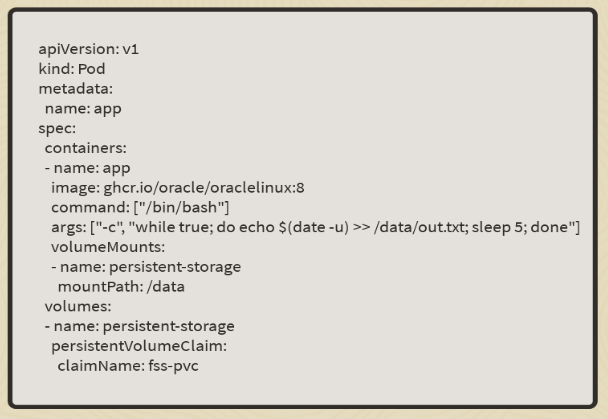
The Pod pulls an Oracle Linux container and runs a command within the bash shell. The command writes to Standard Output (STDOUT) and redirects that output to the
/datadirectory, a volume mount associated with the PVC.Create the Pod.
kubectl create -f ~/fss-pod.yamlGet a list of Pods.
kubectl get podsThe
STATUSwill start withContainerCreatingas the container pulls the image and starts. Running thekubectlcommand again, theSTATUSshould eventually show asRunningonce the container starts. If theSTATUSnever makes it toRunninguse the next step to troubleshoot the problem, as it is probably a typo in thefss-pv.yamlfile if you optionally choose to update it.Describe the Pod.
kubectl describe pod appRunning this command shows details of the specific Pod, including events helpful in troubleshooting errors if the Pod fails to start. If an error occurs, you can undo the previous steps for the Pod, PVC, and PV using the
kubectl delete ([-f FILENAME] | TYPE [(NAME | -l label | --all)])command. For example,kubectl delete pod app, removes theappPod deployment.
Verify PersistentVolume Access
There are several ways to verify that the data gets written to the PV.
Use the Pod
Open a shell to the container within the Pod.
kubectl exec -i -t app --container app -- /bin/bashNote: The short options
-iand-tare the same as the long options--stdinand--tty.Watch the container writing the date to a file in the volume mount location.
timeout 60s tail -f /data/out.txtExit the container shell.
exit
Mount the File System
Note: If you completed the optional step of using the
fss-demoFile System in thefss-pv.yamlfile, update the commands below accordingly.
Install the NFS client.
sudo dnf install -y nfs-utilsCreate the mount point directory.
sudo mkdir -p /mnt/fss-ocneMount the file system.
sudo mount ocne-fss.lv.vcn.oraclevcn.com:/fss-ocne /mnt/fss-ocneMonitor the container writing to the File System using the OS mount point.
sudo timeout 60s tail -f /mnt/fss-ocne/out.txt
Summary
Writing the out.txt file within the container to /data and then seeing the same file at the OS level using the File System mount commands confirms you have a working PersistentVolume using the OCI File System service.