Use OCI Cloud Controller Manager on Oracle Cloud Native Environment
Introduction
The Kubernetes LoadBalancer Service exposes the Deployment externally using a cloud provider's load balancer. The dependent NodePort and ClusterIP Services, to which the external load balancer routes, are automatically created.
This tutorial shows how to deploy the Oracle Cloud Infrastructure Cloud Controller Manager module (OCI-CCM module) within Oracle Cloud Native Environment to handle requests for an external LoadBalancer Service type. The Oracle Cloud Infrastructure Cloud Controller Manager module uses the open source oci-cloud-controller-manager project, which is a Kubernetes Cloud Controller Manager implementation (or out-of-tree cloud-provider) for Oracle Cloud Infrastructure (OCI).
Objectives
At the end of this tutorial, you should be able to do the following:
- Deploy the Oracle Cloud Infrastructure Cloud Controller Manager module
- Create a Deployment and LoadBalancer Service
- Verify access through the LoadBalancer Service
Prerequisites
Minimum of a 3-node Oracle Cloud Native Environment cluster:
- Operator node
- Kubernetes control plane node
- Kubernetes worker node
Each system should have Oracle Linux installed and configured with:
- An Oracle user account (used during the installation) with sudo access
- Key-based SSH, also known as password-less SSH, between the hosts
- Installation of Oracle Cloud Native Environment
Deploy Oracle Cloud Native Environment
Note: If running in your own tenancy, read the linux-virt-labs GitHub project README.md and complete the prerequisites before deploying the lab environment.
Open a terminal on the Luna Desktop.
Clone the
linux-virt-labsGitHub project.git clone https://github.com/oracle-devrel/linux-virt-labs.gitChange into the working directory.
cd linux-virt-labs/ocneInstall the required collections.
ansible-galaxy collection install -r requirements.ymlDeploy the lab environment.
ansible-playbook create_instance.yml -e localhost_python_interpreter="/usr/bin/python3.6" -e oci_ccm_bash=trueThe free lab environment requires the extra variable
local_python_interpreter, which setsansible_python_interpreterfor plays running on localhost. This variable is needed because the environment installs the RPM package for the Oracle Cloud Infrastructure SDK for Python, located under the python3.6 modules.Important: Wait for the playbook to run successfully and reach the pause task. At this stage of the playbook, the installation of Oracle Cloud Native Environment is complete, and the instances are ready. Take note of the previous play, which prints the public and private IP addresses of the nodes it deploys and any other deployment information needed while running the lab.
Confirm the Cluster is Running
Open a terminal and connect via SSH to the ocne-operator node.
ssh oracle@<ip_address_of_node>Confirm the environment is ready.
ssh ocne-control-01 kubectl get pods -AThe
STATUScolumn shows all the Pods in aRunningstate.
Open HealthCheck Port on Oracle Linux Firewall
When using a LoadBalancer Service associated with OCI-CCM, Kubernetes expects a health check endpoint available on port 10256. Therefore, kube-proxy creates a listener on this port so the cloud provider load balancer can verify that kube-proxy is healthy. This health check is how the load balancer determines which nodes can have traffic routed to them.
Set the firewall rules for the control plane and worker nodes.
Opening this port on the Oracle Linux firewall is essential when working in a clustered environment.
for host in ocne-control-01 ocne-worker-01 ocne-worker-02
do
  printf "======= $host =======\n\n"
  ssh $host "sudo firewall-cmd --add-port=10256/tcp --permanent; sudo firewall-cmd --reload"
 done
Open Port Range for Kubernetes Pods
The LoadBalancer Service automatically assigns ports to services within the range 30000 to 32767. Open these ports in the Oracle Linux firewall to allow communication from the OCI LoadBalancer to the Pod.
Set the firewall rules on the control plane and worker nodes.
for host in ocne-control-01 ocne-worker-01 ocne-worker-02
do
  printf "======= $host =======\n\n"
  ssh $host "sudo firewall-cmd --add-port=30000-32767/tcp --permanent; sudo firewall-cmd --reload"
 done
Deploy the Oracle Cloud Infrastructure Cloud Controller Manager Module
Determine the Oracle Cloud Infrastructure authentication method.
The free lab environment uses policies to allow instance principals, which enable instances to be authorized actors (or principals) to perform actions on service resources.
The Oracle Cloud Infrastructure Cloud Controller Manager module defaults to using
oci-use-instance-principals: truefor authentication.For more details, see the Using the Oracle Cloud Infrastructure Load Balancer documentation on how to pass credential information related to your Oracle Cloud Infrastructure tenancy rather than using Instance Principals.
Add the required Oracle Cloud IDs (OCIDs) to environment variables.
These OCID values are required to instruct the oci-ccm module on which compartment within a tenancy to communicate with. For details on OCIDs, see the OCI Resource Identifiers documentation.
The deployment playbook adds the following environment variables to the
oracleusers.bashrcfile:COMPARTMENT_OCID: configures the Compartment within which the cluster resides.VCN_OCID: configures the Virtual Cloud Network (VCN) within which the cluster resides.LB_SUBNET_OCID: configures the VCN subnet to which theoci-ccmmodule adds load balancers.
IMPORTANT: Ensure the OCIDs are correct per your environment. If the values are incorrect, the
oci-ccmmodule installs but will fail to create a LoadBalancer when requested by the Service.Confirm the OCID environment variables exist.
env | grep OCIDAvoid using the
--api-serverflag in future olcnectl commands.Get a list of the module instances and add the
--update-configflag to save the API configuration.olcnectl module instances \ --api-server $(hostname):8091 \ --environment-name myenvironment \ --update-configCreate the module.
olcnectl module create \
--environment-name myenvironment \
--module oci-ccm \
--name myoci \
--oci-ccm-kubernetes-module mycluster \
--oci-use-instance-principals true \
--oci-compartment $COMPARTMENT_OCID \
--oci-vcn $VCN_OCID \
--oci-lb-subnet1 $LB_SUBNET_OCID
Install the module.
olcnectl module install \
--environment-name myenvironment \
--name myoci
Create Deployment and Service
Generate a configuration file for the deployment and service.
ssh ocne-control-01 tee echo-oci-lb.yml > /dev/null << 'EOF'
---
apiVersion: apps/v1
kind: Deployment
metadata:
  name: echo-deployment
  labels:
    app: echo1
spec:
  replicas: 2
  selector:
    matchLabels:
      app: echo1
  template:
    metadata:
      labels:
        app: echo1
    spec:
      containers:
      - name: echoserver
        image: k8s.gcr.io/echoserver:1.4
        ports:
        - containerPort: 80
---
kind: Service
apiVersion: v1
metadata:
  name: echo-lb-service
  annotations:
    service.beta.kubernetes.io/oci-load-balancer-security-list-management-mode: "None"
    service.beta.kubernetes.io/oci-load-balancer-internal: "false"
    service.beta.kubernetes.io/oci-load-balancer-shape: "flexible"
    service.beta.kubernetes.io/oci-load-balancer-shape-flex-min: "10Mbps"
    service.beta.kubernetes.io/oci-load-balancer-shape-flex-max: "10Mbps"
spec:
  selector:
    app: echo1
  type: LoadBalancer
  ports:
  - name: http
    port: 80
    targetPort: 8080
EOF
Create deployment and service.
ssh ocne-control-01 kubectl create -f echo-oci-lb.yml
Verify Creation of Deployment and Service
Get a list of Deployments.
ssh ocne-control-01 kubectl get deploymentExample Output:
NAME              READY   UP-TO-DATE   AVAILABLE   AGE
echo-deployment   2/2     2            2           15s
Get a list of Services.
ssh ocne-control-01 kubectl get serviceExample Output:
NAME              TYPE           CLUSTER-IP     EXTERNAL-IP   PORT(S)        AGE
echo-lb-service   LoadBalancer   10.108.35.18   <pending>     80:32162/TCP   23s
kubernetes        ClusterIP      10.96.0.1      <none>        443/TCP        13m
The 'pending' under EXTERNAL-IP for the echo-lb-service exists until the Oracle Cloud Infrastructure Cloud Controller Manager module creates and starts the OCI LoadBalancer.
Repeat running the
kubectl get servicecommand until the output shows the EXTERNAL-IP address. It should appear within 1-2 minutes, maximum.The PORTS indicate the OCI LoadBalancer listening port (80) and the auto-generated Kubernetes NodePort secondary service port.
Get a list of Endpoints.
ssh ocne-control-01 kubectl get endpointsExample Output:
NAME              ENDPOINTS                         AGE
echo-lb-service   10.244.0.7:8080,10.244.0.8:8080   5m37s
kubernetes        10.0.0.140:6443                   18m
An Endpoint is a resource referenced by a Kubernetes Service. The resource tracks the IP addresses and ports of one or more Pods dynamically assigned during Service creation.
Verify Application
Test on a Control Plane Node
With a LoadBalancer Service type, the IP address and port to test is the EXTERNAL-IP address and port of the service, which is the OCI LoadBalancer Listener. The OCI LoadBalancer sends the request to the OCI LoadBalancer Backend. The OCI LoadBalancer Backend then routes traffic to the secondary NodePort Service running on the specific node and then to the Pod.
Using this specific test requires a node where kubectl exists.
Use JSONPath to assign the LoadBalancer listener a variable.
LB=$(ssh ocne-control-01 'kubectl get svc -o jsonpath="{.status.loadBalancer.ingress[0].ip}" echo-lb-service')Use JSONPath to assign the LoadBalancer port a variable.
LBPORT=$(ssh ocne-control-01 'kubectl get svc -o jsonpath="{.spec.ports[0].port}" echo-lb-service')Test the application.
curl -i -w "\n" $LB:$LBPORTExample Output:
HTTP/1.1 200 OK
Server: nginx/1.10.0
Date: Wed, 06 Jul 2022 16:41:23 GMT
Content-Type: text/plain
Transfer-Encoding: chunked
Connection: keep-alive

CLIENT VALUES:
client_address=10.244.0.1
command=GET
real path=/
query=nil
request_version=1.1
request_uri=http://130.162.210.115:8080/

SERVER VALUES:
server_version=nginx: 1.10.0 - lua: 10001

HEADERS RECEIVED:
accept=*/*
host=10.0.0.138
user-agent=curl/7.61.1
BODY:
-no body in request-
The IP address of
130.162.210.115shown in the output above is the EXTERNAL-IP address for the OCI LoadBalancer. This address is different on each tutorial deployment. You can verify the load balancer address by optionally logging into the Cloud Console and navigating to Networking > Load Balancers.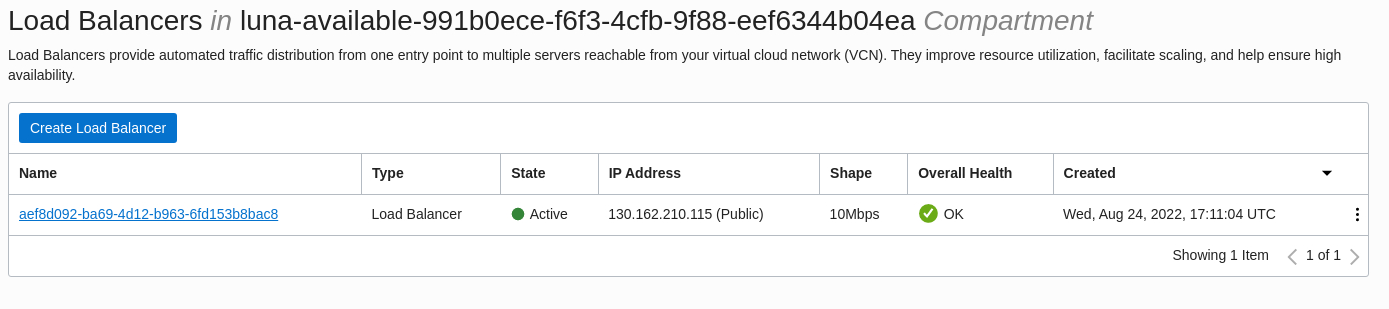
Note: If you don't get a similar output to the example output, try running the
curlcommand again.
Test from a Browser
Using this specific test requires a node outside the Kubernetes cluster.
Find the
EXTERNAL-IPvalue for theecho-lb-service.ssh ocne-control-01 kubectl get serviceExample Output
NAME              TYPE           CLUSTER-IP     EXTERNAL-IP      PORT(S)        AGE
echo-lb-service   LoadBalancer   10.102.1.165   130.162.210.115  80:31468/TCP   32s
kubernetes        ClusterIP      10.96.0.1      <none>           443/TCP        11m
Using a browser, open a new tab.
Enter the value returned in the
EXTERNAL-IPcolumn and press Enter.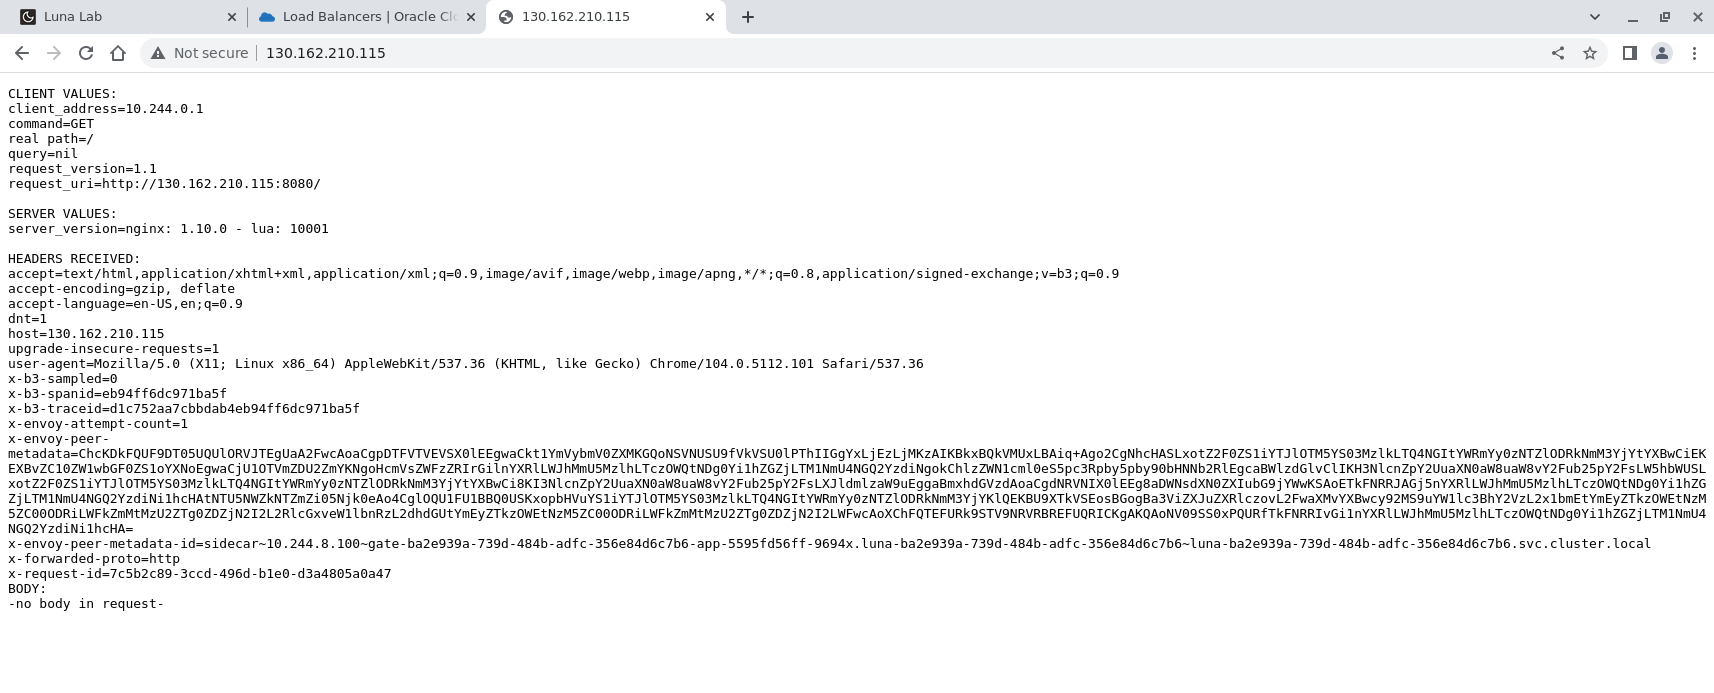
NOTE: The client_address shown in the output is the gateway IP address associated with the cni0 interface. The cni0 interface manages the Kubernetes Cluster Networking as covered in the Network Plugins upstream documentation.
Summary
We now understand how to create a LoadBalancer Service within Kubernetes. Check out and self-explore additional features of Oracle Cloud Native Environment using the Oracle Cloud Infrastructure Cloud Controller Manager module and the available Load Balancer Annotations .