Use the tmux Terminal Multiplexer on Oracle Linux
Introduction
As a default, when your SSH connection terminates, any remote terminal sessions started by that connection also terminate. You can avoid that issue and reuse those sessions for yourself and others by using the tmux terminal multiplexer. You can also manage more complex tasks from a single SSH connection, as a terminal multiplexer can provide browser-style tabs for each task and even divide up your screen with multiple terminal sessions called panes.
In previous versions of Oracle Linux, you might have encountered a similar tool called screen. This tool has been around for years and is still available in the Oracle developer EPEL repository. However, we'll focus on and explore tmux, which Oracle ships in the base repository.
Objectives
In this tutorial, you'll learn how to:
- Connect and disconnect from a persistent tmux session
- Display, hide, and switch between multiple terminals in the same tmux session
- Manage several persistent tmux sessions
Prerequisites
Minimum of a single Oracle Linux system
Each system should have Oracle Linux installed and configured with:
- A non-root user account with sudo access
- Access to the Internet
Deploy Oracle Linux
Note: If running in your own tenancy, read the linux-virt-labs GitHub project README.md and complete the prerequisites before deploying the lab environment.
Open a terminal on the Luna Desktop.
Clone the
linux-virt-labsGitHub project.git clone https://github.com/oracle-devrel/linux-virt-labs.gitChange into the working directory.
cd linux-virt-labs/olInstall the required collections.
ansible-galaxy collection install -r requirements.ymlDeploy the lab environment.
ansible-playbook create_instance.yml -e localhost_python_interpreter="/usr/bin/python3.6"The free lab environment requires the extra variable
local_python_interpreter, which setsansible_python_interpreterfor plays running on localhost. This variable is needed because the environment installs the RPM package for the Oracle Cloud Infrastructure SDK for Python, located under the python3.6 modules.The default deployment shape uses the AMD CPU and Oracle Linux 8. To use an Intel CPU or Oracle Linux 9, add
-e instance_shape="VM.Standard3.Flex"or-e os_version="9"to the deployment command.Important: Wait for the playbook to run successfully and reach the pause task. At this stage of the playbook, the installation of Oracle Linux is complete, and the instances are ready. Take note of the previous play, which prints the public and private IP addresses of the nodes it deploys and any other deployment information needed while running the lab.
Install the tmux Terminal Multiplexer
Open a terminal and connect via SSH to the ol-node-01 instance.
ssh oracle@<ip_address_of_instance>Install the
tmuxpackage using the package manager on your instance.sudo dnf install -y tmux
Start and Connect to a tmux Session
Note: tmux sessions are not preserved between reboots, so they are best suited for persistent remote servers.
The tmux command rearranges your terminal window, with a green band running along the bottom that lists the currently active panes. By default, sessions and panes are ordered numerically according to dynamically assigned ID numbers that count upwards from zero.
All tmux sessions are hosted in a background service, so you can reconnect if your connection times out or your user account has previously logged off.
Start
tmuxwithout any parameters to create a new session and connect to it.tmuxList your currently open
tmuxsessions.tmux lsExample Output:
oracle@ol-node-01 ~]$ tmux ls
0: 1 windows (created Thu Aug 22 15:34:11 2024) [132x23] (attached)


...


[0] 0:bash*                                                                                             "ol-node-01" 15:38 22-Aug-24
Detach by pressing Ctrl+b, and then the d key.
Reattach to your persistent
tmuxsession.tmux attach -t 0
You can run tmux ls from inside or outside tmux to verify which sessions are available for you to reopen.
Manage Multiple tmux Sessions
Note: You cannot create nested tmux sessions by default, so ensure you have detached from your current tmux session before attempting to create or connect to any other tmux sessions.
Rename your existing session from the default value of
[0]tooracle.The terminal shows the tmux session name on the status bar.
tmux rename-session -t 0 oracleDetach by pressing Ctrl+b, and then the d key.
Create a new tmux session called
oracletemp.tmux new -t oracletempDetach by pressing Ctrl+b, and then the d key.
List your open sessions.
tmux lsExample Output:
[oracle@ol-node-01 ~]$ tmux ls
oracle: 1 windows (created Thu Aug 22 15:34:11 2024) [132x23]
oracletemp-1: 1 windows (created Thu Aug 22 15:54:17 2024) [132x23] (group oracletemp)
Reconnect to the
oraclesession.tmux attach -t oracle
Manage tmux Windows
Terminal window panes behave much like web browser tabs, where you can create, delete, and switch between them. Unlike a web browser, you must use keyboard shortcuts to perform those actions.
Create a new terminal window by pressing Ctrl+b, and then the c key.
You can confirm that a new tmux window was created by looking at the status bar, which lists two windows. An asterisk indicates the currently active window.
Example Output:
[0] 0:bash- 1:bash* "ol-node-01" 15:58 23-Aug-24Switch to the next window by pressing Ctrl+b, and then the n key.
The asterisk indicating the currently active window moves between each numbered tab as you switch.
Example Output:
[0] 0:bash* 1:bash- "ol-node-01" 15:58 23-Aug-24Switch to the previous window by pressing Ctrl+b, and then the p key.
Switch to the second window by pressing Ctrl+b, and then then the 1 key.
Close the second window by pressing Ctrl+b, and then the ampersand (&) key.
Enter y to confirm the action.
Example Output:
kill-window bash? (y/n)Rename the first window by pressing Ctrl+b, and then the comma (,) key.
Example Output:
(rename-window) labUse the keyboard to replace the original name bash and update the new name to lab. Then press the Enter to confirm the change.
Example Output:
[0] 0:lab* "ol-node-01" 15:58 23-Aug-24
Manage tmux Panes
tmux allows you to split the current terminal window into multiple panes to suit your workflow. For example, you could input commands on one pane and then review the output for those commands on the other.
Split the current pane vertically by pressing Ctrl+b, and then the modulo (%) key.
Split the current pane horizontally by pressing Ctrl+b, and then the quotation mark (") key.
You can switch between split panes by pressing Ctrl+b, and then the direction keys on your keyboard.
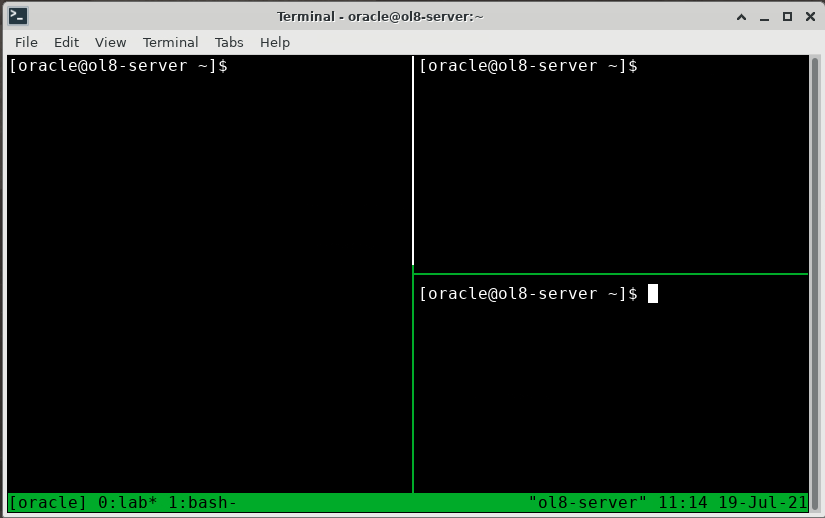
Close any of the panes by pressing Ctrl+b, and then the x key.
Confirm the action by pressing y.
Create a new tmux window.
Enter Ctrl+b, and then the c key to create a new tmux window. The split panes are no longer visible.
Switch tmux windows.
Now enter Ctrl+b and then the p key. The tmux window containing the panes you just created is displayed.
Reconnect to a tmux Session Over SSH
Detach by pressing Ctrl+b, and then the d key.
Run the
exitcommand to end the SSH connection.Press the up direction key, and then reuse the command you previously executed to start a new SSH connection:
ssh oracle@<ip_address_of_instance>Reconnect to your tmux session.
tmux attach -t oracle
Terminate tmux Sessions
List your sessions.
tmux lsDetach by pressing Ctrl+b, and then the d key.
Terminate your sessions.
Terminate the
oracletempsession:tmux kill-session -t oracletempTerminate every
tmuxsession simultaneously with a single command:tmux kill-server
Next Steps
That is the end of our introduction to connecting to a tmux session, persisting it, reconnecting to it, and switching between multiple tmux sessions on Oracle Linux. However, it barely scratches the surface of what tmux is capable of and how it can help you administer your Oracle Linux environments. Check out the tmux wiki for more details.