Lab Purpose and Guidelines
The purpose of this lab is to familiarize yourself with the Application Integration capability of Oracle Integration (OIC) so you can represent the product in customer sessions, deliver demonstrations and develop skills to build proof-of-concept (POC) projects for customers. You will use the Integration component of Oracle Integration 3 (OIC 3) to build an integration for a RESTful process application to connect to Autonomous Transaction Processing (ATP) database to create a new order based upon an approved order request.
Estimated duration is around 1 hour.
Note: After this lab, it is also highly recommended that you attempt another lab, namely Oracle Integration 3 (Process Automation) which demonstrates the way to fully automate a business process with both integration (covered in this lab) and process automation capabilities that OIC 3 provides. This will give you a complete picture of the end-to-end solution for this use case.
Description of the Business Solution
Use case and architecture introduction
Mama Maggy, a large pizza chain, has a pizza ingredient inventory order control problem with its 10,000 worldwide stores. Management is demanding a better automated process. Specifically, Mama Maggy wants to automate how stores order their pizza ingredients and other essentials needed to operate a store. Their current process is manual and completely ineffective as reflected by these comments we have heard from our internal champions at Mama Maggy:
"Submitting order requests takes too much time for store managers."
"Order requests are not being promptly evaluated by regional managers."
"Evaluating order requests is cumbersome for our regional managers."
"Transforming order requests into approved orders in the backend system is a manual, error-prone process."
The solution is to provide an automated process for store managers to efficiently enter their order requests and have visibility into order status during the approval process. The new system will also provide regional managers with a structured approach to approve or disapprove order requests making the process faster. Once an order request has been approved, the new process automation solution is to interact with a backend system in the cloud to create a new order. In these labs, the backend system will be a cloud-based database rather than a SaaS system.
Here is the proposed business process flow as shown below:
The workflow begins at a Submit Request start event where the Store Manager uses a web form to provide details for an inventory order request for their store.
When the Store Manager is done filling in the web form, they press the Submit button. This generates a workflow task for the Regional Manager at the Approve Request human activity.
The Regional Manager accepts the task and uses a web form to evaluate the request.
If the request looks reasonable:
The Regional Manager presses the Approve button on the web form.
Processing continues into the Create Order integration activity where an order is created in the backend system (simulated as a database table line item).
The process then ends at the Completed end event.
If the order request looks unreasonable:
The Regional Manager enters comments into the web form and presses the Reject button on the web form.
The Approved? exclusive gateway routes the request back to the Store Manager at the Resubmit human activity.
The Store Manager accepts the task and uses a Resubmit web form to read the Regional Manager’s comments and to add some additional notes to the request to plead their case.
When the Store Manager is done editing their request in the Resubmit web form, they press the Submit button. This generates a workflow task for the Regional Manager at the Approve Request human activity to review the same order request again. The Accept/Reject process continues as shown above.

The solution will provide the following business values for Mama Maggy:
Lower costs: more efficient entry and evaluation of order requests
Better efficiency: faster entry of order requests and faster evaluations
Lower error rates: approval of order requests automatically results in orders being created in the backend system
Enhanced visibility: status of in-process order requests is constantly available
Description of the Technical Solution
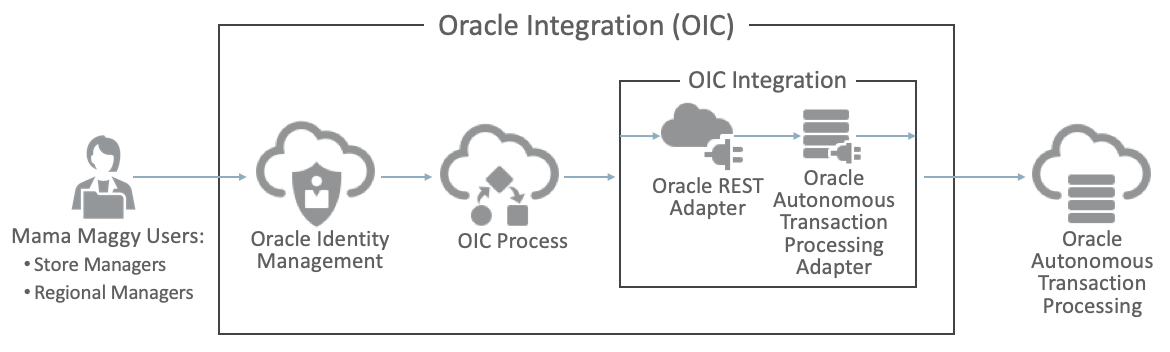
Let’s review the technical architecture to reveal what Oracle products are used in the new solution. Refer to the technical architecture diagram below. We’ll again follow an inventory request through the architecture using a scenario:
A Mama Maggy user, either a Store Manager or a Regional Manager, interacts with a process automation application that is hosted by Oracle Integration (commonly referred to as Oracle Integration or OIC).
OIC utilizes Oracle Identity Management to authenticate the user to the current role (Store Manager or Regional Manager) in the application.
OIC allows the user to view and execute workflow tasks based on the specifications in the business process model for the application.
Store Managers and Regional Managers then submit and evaluate order requests.
Once a Regional Manager has approved an inventory order request:
OIC Process sends a REST request (JSON payload) to OIC Integration that hosts an integration built for Mama Maggy.
The integration (the focus of this lab):
Uses the Oracle REST Adapter to accept the order request information from the Store Manager
Maps the order request data into an Order
Uses the Oracle Autonomous Transaction Processing (ATP) Adapter to insert a new Order row in the ORDERS table in the Oracle Autonomous Transaction Processing database.
Control is passed back to OIC Process to end the process.
Task 1: Preparing Your Environments - Lab Files Download
You will be using Luna's virtual desktop at the right of your screen to work on your labs. All lab files and tools have been made available for you.
You will require a couple of files while you are working on the labs. Follow below instructions to download them now before we start doing the labs.
Click the Google Chrome browser from Luna's desktop screen at the right. Copy and paste the below links to the URL field to download the below two files to Luna desktop:
1. ATP Wallet zip file
https://luna.oracle.com/api/v1/labs/4d82c299-c5ce-4433-802c-7bc623962831/gitlab/files/Wallet_DBAPPSHARED.zip2. XSD file namely RESTEndpointRequestPayload
https://luna.oracle.com/api/v1/labs/4d82c299-c5ce-4433-802c-7bc623962831/gitlab/files/RESTEndpointRequestPayload.xsdNOTE: Unlike the ATP Wallet, the Chrome browser will only display its content in text instead of downloading straight to the Luna desktop. Let's save it into Luna as a file now. Right-click on the screen, choose Save as. At the pop-up window, rename the file and change the file extension from txt to xsd like this:
RESTEndpointRequestPayload.xsdThen click the Save button at the top right corner. The XSD file is saved in Luna's download folder for later use.

Task 2: Create Your Oracle Integration 3 (OIC 3) Instance
Walkthrough demo video
- Click the Luna Lab icon located on the virtual desktop on your right.

- Here you will find the login tenant information required for this lab. Now click OCI Console to logon.
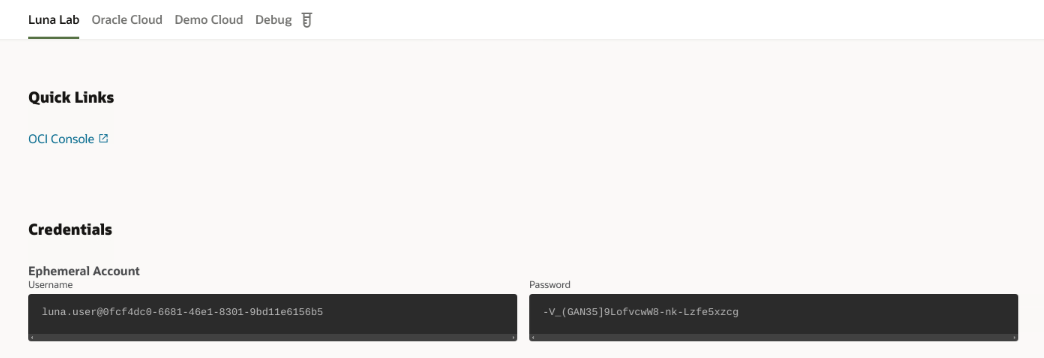
- Back to the Luna Lab tab on top of your browser and copy and paste the credentials (username and password) to the login page. NOTE: Do not use your Oracle SSO account if you are an Oracle employee.

- Now you are on OCI mainpage. Click the hamburger icon at the top left corner. Select Developer Services on the left menu, then Integration.

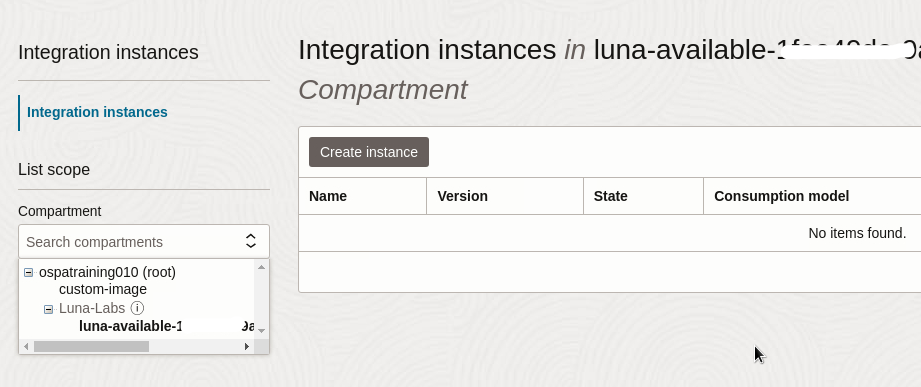
- A compartment should have been assigned to you automatically. If not, select your assigned compartment in the compartment dropdown menu that shows under Luna-Labs directory. Then click the Create instance button to create an OIC instance.
- The Create instance window displays.
- In Name field, give a name to your OIC instance.
- Edition: choose Enterprise that provides complete integration and process automation functionality of Oracle Integration Cloud. Healthcare edition provides additional industry-specific adapters and supports for healthcare industry.
- Shape: choose Development.
- License type: Subscribe to a new Oracle Integration license.
- Click Create at the bottom of the form.

- It takes around 5-10 minutes for a new OIC instance to be created for you. Once it is done, the state will be changed from creating to active and you will be able to see a green dot.

- Click your instance link under Name. Click the Service console to activate the OIC instance.

- Now you are at Oracle Integration Cloud mainpage. Click the hamburger icon at the top right of Chrome browser to zoom out to 67-80% to optimize your viewing experience.

That completes the steps to prepare your environment and you are ready to start Lab 1. Keep right on going.
Creating an Integration
In this lab, you use the Integration component of Oracle Integration (OIC) to build an application integration which will be used in another lab - Oracle Integration - Process Automation to connect a process automation application to an Autonomous Transaction Processing (ATP) database creating a new order based on an approved order request.
Key Tasks to Complete
Create two connections that leverage prebuilt adapters. Connections let our integration reach outside Oracle Integration to interact with calling clients and backend services. The first connection allows an integration to be triggered by a REST request from a process application built by OIC Process. The second connection initiates an insert operation on a table in the ATP database.
Use the two connections to build a new integration that accepts order data via a REST POST and creates a new order row in the ORDERS table in the ATP database.
Let's revisit the technical architecture, displayed below, to get your bearings. Focus on the OIC Integration area. In the integration we are about to build, we will create two connections utilizing REST and ATP adapters and we will perform data mappings to make sure the right data is available to them. Ultimately, a new order will be added to Oracle Autonomous Transaction Processing:
Task 3: Create Connections
Walkthrough demo video
- Click the hamburger menu icon in the upper left to reveal the Oracle Integration menu.
We will create two connections you’ll use in the integration you'll build in a moment. One connection will enable a REST client to access the integration. The other connection will allow your integration to communicate with the ATP database.
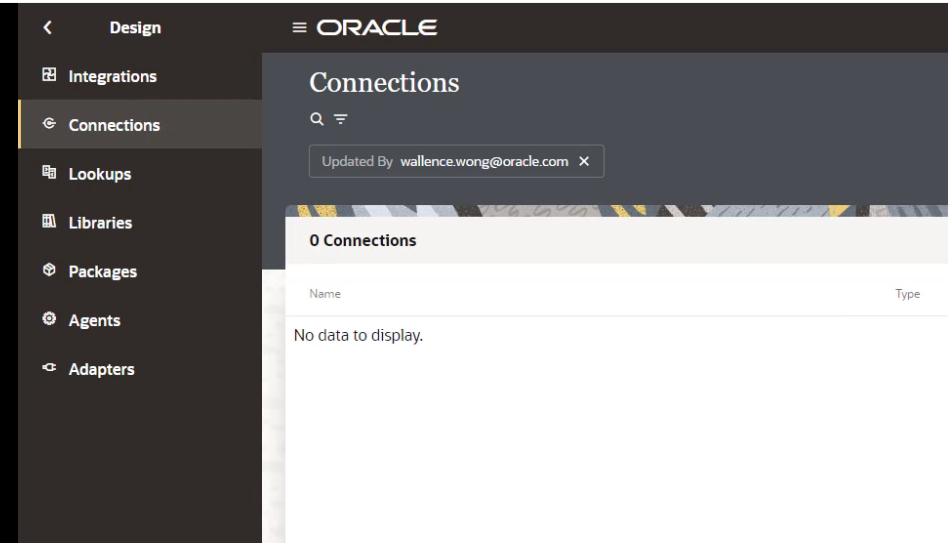
- Click Design, then Connections on the menu.
Create a REST Connection
Create a REST Trigger connection that will allow your integration to be initiated:
Click the Create button in the upper-right corner of the Connections page.
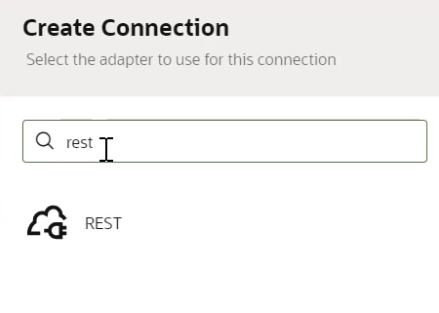
The Create Connection dialog appears so you can choose the prebuilt adapter that you want to be the basis for your new connection. Oracle has many prebuilt adapters that shield the user from all the details on how to interact with many backend services. Prebuilt adapters save time and allow less technical people to be successful building integrations.
In the Search field, enter REST and press Return. The REST adapter icon appears. Click the icon to select it.
The Create Connection dialog appears so you can provide details about how this connection will be used in your integration.
Fill in the fields:
- Name:
REST_TriggerRole: Select Trigger from the drop-down menu to indicate that this connection will trigger the first step in a series of steps in an integration.
Description:
REST connection to support triggering of an integration

Click the Create button.
For Security, choose OAuth 2.0 Or Basic Authentication.

Click the Test button in the upper-right corner and look for the “Connection REST_Trigger was tested successfully” message to indicate that you have created a valid connection.
Note the Configuration Progress indicates that your connection has been 100% defined.
Click the Save button in the upper right to save your new connection.
Click the < button in the upper left to return to the Connections page. Notice that your new connection appears in the Connections list that is marked as Configured status.
Create an ATP Connection
Let's create the second connection we'll need for our integration. That will be an ATP Invoke connection that will allow your integration to invoke a backend service, which is the ATP Database.
Click the Create button in the upper-right corner of the Connections page. The Create Connection dialog appears so you can choose the prebuilt adapter you want to be the basis for your new connection.
In the Search field, enter: ATP and press Return.
The Oracle ATP adapter appears. Click the icon to select it.
The Create Connection dialog appears. Fill in the fields:
- Name:
ATP_Invoke_Insert_Into_DBIn the Role field, select Invoke from the dropdown menu to indicate that this connection will not trigger the integration, but instead, it will be invoked by it.
Description:
Insert an order row into the order table in ATP
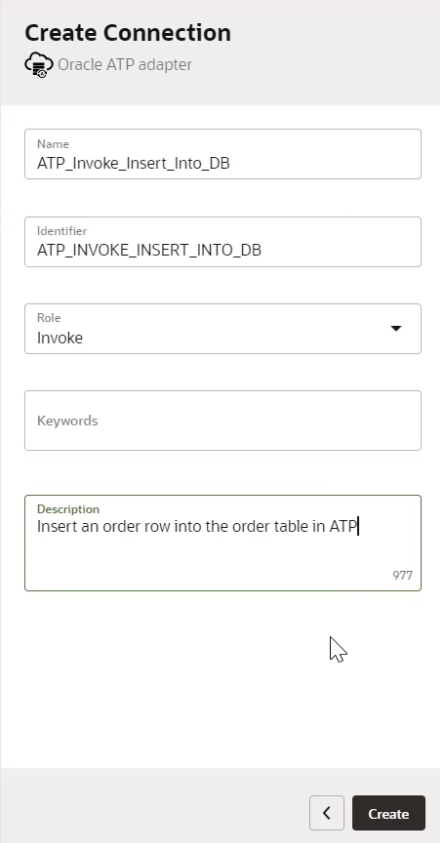
- Click the Create button.
Establish the Connection Properties for this new ATP invoke connection:
Under Properties, click the > to expand the optional properties menu.
In the Service Name field, enter:
dbappshared_high(This gives us the best performance when accessing the ATP database.)
Establish the Security settings: Perform the necessary configuration:
For the Wallet field, just to recall that you have downloaded the wallet zip file. We can supply the connection with the database sign in details (the wallet) you established in that section.
Click the Upload check box
 to begin uploading your wallet file.
Select the Choose File button when the Upload File dialog appears.
At the top of the dialog, it shows your name and a home button. Click the Downloads folder and select your Wallet zip file that you downloaded into Luna's File Manager earlier.
Select your Wallet zip file and click the Open button.
Click the Upload button on the Upload File dialog to upload your database access credentials into your new connection.
For the Wallet Password, enter
DBWelcome12345- For the Database Service Username, enter
atpc_user- For the Database Service Password, enter
DBWelcome12345
- Click the Test button in the upper right and watch for the “Connection ATP_Invoke_Insert_Into_DB was tested successfully” message to appear.
Click the Save button in the upper-right corner to save your new connection.
Click the < button in the upper-left corner to return to the Connections page.
Notice that your two new connections appear on the Connections page:

Task 4: Create a New Integration
Walkthrough demo video
With our two connections in place, we can now create our integration.
- Click the Integrations option at the left-side menu:

The Integrations page appears. Click the Create button in the upper-right corner.
The Create integration dialog appears showing the various common patterns used to create a new integration. These patterns speed integration development and do a lot of pre-configuration for you.
Read the descriptions for the three patterns so you can appreciate how OIC supports each of them.
Select the Application option, then click the Create button. Our integration will be triggered by an event from an application you will develop in the Lab - Oracle Integration (Process Automation).
The Create integration dialog appears. Fill in the fields:
- In the Name field, enter:
Create New Order- Scroll down to the bottom. In the Description field, enter:
Accept a REST POST call and create a new order in the ATP database

- Click the Create button to display the Integration Editor.
- Notice the beginnings of the new integration in the integration editor canvas. This is where you will visually define your integration using easy-to-use drag and drop features:

- Click the Save button in the upper-right corner.
Task 5: Define the Integration
Let's start adding elements to the integration editor canvas to define your integration.
Add a Trigger
From the Trigger list, select the one you created, i.e., REST_Trigger.
The Configure REST Endpoint dialog appears on the right. An endpoint indicates how you access the resource and what you want to do with it. Fill in:
- What do you want to call your endpoint? Enter:
Accept_Order_Data_Endpoint- What does this endpoint do? Enter:
Accept a REST POST of new order dataClick Continue in the lower-right corner to move to the next step - Resource Configuration.
What is the endpoint’s relative resource URI? Enter:
/orderWhat action do you want to perform on the endpoint? Select POST from the drop-down menu. POST is a standard method to use to send XML data to a server in the request body of an HTTP request.
Select any options that you want to configure: Check on Configure a request payload for this endpoint.
Click Continue to move to the next step.
Find the Select the request payload format area so you can define the structure of payload data that will come into the integration with this trigger.
Make sure that XML Schema (the default) is selected from the dropdown menu.
At the Schema Location field, we need an xsd file to provide a data definition as we are configuring a REST endpoint for our integration. We will use the XSD format to define the data. “XSD” stands for XML Schema Definition. It is a standard way to describe the structure of an XML document. Our request payload for our endpoint will be formatted in XML.
Click the Drag and Drop button to display a file chooser dialog:
Navigate to Download directory and choose the RESTEndpointRequestPayload.xsd file you downloaded earlier to Luna's File Manager.
Notice in the Element field that the tooling has read the file and has selected Order. That’s the only element defined in your XSD. NOTE: If the tooling has trouble validating your xsd file, you may need to edit it and clean up some formatting. Sometimes, copying and pasting drags along some hidden characters at the end of lines.
In the field What is the media-type of Request Body?, select JSON. “JSON” stands for “JavaScript Object Notation.” It is a lightweight data interchange format that is easy for humans to read and write. Later, in Lab 2, you’ll see that this request payload will be supplied by a web form and web forms deal in JSON data structures.
Click Continue to display the Summary dialog so you can review your settings for this request endpoint.
Click the left arrow on the Endpoint Summary field to see that you have defined an endpoint that will accept a JSON payload via a POST to a REST service URI called /order:
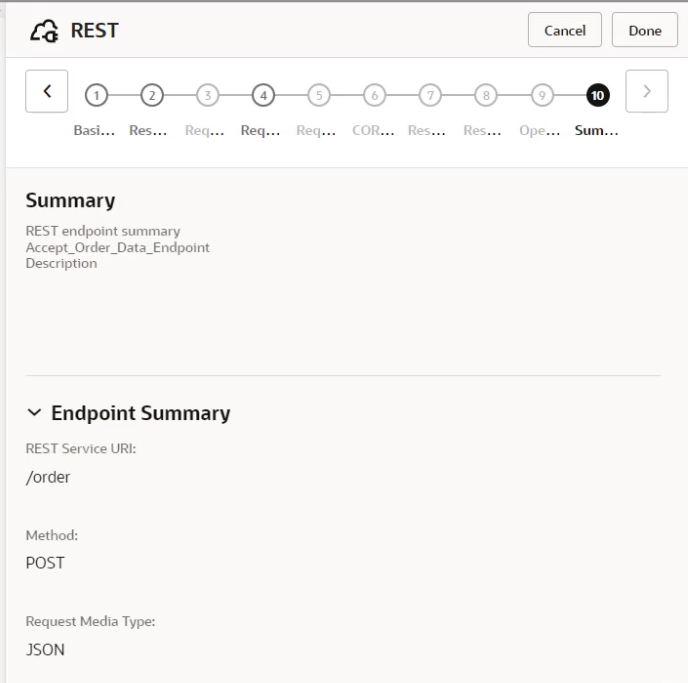
- Click Finish to close the Configure REST Endpoint dialog.
- The integration editor canvas now shows your REST trigger at the top of the diagram:

- Click Save in the upper-right corner.
Add an Invoke
- Find the Invokes icon
 at the extreme right side of the window and click it so we can add your ATP_Invoke_Insert_Into_DB connection to the integration editor canvas. The available invoke connections appear:

Drag your ATP_Invoke_Insert_Into_DB connection and drop it onto the plus icon that appears on the diagram right below your REST trigger element as you drag.
The Oracle Adapter Endpoint Configuration Wizard dialog appears. Fill in the fields:
- What do you want to call your endpoint? Enter:
Insert_Order_Endpoint- What does this endpoint do? Enter:
Insert a new order into the ATP databaseWhat operation do you want to perform? Select: Perform an Operation On a Table from the drop-down menu.
What operation do you want to perform on Table? Make sure that the Insert option is selected.
Click the Continue button in the upper-right corner to the next step.
The wizard moves to the Configure Operation On Table step. Make these selections in the fields:
Schema: Select: ATPC_USER from the drop-down menu.
Table Type: Make sure that TABLE is selected
For Table Name, click the Search button.
Move the ORDERS table to the Selected column in the table that appears, by selecting it and clicking the “>” symbol.
Click the Import Tables button at the bottom to display the Select the parent database table step. Make sure that ORDERS is selected and click Continue.
You are asked to select items to be shown on the table. Check all five boxes under ORDERS, then hit Continue.
The wizard displays the Summary step page. See that you have configured your ATP connection to perform an Insert database operation on the ORDERS table:

- Click Finish to close the Oracle Adapter Endpoint Configuration Wizard dialog.
- The integration canvas now shows your ATP invoke at the bottom of the diagram. Notice that a Map to Insert_Order element has been automatically inserted ahead of it so you can map incoming data from your REST trigger to your ATP invoke:

- Click Save in the upper-right corner.
Task 6: Map Data
Let’s use the data mapper to indicate how incoming order data from the REST POST request is to be passed to the outbound invocation of the ATP database:
- Hover your mouse cursor on the Map element in the canvas. You will see ... at the bottom-right corner. Click it to display the menu.

Select Edit to display the data mapper.
Expand the Order fields to display the five fields each at the left and right columns.

Map each of the five fields from the source at the left (the inbound REST call) to the corresponding files in the target at the right (the outbound ATP invocation):
Click a source field (such as orderID) at the left and drag it to the corresponding target field (such as orderID) at the right to highlight those you want to map.
A green line appears temporarily, but you are looking for both fields to show a green check mark icon to indicate that the mapping is in place.
NOTE: If you make a mistake during mapping, delete a mapping:
Right-click the field name on the target side.
Select the Delete Mapping option in the pop-up menu.
Notice that the mapping is gone from the data mapper.
Perform the desired mapping.
Continue mapping until all five fields are mapped:

Click the Validate button in the upper-right corner of the mapper and look for the “Map to Insert_Order_Endpoint successfully validated.” message.
Click the < button in the upper-left corner to close the data mapper. The modeling canvas window redisplays.
Click Save in the upper-right corner of the editing canvas window.
Task 7: Configure Integration Tracking
Notice the red 1 icon at the top right of the canvas indicating that we aren’t done yet. Let’s explore the error:
Click the red 1 icon to display the Errors panel.
Read the error message to learn the details:

You learn that we haven’t supplied the fields we want to display in the tracking facility. OIC Tracking can help us troubleshoot our integration when something goes wrong at runtime, so the tooling makes tracking a mandatory requirement. Now, we need to specify what data fields we want to use to track the execution of an integration. We can specify up to three pieces of data to include in the tracking logs. The orderID field seems like important information to add to the tracking information, so we’ll add it.
- Click the (I) (highlighted below) on the top bar on the right to display the Business Identifiers dialog:

- Under Sources on the left, click Order to expand the field list. Find OrderID field and drag and drop it to the Business Identifier Field on the right column of the table.

Click Save to record your selection.
The red 1 error icon disappears. Our Create New Order integration is now complete:
Click < in the upper-left corner to exit the integration editor canvas window. The Integrations page redisplays and shows your new Create New Order integration at the top.
Task 8: Activate an Integration
Our last step in this lab is to activate our integration.
- At the right of your integration, there are a couple of icons. Click the one that shows Activate when it is hovered (it looks like an on/off button). The Activate Integration dialog appears.

Select a tracing option in the Activate Integration dialog that appears:
- Production

- Click the Activate button in the lower-right corner.
When the Activate Integration dialog closes, verify that the integration has been activated:
Refresh your browser window.
See that the Active status is shown meaning that your integration has been activated and is ready for use. Keep refreshing if the message doesn’t appear.

Congratulations! You have completed this OIC Integration lab. It is also highly recommended that you attempt another Oracle Integration lab, namely Oracle Integration 3 (Process Automation) where you’ll use the Business Process component of Oracle Integration to build a process automation application Mama Maggy’s store managers use to enter order requests and regional managers to approve/reject them. If the requests are approved, orders will be created in the ATP database using the integration that you have just built. At the end, you will be able to see how your integration will work with the process application to solve Mama Maggy's challenges.
Contact Us
Having an issue with the lab? Have an idea on how it could be made better? Want to tell us how awesome the lab is? Click the icon below to contact the team and let us know your feedback.
![]()