Create a web server on a compute instance
Introduction
Oracle Cloud Infrastructure Compute lets you provision and manage compute hosts, known as instances. You can launch instances as needed to meet your compute and application requirements. After you launch an instance, you can access it securely from your computer, restart it, attach and detach volumes, and terminate it when you're done with it. Any changes made to the instance's local drives are lost when you terminate it. Any saved changes to volumes attached to the instance are retained.
Prerequisites
Be sure to review Best Practices for Your Compute Instance for important information about working with your Oracle Cloud Infrastructure Compute instance.
This tutorial assumes you know how to generate SSH keys on Oracle Cloud Infrastructure. Keep your SSH keys handy.
Create a web server on a compute instance
Oracle Cloud Infrastructure offers both Bare Metal and Virtual Machine instances:
- Bare Metal - A bare metal compute instance gives you dedicated physical server access for highest performance and strong isolation.
- Virtual Machine - A Virtual Machine (VM) is an independent computing environment that runs on top of physical bare metal hardware. The virtualization makes it possible to run multiple VMs that are isolated from each other. VMs are ideal for running applications that do not require the performance and resources (CPU, memory, network bandwidth, storage) of an entire physical machine.
An Oracle Cloud Infrastructure VM compute instance runs on the same hardware as a Bare Metal instance, leveraging the same cloud-optimized hardware, firmware, software stack, and networking infrastructure.
Navigate to the Compute tab and click Create Instance. We will launch a VM instance for this lab.
The Create Compute Instance wizard will launch. Set the name of the server to Web-Server. Click on the Show Shape, Networking, Storage Options link to expand that area of the page.
Most of the defaults are perfect for our purposes. However, you will need to scroll down to the Configure Networking area of the page and select the Assign a public IP address option.
Note: You need a public IP address so that you can SSH into the running instance later in this lab.
Scroll down to the SSH area of the page. Choose your SSH key that you created earlier. Press the Create button to create your instance.
Launching an instance is simple and intuitive with few options to select. The provisioning of the compute instance will complete in less than a minute and the instance state will change from provisioning to running.
Once the instance state changes to Running, you can SSH to the Public IP address of the instance.
Connect to the instance and install Apache HTTP server
To connect to the instance, you can use
Terminalif you are using MAC orGitbashif you are using Windows. On your terminal or gitbash enter the following command:Note: For Oracle Linux VMs, the default username is opc
ssh opc@<public_ip_address>If you have a different path for your SSH key enter the following:
ssh -i <path_to_private_ssh_key> opc@<public_ip_address>For this lab, we are going to install an Apache HTTP Webserver and try to connect to it over the public Internet. SSH into the Linux instance and run following commands:
Note: Apache HTTP Server is an open-source web server developed by the Apache Software Foundation. The Apache server hosts web content, and responds to requests for this content from web browsers such as Chrome or Firefox.
Install Apache http
sudo yum install httpd -yStart the apache server and configure it to start after system reboots
sudo apachectl start
sudo systemctl enable httpd
Run a quick check on apache configurations
sudo apachectl configtestCreate firewall rules to allow access to the ports on which the HTTP server listens.
sudo firewall-cmd --permanent --zone=public --add-service=http
sudo firewall-cmd --reload
Create an index file for your webserver
sudo bash -c 'echo This is my Web-Server running on Oracle Cloud Infrastructure >> /var/www/html/index.html'
Open your browser and navigate to
http://Public-IPAddress(the IP address of the Linux VM).Note: Your browser will not return anything because port 80 was not opened into the Security Lists.
Using the menu, click on Virtual Cloud Network and then the VCN you created for this practice.
Now click on Security Lists on the left navigation bar for the VCN.
Click on the Default Security List.
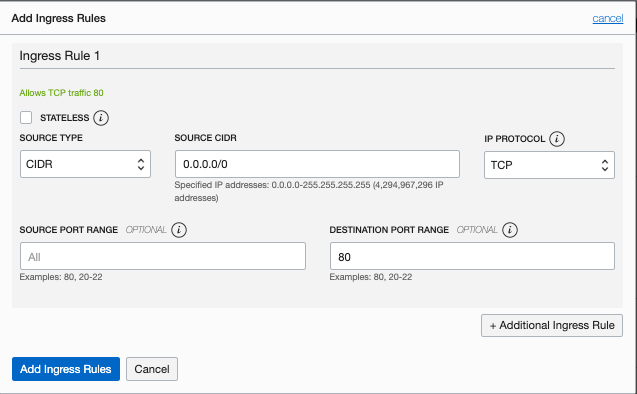
Here you need to open port 80. Click on + Another Ingress Rule and add the following values as shown below:
- Source Type: CIDR
- Source CIDR: 0.0.0.0/0
- IP Protocol: TCP
- Source Port Range: All
- Destination Port Range: 80
- Click on Add Ingress Rules at the bottom.
Navigate to
http://<public_ip_address>(the IP address of the Linux VM) in your browser. And now you should see the index page of the webserver we created above.
Troubleshooting
If you are unable to see the webserver on your browser, possible scenarios include:
VCN Security Lists is blocking traffic, Check VCN Security List for ingress rule for port 80
Firewall on the linux instance is blocking traffic
This will show http service as part of the public zone
# sudo firewall-cmd --zone=public --list-servicesAn httpd service should be listening on the port 80, if it’s a different port, open up that port on your VCN SL
# sudo netstat -tulnp | grep httpd
Your company VPN is blocking traffic
Acknowledgements
Authors - Flavio Pereira, Larry Beausoleil
Contributors - Oracle LiveLabs QA Team (Kamryn Vinson, QA Intern, Arabella Yao, Product Manager Intern, DB Product Management)